Ga door naar hoofdinhoud

Motorola Razr 2019 Main Screen Replacement

Wat je nodig hebt

  1. Motorola Razr 2019 Main Screen Replacement, Turn off phone: stap 1, afbeelding 1 van 1
    • If possible, remove any saved fingerprints as the fingerprint sensor may not work after completion.

    • As a precaution, backup any important information on the phone before starting.

    • Hold the lock button to bring up the power options and press shut down.

    • If the main display is no longer usable, use the outer display to select shut down.

  2. Motorola Razr 2019 Main Screen Replacement, Pry up top of Back Cover: stap 2, afbeelding 1 van 3 Motorola Razr 2019 Main Screen Replacement, Pry up top of Back Cover: stap 2, afbeelding 2 van 3 Motorola Razr 2019 Main Screen Replacement, Pry up top of Back Cover: stap 2, afbeelding 3 van 3
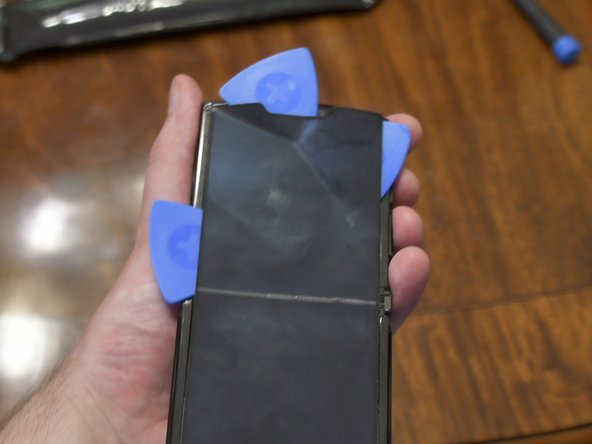
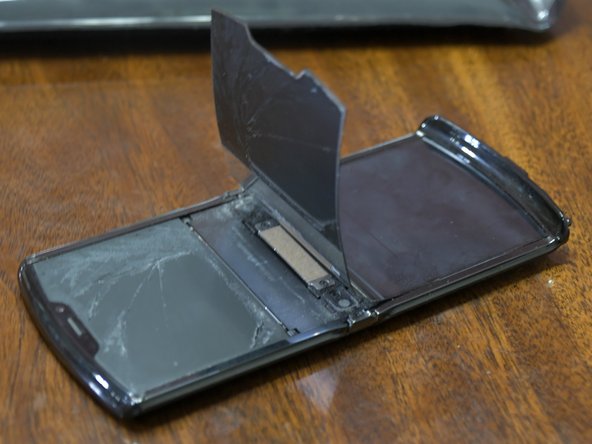
    • Use the iOpener to warm up the top portion of the Back Cover.

    • There is adhesive at the bottom of the cover as well, but focus on the top for this step.

    • Insert picks between the cover and frame halfway down the phone and slide towards the hinge.

    • Carefully pry up the cover only enough to detach from the adhesive.

    • Do not pry more than about the thickness of the phone as it may damage the cover.

    • Leave picks between the cover and the frame to keep them from sticking back together.

  3. Motorola Razr 2019 Main Screen Replacement, Remove Back Cover: stap 3, afbeelding 1 van 3 Motorola Razr 2019 Main Screen Replacement, Remove Back Cover: stap 3, afbeelding 2 van 3 Motorola Razr 2019 Main Screen Replacement, Remove Back Cover: stap 3, afbeelding 3 van 3
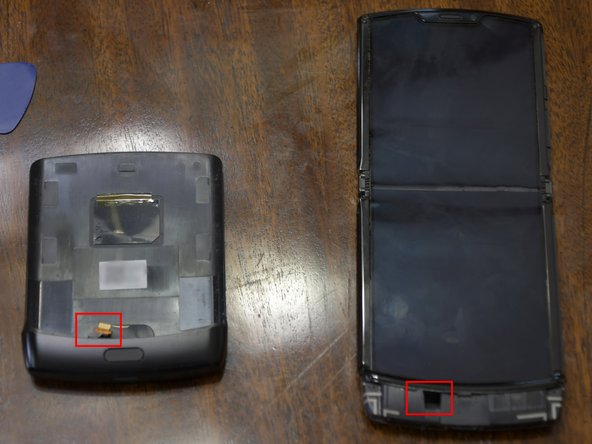
    • Use the iOpener to warm up the backside of the Back Cover chin.

    • There are several adhesive pads on the lower back and bottom of the phone

    • Slide the back cover away from the hinge, careful to not go too far.

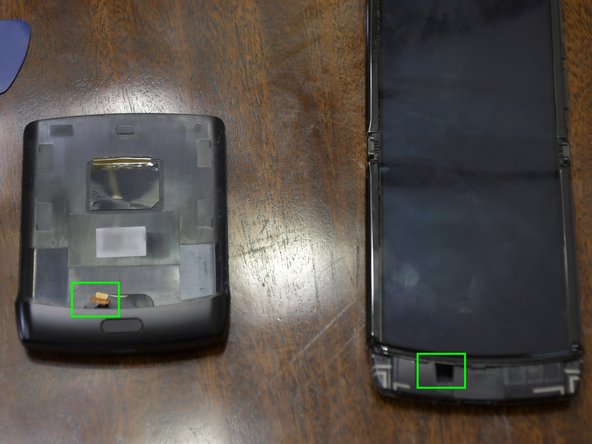
    • There is a cable from the fingerprint reader to the phone that needs to be disconnected.

    • If the cable is ripped from the motherboard and damages the connector, the phone will still be usable, just without the fingerprint sensor.

    • Running the picks all the way around the cover can help loosen it.

    • Sliding the cover side to side can help loosen it.

    • Disconnect the fingerprint reader cable and fully remove the cover.

  4. Motorola Razr 2019 Main Screen Replacement, Remove Chin Speaker Assembly: stap 4, afbeelding 1 van 3 Motorola Razr 2019 Main Screen Replacement, Remove Chin Speaker Assembly: stap 4, afbeelding 2 van 3 Motorola Razr 2019 Main Screen Replacement, Remove Chin Speaker Assembly: stap 4, afbeelding 3 van 3
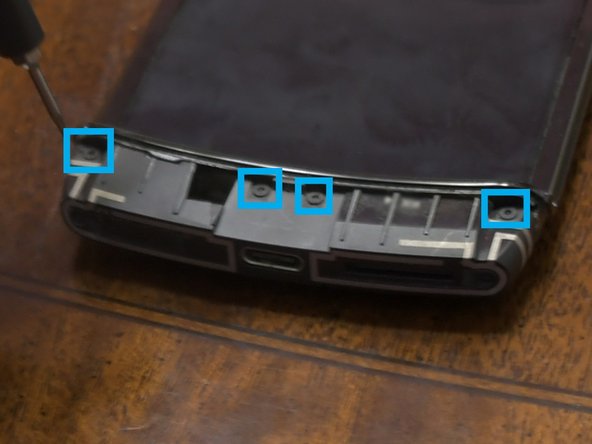
    • Unscrew 4 T3 screw from the top of the Chin Speaker assembly.

    • Do not immediately remove the assembly as there is a speaker wire attached.

    • Flip the phone over, slide the assembly down slightly, and disconnect the speaker wire.

    • Remove the Chin Speaker Assembly.

  5. Motorola Razr 2019 Main Screen Replacement, Remove Battery: stap 5, afbeelding 1 van 3 Motorola Razr 2019 Main Screen Replacement, Remove Battery: stap 5, afbeelding 2 van 3 Motorola Razr 2019 Main Screen Replacement, Remove Battery: stap 5, afbeelding 3 van 3
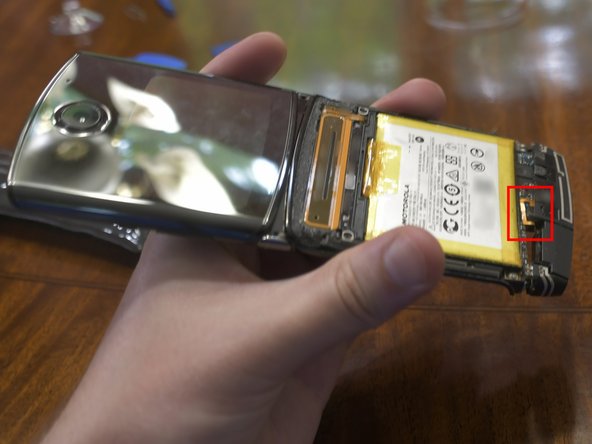
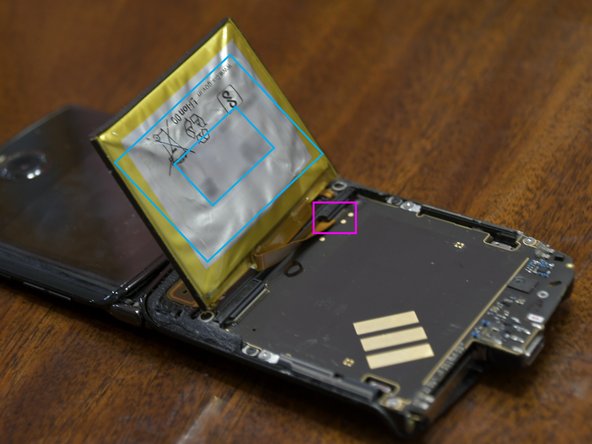
    • Carefully pry up the battery.

    • Use caution to not damage the surface mount components on the PCB near the battery.

    • The black thin tabs holding the batter are part of the battery assembly. Pry underneath them.

    • The adhesive is roughly a circle around the mid portion of the battery.

    • I used an iOpener to warm up the adhesive, but heating up batteries is not advised.

    • Pry off the small black bar at the top of the battery.

    • Disconnect the battery and remove.

  6. Motorola Razr 2019 Main Screen Replacement, Remove Motherboard: stap 6, afbeelding 1 van 3 Motorola Razr 2019 Main Screen Replacement, Remove Motherboard: stap 6, afbeelding 2 van 3 Motorola Razr 2019 Main Screen Replacement, Remove Motherboard: stap 6, afbeelding 3 van 3
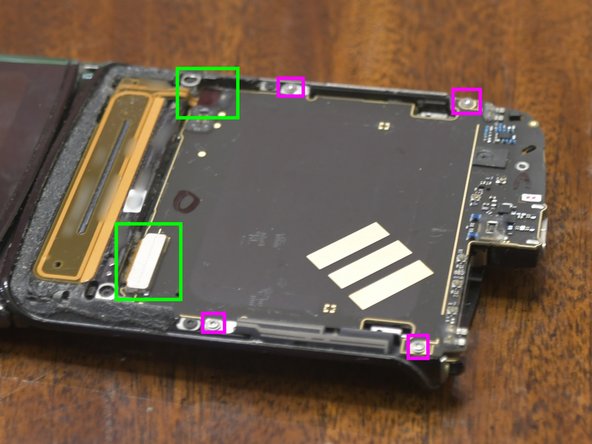
    • With the inside of the phone facing up, unscrew and disconnect the haptic motor.

    • Disconnect the 1 remaining connector under where the haptic motor was.

    • Flip the phone over and pry up the 2 visible connectors.

    • Remove 4 T3 screws.

    • Carefully lift the Motherboard up towards the hinge and disconnect the 3 connectors on the bottom.

    • Folding the motherboard all the way back may damage components.

  7. Motorola Razr 2019 Main Screen Replacement, Remove Chin Bar: stap 7, afbeelding 1 van 2 Motorola Razr 2019 Main Screen Replacement, Remove Chin Bar: stap 7, afbeelding 2 van 2
    • Remove 2 gold T3 screws and 1 black T3 screw from the chin bar.

    • Carefully pry off the Chin Bar.

    • Use caution to not damage the small PCB under the bar.

    • There are adhesive pads all along the bar.

    • I carefully used a heat gun to soften the adhesive.

    • There are magnets in the phone that the Chin Bar is attracted to.

  8. Motorola Razr 2019 Main Screen Replacement, Detach Main Screen from top half: stap 8, afbeelding 1 van 3 Motorola Razr 2019 Main Screen Replacement, Detach Main Screen from top half: stap 8, afbeelding 2 van 3 Motorola Razr 2019 Main Screen Replacement, Detach Main Screen from top half: stap 8, afbeelding 3 van 3
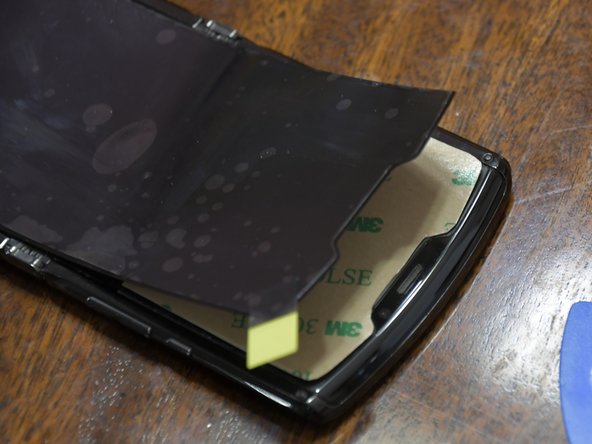
    • Use the iOpener to warm up the top half of the Main Screen.

    • Carefully pry the Main Screen off the phone body.

    • I slid a pick from the hinge up one side and around the top, them peeled the screen off.

  9. Motorola Razr 2019 Main Screen Replacement, Remove Main Screen: stap 9, afbeelding 1 van 3 Motorola Razr 2019 Main Screen Replacement, Remove Main Screen: stap 9, afbeelding 2 van 3 Motorola Razr 2019 Main Screen Replacement, Remove Main Screen: stap 9, afbeelding 3 van 3
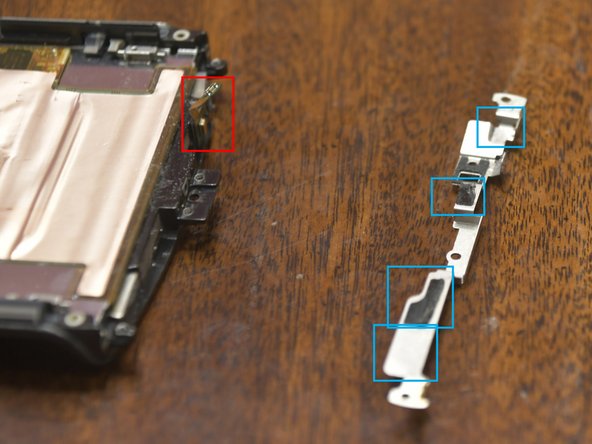
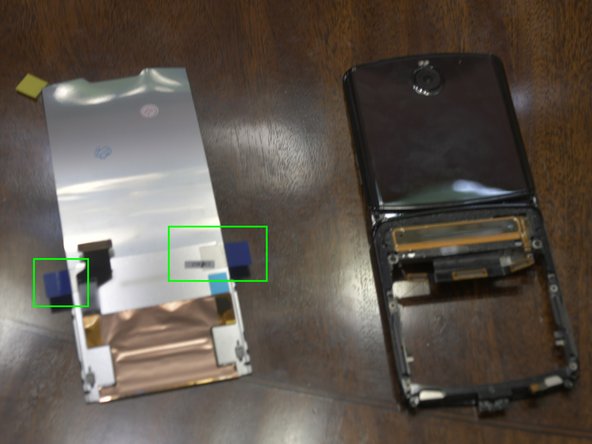
    • Slide the Main Screen out the bottom of the phone.

    • There are components on the back of the screen that will be caught on the frame. Pry them up slightly to go over the catches.

    • There is a small cable at the bottom of the screen that it may get caught on, but it can be pressed out of the way.

    • This completes the disassembly process.

  10. Motorola Razr 2019 Main Screen Replacement, Clean phone top half: stap 10, afbeelding 1 van 1
    • Clean any residual adhesive from the top half of the phone.

    • Rubbing alcohol can be used to aid with this.

    • I carefully used acetone.

    • Clean and inspect the rest of the phone as necessary.

  11. Motorola Razr 2019 Main Screen Replacement, Install new Main Screen: stap 11, afbeelding 1 van 3 Motorola Razr 2019 Main Screen Replacement, Install new Main Screen: stap 11, afbeelding 2 van 3 Motorola Razr 2019 Main Screen Replacement, Install new Main Screen: stap 11, afbeelding 3 van 3
    • As of this writing, main screens for the Razr 2019 are available on Amazon and other online retailers. They typically do not include the necessary adhesive pad.

    • Remove the two tabs from the bottom sides of the Main Screen.

    • Slide the screen most of the way into the frame.

    • Once the screen components are past the catches, remove the protective film from the adhesive pads.

    • Finish sliding the screen up and press down the components.

    • Temporarily tape the screen in place.

    • The Main Screen is spring loaded, so make sure it is positioned all the way up into the notch.

  12. Motorola Razr 2019 Main Screen Replacement, Install Chin Bar: stap 12, afbeelding 1 van 1
    • Install the Chin Bar and attach with 2 gold T3 screws and 1 black T3 screw.

    • Check that the adhesive pads are not too badly damaged. Replace as needed.

    • Magnets in the phone will interact with the chin bar.

  13. Motorola Razr 2019 Main Screen Replacement, Install Motherboard: stap 13, afbeelding 1 van 3 Motorola Razr 2019 Main Screen Replacement, Install Motherboard: stap 13, afbeelding 2 van 3 Motorola Razr 2019 Main Screen Replacement, Install Motherboard: stap 13, afbeelding 3 van 3
    • Connect 3 bottom connectors to the Motherboard.

    • Press the Motherboard down and towards the hinge until it hooks into the frame.

    • Install 4 T3 screws.

    • Connect the 2 top connectors.

    • Flip the phone over and connect 1 connector.

    • Connect the haptic motor and install with 1 T3 screw.

  14. Motorola Razr 2019 Main Screen Replacement, Install Battery: stap 14, afbeelding 1 van 2 Motorola Razr 2019 Main Screen Replacement, Install Battery: stap 14, afbeelding 2 van 2
    • Connect the Battery to the motherboard.

    • At this point, the phone can be powered on to verify the new screen is functional.

    • My phone appeared to be unable to make phone calls, but it was functional enough to verify the screen worked properly.

    • Install the black bar over the battery connector.

    • Press the Battery to the motherboard, making sure it is pressed snugly against the black bar.

    • As needed, use new adhesive.

  15. Motorola Razr 2019 Main Screen Replacement, Install Chin Speaker Assembly: stap 15, afbeelding 1 van 2 Motorola Razr 2019 Main Screen Replacement, Install Chin Speaker Assembly: stap 15, afbeelding 2 van 2
    • Connect the speaker cable to the motherboard.

    • Slide the Chin Speaker Assembly fully onto the phone.

    • Flip the phone over and screw in 4 T3 screws.

    • Powering on the phone at this point did allow phone calls to be made.

  16. Motorola Razr 2019 Main Screen Replacement, Attache Main Screen to phone: stap 16, afbeelding 1 van 2 Motorola Razr 2019 Main Screen Replacement, Attache Main Screen to phone: stap 16, afbeelding 2 van 2
    • Cut adhesive to shape.

    • Use the thinnest adhesive available.

    • The whole top portion of the phone under the screen needs to be covered by the adhesive.

    • The old screen can be used as a guide to trace a pattern onto the adhesive.

    • Attach the adhesive to the phone.

    • Make sure to remove any stickers on the back of the screen as they will be noticeable through the screen if left attached.

    • Press the screen onto the adhesive.

    • Make sure the screen is up all the way into the notch.

  17. Motorola Razr 2019 Main Screen Replacement, Reattach Back Cover: stap 17, afbeelding 1 van 2 Motorola Razr 2019 Main Screen Replacement, Reattach Back Cover: stap 17, afbeelding 2 van 2
    • Fix/reattach the adhesive around the speaker opening.

    • Add new adhesive as needed to the phone.

    • Plug in the cable from the fingerprint sensor.

    • I was unsuccessful at this and accidentally broke the connector. The phone works fine, except it no longer has the fingerprint sensor as a security option.

    • Press the Back Cover up and then press the back together.

    • A phone case may help hold the Back Cover in place if the adhesive is problematic.

  18. Motorola Razr 2019 Main Screen Replacement, Remove Screen Protector: stap 18, afbeelding 1 van 1
    • Remove the screen protector with the tab.

    • Verify the phone folds correctly.

Conclusie

This should bring the phone back up to a usable state to extent its life.

Note: Keep an eye on the screen to make sure it does not shift or become detached. Also keep an eye on the back cover to make sure it does not slide down or detach.

David

Lid sinds: 12/04/18

277 Reputatie

1 Handleiding geschreven

0 opmerkingen

Voeg opmerking toe

Weergavestatistieken:

Afgelopen 24 uren: 4

Afgelopen 7 dagen: 25

Afgelopen 30 dagen: 96

Altijd: 1,051