Deze vertaling geeft mogelijk niet de meest recente updates van de bronhandleiding weer. Help ons met het updaten van de vertaling of bekijk de bronhandleiding.
Inleiding
Als de batterij van je telefoon geen lading meer vast kan houden, is het tijd deze te vervangen. Gebruik deze handleiding om je batterij te vervangen. Neem, als je batterij gezwollen is, de juiste voorzorgsmaatregelen.
Let op: Er is een aanzienlijk risico op het kapotmaken van je scherm vanwege de sterke lijm die het scherm vasthoudt, de minimale ruimte voor tools en de hoeveelheid warmte die is vereist. Als je je scherm toch vervangt, hoef je je geen zorgen te maken—voor alle andere reparaties moet je echter zeer voorzichtig te werk gaan en rekening houden met de noodzaak om ook je scherm te moeten vervangen als deze stuk gaat.
Wat je nodig hebt
-
-
Ontlaad de batterij van je telefoon, indien mogelijk, voordat je begint met het demonteren van je toestel. Als je batterij geladen is, is het risico op een ongeluk groter.
-
Als je scherm gebarsten is, kun je dit beplakken met doorzichtige tape. Zo houd je de glasscherven bij elkaar en voorkom je fysieke schade.
-
-
-
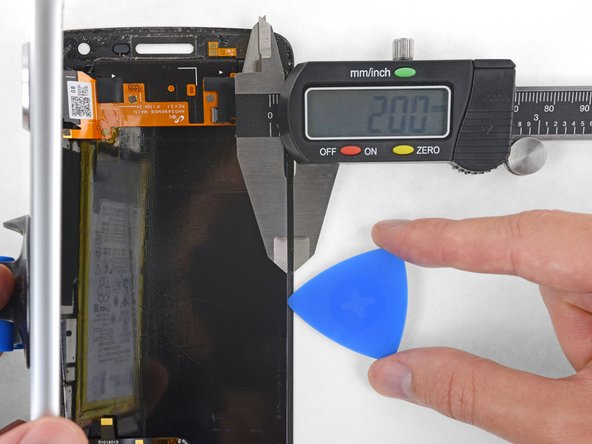
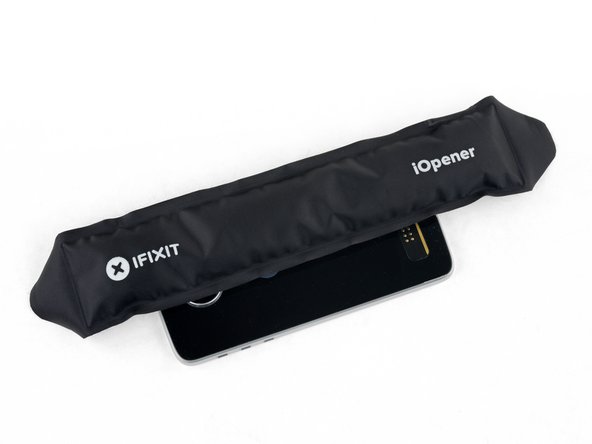
Verwarm een iOpener en leg deze gedurende twee minuten of totdat het te heet is om aan te reaken op de linkerkant van het scherm. Op deze manier verzwak je de lijm die het scherm bevestigt.
-
-
-
Om een beter beeld te krijgen van hoe dit in z'n werk gaat, kun je de eerste foto bekijken, waarop je de achterkant van de schermmodule (rechts) kunt zien nadat deze van de telefoon (links) verwijderd is.
-
Als je van plan bent je schermmodule opnieuw te gebruiken, zul je extra moeten letten op de zijkanten. Zorg dat je, bij het doorsnijden van de lijm, je plectrum niet verder dan ong. 2 mm in het toestel steekt. Doe je dit niet dan riskeer je je schermpaneel te beschadigen, waardoor je deze niet meer kunt hergebruiken.
-
Speelkaarten kunnen daarom ook worden gebruikt als wriktool, wat veiliger maar ook langzamer is. De speelkaarten zijn minder schadelijk voor het glazen scherm, wat handig uitkomt als je je scherm wilt hergebruiken.
-
-
-
Druk een zuignap, in het midden van de linkerzijde, op het scherm.
-
Trek de zuignap omhoog met een stevige, constante kracht om zo een kleine opening te creëren tussen het voorste paneel en de achterste behuizing.
-
Dit kan aardig wat kracht vereisen. Maar onthoud dat je enkel een zeer kleine opening, waar slechts je wriktool in past, hoeft te creëren.
-
Als je moeite hebt met het creëren van de opening, verwarm je je telefoon nog eens om de lijm verder te verzwakken. Vervolgens doe je nog een poging. De lijm koelt snel af, dus het kan nodig zijn dat je deze stap meerdere keren herhaalt.
-
-
-
Snijd de lijm onder de onderste rand door, maar wees hierbij voorzichtig en zorg dat je de vingerafdruksensor niet beschadigt.
-
Schuif of rol je tool langs de onderkant van de vingerafdruksensor en ga verder aan de andere kant van de sensor. Wrik niet direct in de buurt van of onder de sensor zelf.
-
-
-
Steek je tool in de rechter bovenhoek van de telefoon en schuif deze onder de bovenste rand langs de bovenkant om de lijm aldaar los te maken.
-
Als je tool de linkerzijde van de oorstukspeaker bereikt, stop je.
-
Schuif of rol je tool over de bovenkant van de flitsmodule van de selfie-camera om te voorkomen dat je deze beschadigt.
-
-
-
-
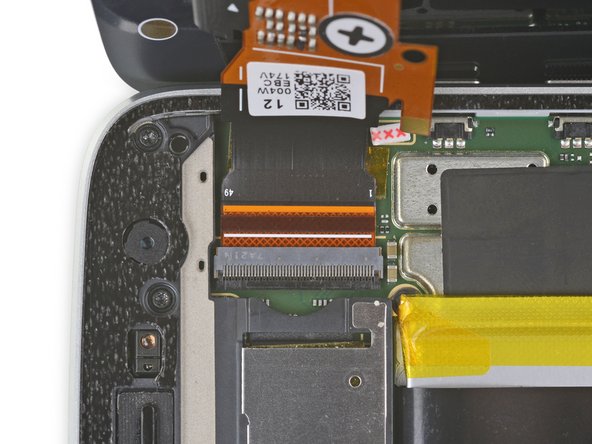
Gebruik de punt van je spudger om, terwijl je het scherm open houdt, de sluitklem op de ZIF-aansluiting van de vingerafdruksensorkabel open te klappen.
-
-
-
Gebruik je spudger om, aan de overkant van de telefoon, de sluitklem op de schermkabelaansluiting open te klappen.
The locking tab on the is dark colored and runs almost the entire width of the ZIF connector. It is located on the opposite side from where the cable connects into. Pry upward from the bottom- it works like a hinge.
-
-
-
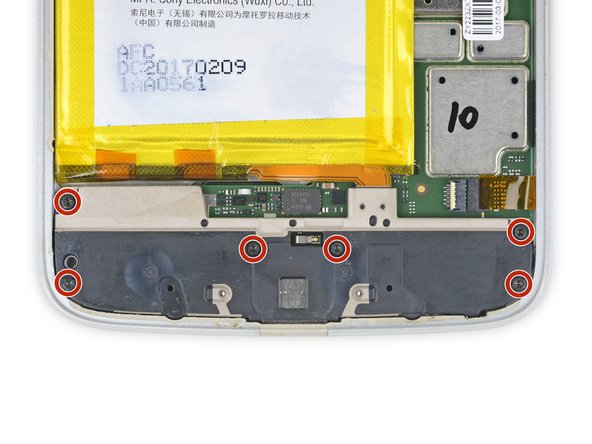
Gebruik een T3 Torx-schroevendraaier om de zes 3.2 mm lange schroeven, die de onderste cover bevestigen, te verwijderen.
The repair kit that was bought for this phone came with the wrong size torx bit. Mine came with a T5 Torx which was bigger and I almost ruined the screw. I noticed it was not working and looked at the bit and in fact it was not the T3. Luckily I have the full kit and had a T3 Torx handy. Make sure to look at the Bits before using them. The screws are so fragile that they can get stripped easily.
The kit comes with both a T3 and a T5—the T5 isn’t needed if all you’re doing is replacing the battery.
-
-
-
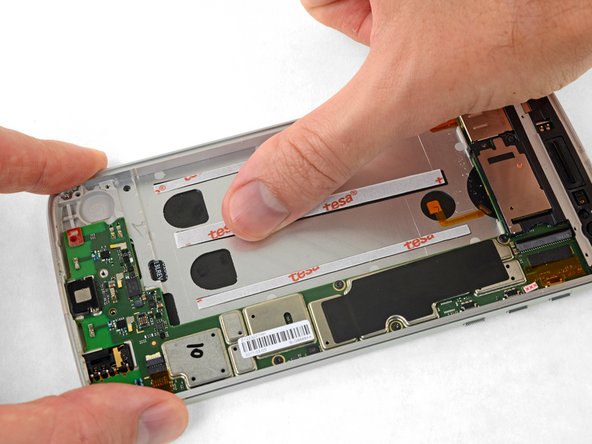
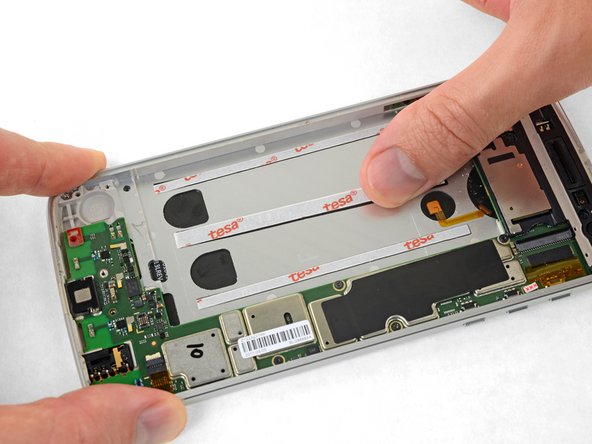
Trek de zwarte treklip aan de bovenkant van de batterij los en trek deze langzaam onder de batterij weg in een hoek van ongeveer 45 graden. Zo maak je de uitrekbare kleefstrips onder de batterij los.
-
Dien wat isopropyl alcohol (>90%) toe onder iedere hoek van de batterij en laat dit intrekken. Ga vervolgens verder.
-
Als alternatief kun je je iOpener verwarmen en deze gedurende twee minuten op de achterkant, direct achter de batterij, leggen om de lijm eronder te verzwakken. Herhaal deze stap zo vaak als nodig is om de batterij van de lijm los te krijgen.
-
-
-
Steek meerdere openingsplectrums of een plastic kaart onder de buitenkant van de batterij.
-
Zet een stevige, gelijke druk op je tool om de batterij langzaam maar zeker uit de telefoon los te duwen.
I did sever the orange flex cable as i was lifting the battery free. Is there anyway to repair this fragile cable?
-
-
-
Trek, voordat je je nieuwe batterij installeert, alle oude lijm uit de telefoon.
-
Maak de voorheen gelijmde gebieden vervolgens schoon met wat isopropyl alcohol en een stuk stofvrij doek of een koffiefilter. Dit maakt het oppervlak klaar voor het bevestigen van de nieuwe kleefstrips, waardoor de batterij steviger vast zal komen te zitten.
-
-
-
Plaats uitrekbare kleefstrips met treklip of een aantal strips dubbelzijdige tape, uit een kaart met vooraf op maat gesneden kleefstrips of van een rol Tesa 61395, in de inkeping van de batterij en druk je batterij vervolgens stevig op z'n plek.
-
-
-
Trek alle oude lijm van het scherm en uit de body van je telefoon.
-
Gebruik de punt van je spudger om alle kleinere lijmrestjes te verwijderen.
-
Maak de voorheen gelijmde gebieden schoon met wat isopropyl alcohol om het oppervlak klaar te maken voor de nieuwe kleefstrips. De strips hechten beter aan een schoon oppervlak.
-
-
-
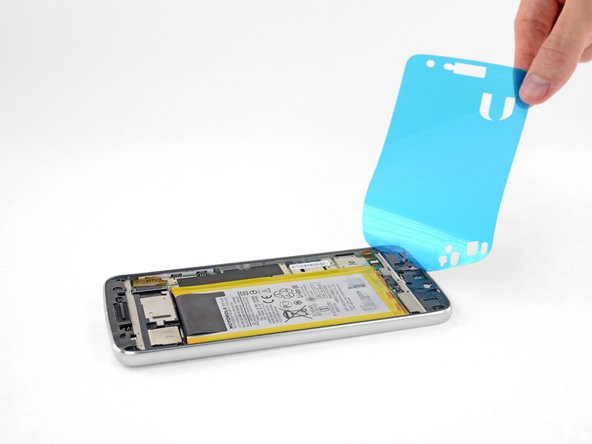
Als je kleefstrip een papieren laag bevat, kun je deze nu verwijderen.
-
-
-
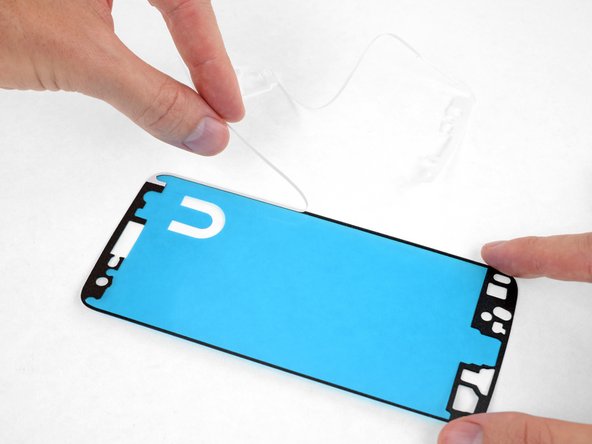
Trek de plastic folie van de kleefstrip af en zorg dat de kleefstrip voor het scherm bloot komt te liggen.
Should the removal of the blue plastic backing wait until after verifying the screen works in the next step?
Well, you can’t connect the screen with the plastic in the way. But in principle, you’re right—it wouldn’t be a bad idea to pause before installing the display adhesive, plug everything in, and verify that it works. Unfortunately, you then have to unplug it again to install the adhesive, so you’ll want to test it again once it’s plugged back in, but before sealing up your phone—just to make sure the cables are seated properly. So, the verification step is probably best left where it’s at.
Well, I connected the screen to the motherboard without peeling off the plastic.
It is possible!
And after testing the phone I took off the plastic foil from the adhesive without unpluging the two connectors. The plasic foil herefor has two cuts in the area of the connectors .
So I think it’s a good idea to swap step 35 to step 36.
-
-
-
Sluit de scherm- en vingerafdruksensorflexkabels aan en schakel je telefoon in voordat je je telefoon sluit.
-
Test alle functies om zeker te weten dat je reparatie is voltooid voordat je het scherm sluit.
-


Vergelijk je vervangende onderdeel met het originele onderdeel om te zien of er onderdelen overgezet moeten worden of om te zien of je de folie van je nieuwe onderdeel moet verwijderen voordat je deze bevestigt.
Breng je e-afval naar een door R2 of e-Stewards gecertificeerde recycler.
Kalibreer je nieuwe batterij nadat je deze handleiding hebt weten te voltooien.
Ging je reparatie niet zoals gepland? Check dan ons antwoordenforum voor hulp bij het oplossen van je probleem.
Annuleren: ik heb deze handleiding niet afgemaakt.
39 andere personen hebben deze handleiding voltooid.
Met dank aan deze vertalers:
75%

Thomas Keulemans helpt ons de wereld te herstellen! Wil je bijdragen?
Begin met vertalen ›


13 opmerkingen
Good instructions. 2 things to add. Be careful how much heat you apply, I damaged my screen. A real heat gun needed about 30 seconds. Second is you can get custom cut stickers for the Z play to reinstall the battery and screen they are from that big online company, you know the one.
One of the best guides ever: clear and precise, with a REAL step by step process. Thank you very much.
I only want to add something: on my model (EU) the battery is attached to the body by two striped along the short sides of the battery. It can be hard to work on those stripes so pur extra attention on that.
Excellent guide. The biggest pain by far was removing the old battery. I didn’t have a heat gun so just used a hair dryer for the multiple rounds of heating and prying. I did end up deforming the old one quite a bit getting it out, but luckily nothing happened. Also, on my adhesive, the U-shaped cutout was *not* at the top left. Just make sure the speaker holes line up.
Excellent instructions! I read it several times while waiting for my new battery to come from ifixit. I was pretty confident in my abilities and knew the risks of damaging the screen in the process. Sure enough, after going through the whole procedure and plugging my old screen back in, half of it was blank… Pretty sure I flexed the screen too much while lifting on it with the suction cup and cracked it. The screen is a lot thinner and flexible than I was expecting. I would have preferred to give more business to ifixit but I didn’t want to be down for another whole week so I had to order a new screen from online company with free 2 day shipping… No complaints towards the author or ifixit at all. I would attempt this repair again.
I just want to mention that even the packaging for the repair parts and tools was impressive. Lots of attention to detail. Only complaint about the tools is that I would have paid a few extra bucks to include some kind of case for the tools. Thanks!
One simple method I use to remove the battery. After heating up the back of the phone, I use an old gift card and insert it through the side of the battery and since its larger and flexible your able to reach the strips of glue underneath the battery and loosen it from the battery. A lot safer than pulling and togging at the battery from the top and the potential risk of puncturing it . Just make sure to look for locations that have any circuits underneath the battery and avoid those spots. Works well for any other phones or tablets. I used it on this phone and only needed to heat it up once. Hope this helps someone.
Great instructions. I’m almost done. My problem is that the phone is working but nothing is on the screen. I’ve tried resetting the phone and reseating the connector. Still nothing. Any advice before I go to Verizon?
Same for me! I replaced the battery and plugged both connectors in. The fingerprint reader is working. I can feel it vibrating when I touch it, but the screen shows nothing even though I know the phone is powered on. I tried reconnecting the screen plug and nothing.
Ok, so I don't know if I did something wrong. But the screen I got did not come with the finger print reader or the front flash. I moved the finger print reader over from the old screen, but I did not see these steps in the guide. And I forgot the front flash and did not notice until I had closed the phone up. Kinda frustrating, but I guess that is in me. If I have fixed the worn down battery I will be happy. Guess I will plug the hole with some tooth paste or something. Lol! Other then that, very helpful guide, I will be using Ifixit next time too. I second the earlier commented that I would have been happy to pay a bit more for a nice case for my new tools.
Sorry to hear of those frustrations! I will amend the guide with a reminder.
After replacing the battery and, yes, new screen, I thought all was good and reassembled the phone. I subsequently found that the speaker isn't working when I am watching a video. I have checked all the settings but can't find the problem. If anyone knows what the most likely problem is, I would appreciate your help. Email me at colormegone123@gmail.com
Mon téléphone, ne fait pas les transferts des données avec l'ordinateur par câble ! Que dois-je faire ??
Who is the manufacturer for OE AMOLED displays for Moto Z play ? How can i get original display ?
I am from INDIA and i need a original AMOLED display for my Moto Z play