Deze vertaling geeft mogelijk niet de meest recente updates van de bronhandleiding weer. Help ons met het updaten van de vertaling of bekijk de bronhandleiding.
Inleiding
Gebruik deze handleiding om de LCD- en digitizermodule van je Motorola Moto X Pure Edition te verwijderen of te vervangen.
Ontlaad de batterij van je toestel, voor je eigen veiligheid, tot onder de 25% voordat je met deze procedure begint. Dit verkleint het risico op een ongeluk in het geval dat de batterij per ongeluk beschadigd raakt tijdens deze reparatie.
Bekijk, voordat je met de procedure begint, alvast goed de laatste stap van deze handleiding om je vervangende onderdeel te vergelijken met het onderdeel dat in deze handleiding wordt gebruikt. Deze handleiding is namelijk gemaakt voor een vervangend scherm dat reeds in een nieuw frame geïnstalleerd is. Als je een "kaal" scherm besteld hebt, zul je je oude scherm op voorzichtige wijze van het bestaande frame moeten scheiden om vervolgens je nieuwe scherm in het oude frame te bevestigen. Deze specifieke stappen zul je echter niet in deze handleiding vinden.
Wat je nodig hebt
-
-
Steek een SIM-uitwerptool, -bitje of een rechtgebogen paperclip in het kleine gat in de SIM-kaarthouder.
-
Druk je tool verder in het toestel om de kaarthouder uit de telefoon te duwen.
-
-
-
Verwarm een iOpener en leg deze gedurende ongeveer vijf minuten op de rechterkant van de achterkant van de telefoon om de lijm onder de achterste behuizing te verzwakken.
-
-
-
Druk een pincet dicht en steek de dichte punt in het kleine gat in de rand van de achterste behuizing, naast de SIM-kaarthouder.
-
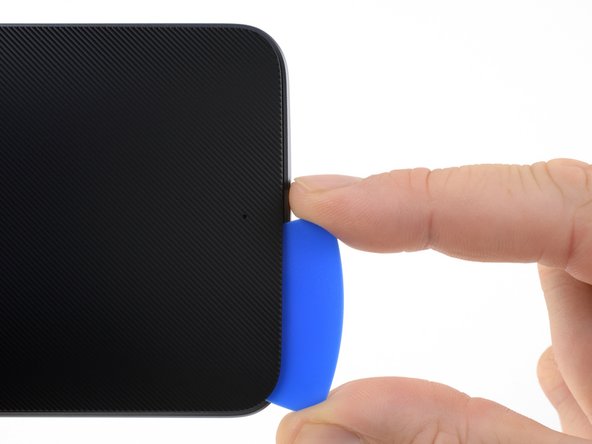
Gebruik je pincet om de achterste behuizing lichtjes omhoog te duwen en schuif vervolgens een openingsplectrum in de opening die je tussen de achterste behuizing en het frame hebt weten te creëren.
Insert only one of the tweezers’ point into the hole. Once the rubber backing is lifted high enough, slip a corner of the opening pick under the rubber backing. Leave the first pick near the corner while you use a second pick as directed in Step 6.
-
-
-
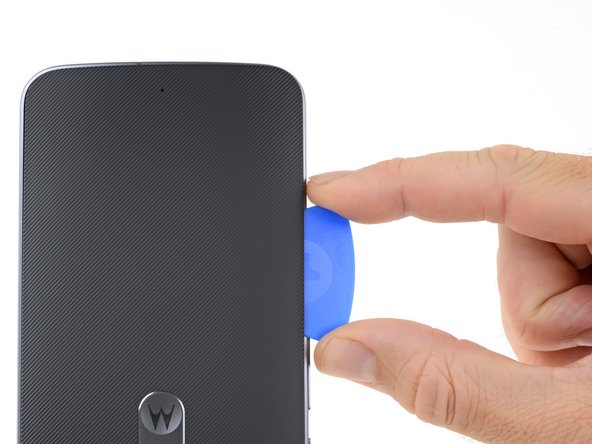
Schuif je openingsplectrum langs de zijkant van de telefoon om de lijm die je daar tegenkomt door te snijden.
-
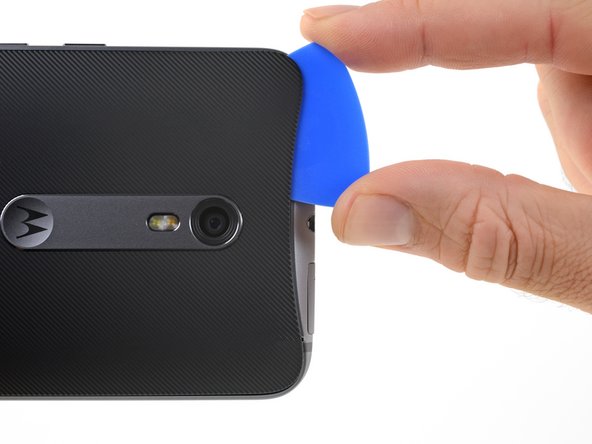
Probeer je plectrum zo ver mogelijk onder de behuizing en richting het midden van de cover te steken. Er bevindt zich namelijk een stevige klodder lijm onder het midden van de achterste behuizing welke je door zult moeten snijden.
I did not have a pick, used a few old credit cards, leaving them in place to keep the phone back separated.
Used a hair dryer to heat up a little, one section at a time, was enough to remove. Pulled apart slowly.
Left adhesive on the back and on the phone, where possible, using a tiny screw driver to separate. Reused whatever adhesive remained to reattach.
-
-
-
Verwarm een iOpener en leg deze gedurende ongeveer vijf minuten op de linkerkant van de achterkant van je toestel om de lijm onder de achterste behuizing te verzwakken.
-
-
-
-
Wrik de behuizing op voorzichtige wijze los van je telefoon.
-
Gebruik je eerst een pincet en een spudger om de lijmresten uit zowel de achterste behuizing als het chassis van de telefoon te verwijderen.
-
Maak je de voorheen gelijmde gebieden schoon met wat isopropyl alcohol (>90%) en een stuk stofvrij doek. Veeg alles weg in een en dezelfde richting (en niet heen en weer). Dit maakt het oppervlak klaar voor het bevestigen van je nieuwe onderdeel.
-
De kleefstrips kun je vinden in een vel dat vooraf op maat gesneden kleefstrips bevat die overeenkomen met de vorm van je achterste behuizing. Als deze niet beschikbaar is, kun je dubbelzijdige tape (zoals Tesa 61395) gebruiken. Verwijder, voordat je de kleefstrips op de behuizing installeert, het metalen deel in het midden.
-
Zet, na het installeren van de achterste behuizing, gedurende een aantal minuten stevige druk op je toestel om zeker te weten dat de lijm zich goed aan het toestel hecht.
Had the pre-cut adhesive sheet for reinstalling the Moto X Pure’s back cover. It seemed like the most “original” option at the time. I tried and tried to get it aligned inside the back cover, but found it virtually impossible to do. You pretty much have to get it perfectly aligned and then stick it down all at once. If it makes contact with the cover before it’s perfectly aligned, it’s all over. You’ll never get it back off without destroying it.
After failing with the pre-cut sheet, I resorted to the die-cut strips and corner pieces. This worked just fine.
-
-
-
Gebruik het platte einde van je spudger om de batterijaansluiting in een rechte beweging uit het contact omhoog te duwen.
Reconnecting the battery was difficult, did not align exactly. Note there are 2 slots that line up and 4 pins. Used a 10x magnifying lens with LED light, purchased to do this job. This step (reassembly) is where the magnifier came in handy. Had to move battery around a bit to get it to line up. Ended up removing adhesive tape from battery, so I could get in place to attach the connector. Battery held in place with screws and phone case, so far so good.
this is the difficult part. I find it is easier to remove this connector as the midframe and phone screen are separating (see step 19). Be also careful in prying this mine got broken luckily it is connected to the old battery which I replaced anyway
Broke the battery plug right off the motherboard! Trying to do a 2nd battery replacement. Only push up gently on the edge of the tab and straight up. Shopping for a new phone.
-
-
-
Gebruik een T3 Torx-schroevendraaier om de twintig 2.4 mm lange schroeven te verwijderen.
Need to add a step for removing the bar holding the buttons in place. Step 5 from the tear down. Still can’t take the mid frame off though.
I stripped the threads on one of the 20 screws, had to drill it out. (Managed to do this without cracking the screen, completed battery replacement, all ok.)
Careful removing the screws, be sure of tight grip. I saw T4 torx suggested on another site for Moto X Pure, this might grip better? Try both.
I did not have to remove the screw holding the volume buttons bar in place. These stay attached, not needed for replacing the battery. Just the 20 screws shown.
DO NOT REMOVE THE SILVER SCREW HOLDING IN THE VOLUME AND ON-OFF BUTTON. If these buttons fall out there are 4 very small springs that will pop out and are very hard to reinsert. If they do pop out do not use tweezers to reinsert but use a magnetic screw driver bit to reinsert.
This is extremely easy to overlook. This screw is a different color (silver versus black) but when you’re in the swing of removing all the screws it’s tempting to just remove ALL the screws. I goofed, had the buttons fall out, could only find 3 of the springs. Put two back in the volume rocker and only one in the power button since it’s smaller, seems like it wouldn’t need two as much. Everything still works, maybe just slightly less tactile than before. Even without the the springs, there’s still some mechanical return to the buttons, so if you do lose them don’t despair.
This is not working, got two out. Most just strip.
Update. The driver provided is not the right size. I had some tools laying around and found one that fit. This allowed me to get all the screws out except the six I stripped using the driver provided by ifiixit. Turns out they come out pretty easy if you have the right size bit. Would have been an easy fix had I not bought the tools…. go figure.
What is the right size bit?
The T3 Torx Driver was bundled in the bag with the Alcohol Prep Pad, not with the rest of the drivers! So look before you there before you call support like I did.
T4 works better, T3 also works. Try both and proceed carefully, get a good grip before turning.
-
-
-
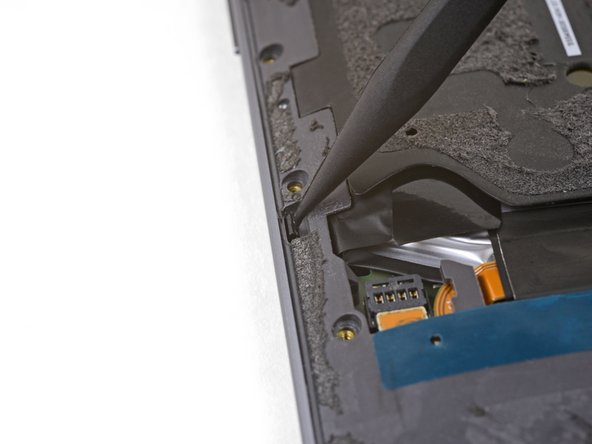
Gebruik de punt van je spudger om de kleine klem, die de linkerzijde van het midframe bevestigt, richting de rand van de telefoon te duwen. Zo komt het midframe los uit de klemmen.
On reassembly, these did not really click back in place. Held tight when reattaching the 20 (19 in my case) screws).
I had to push rather hard to release both clips. The tip of the spudger bent under the pressure I had to apply. But the the clips did finally release without damage.
-
-
-
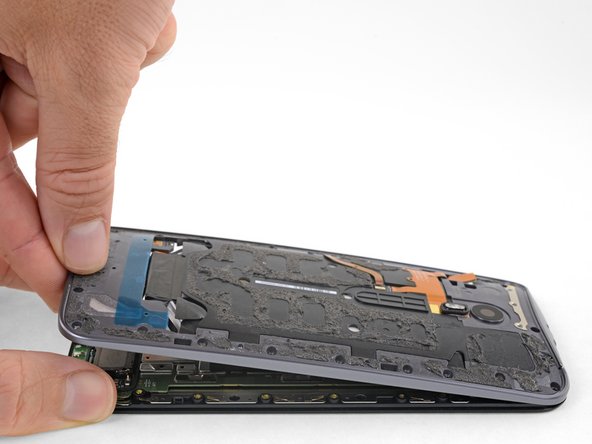
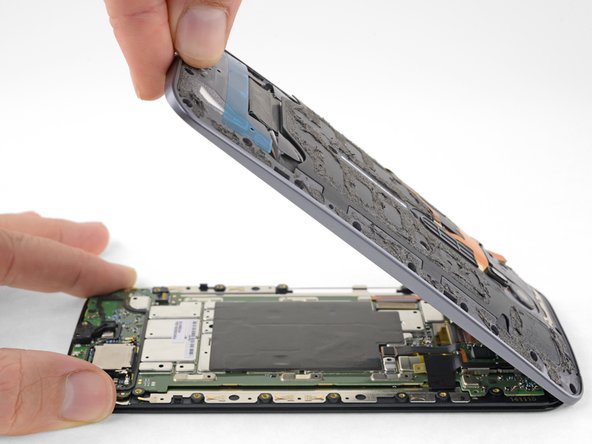
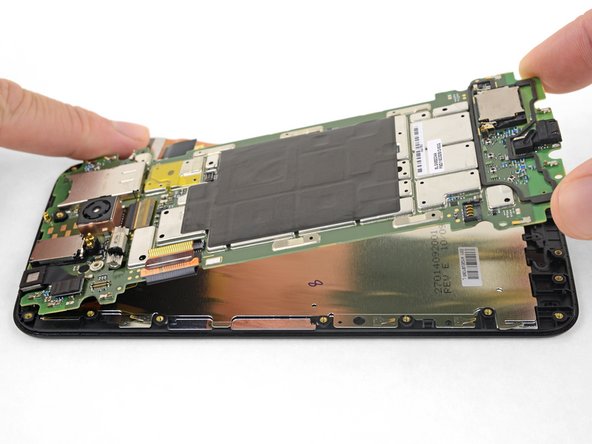
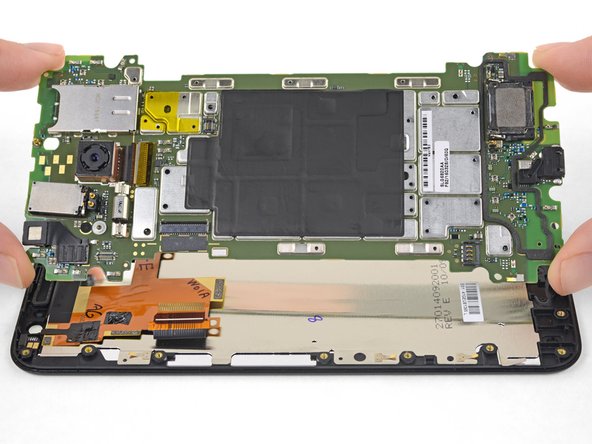
Til het midframe langzaam van het scherm weg door deze op te tillen terwijl je het scherm bij de hoeken vast blijft houden.
-
Verwijder het midframe van het scherm.
My mid-frame and display were separated on the long sides but seemed a little bit stuck on the top and bottom. I used the flat end of the spudger to carefully pry the two assemblies apart at either end.
In my case, stuck in the middle. Pulled apart very slowly, giving the adhesive a chance to separate, and not tearing whatever it was in there. Kept an eye on the inside middle, and very SLOW let it separate. Or was that the battery? In either case, go slow on all steps.
Yeah, everything went according to the guide until this step. I lifted the midframe away from the screen assembly as shown and something in the center didn’t separate at all. I spent a good half hour terrified that I had missed a step or a screw or that there was something different about my phone. In the end I read the comments and very slowly and patiently lifted the midframe until something uncoupled and the two parts cleanly separated. I was certain that permanent damage must have been done, but upon reassembling everything seems to be working perfectly.
Note to self - check that ALL (20) screws have been removed… especially if midframe is stubborn lifting up - i (almost) forgot about the one near the display cable (and it’s threaded into the motherboard instead of the frame) :)
In my unit, the midframe released from the display nicely just as described in the instructions.
-
-
-
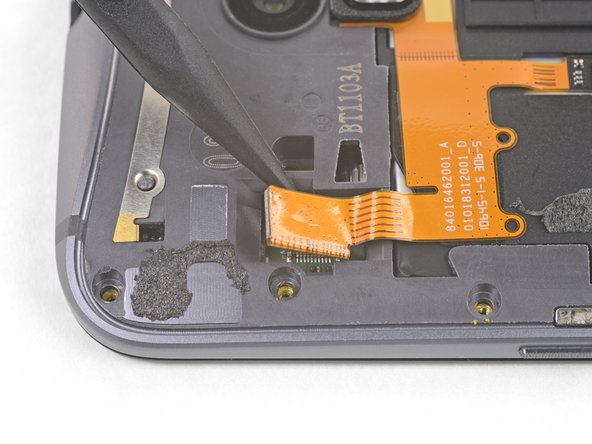
Verwijder de tape die over de schermkabelaansluiting heen is geplakt.
-
-
-
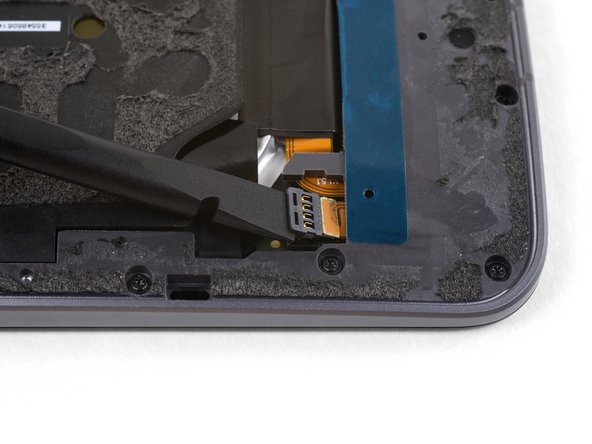
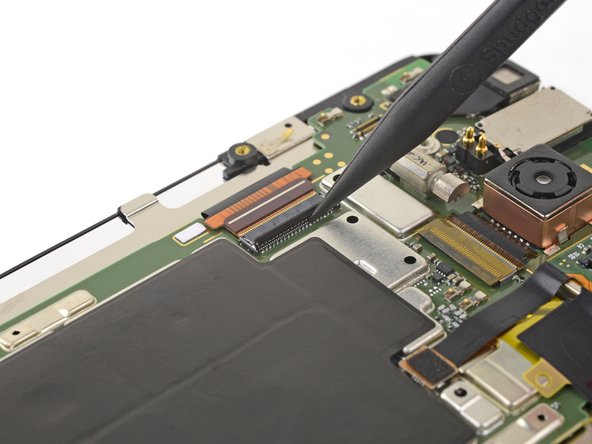
Gebruik de punt van je spudger om de sluitklem op de ZIF-aansluiting van de schermkabel omhoog te klappen.
-
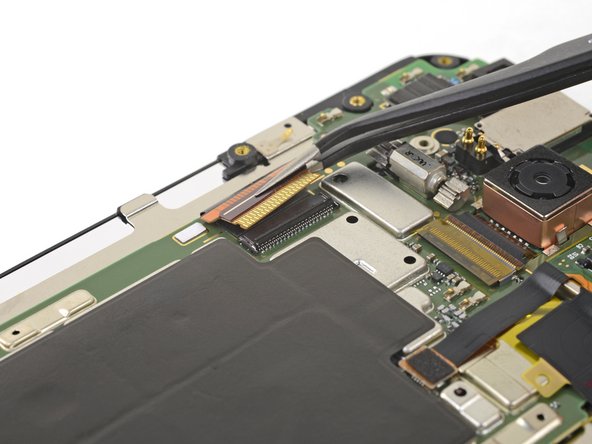
Trek de lintkabel van het scherm uit het contact. Trek de kabel parallel aan het oppervlak van het bord weg.
This step means straight in a flat or horizontal sense, as in move the ribbon cable toward the side of the phone, The image makes it appear that it was lifted up away from the back of the phone.
Thanks Chris!
I’ve adjusted the wording slightly to clarify the action.
-
-
-
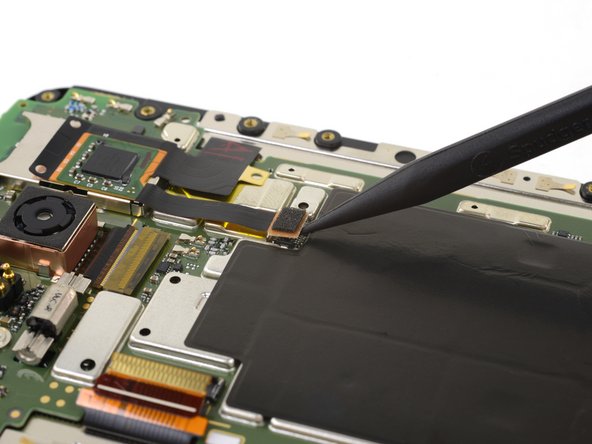
Verwarm een iOpener en leg deze op de kleine PCB die aan de bovenkant van de SIM-kaarthouder bevestigd is.
-
-
-
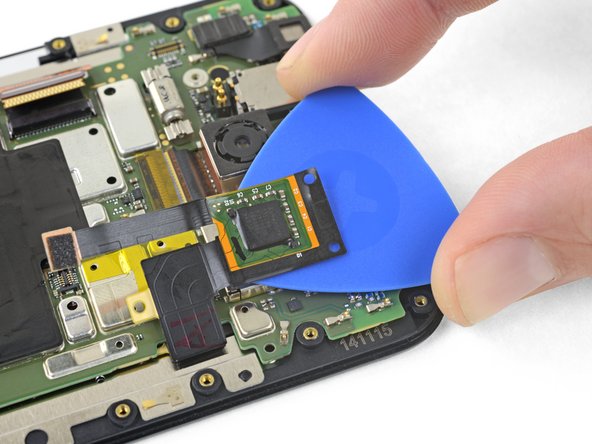
Als het goed is blijven nu enkel het LCD-scherm en de digitizermodule (inclusief frame) over.
-
Zorg dat je zeker weet dat je vervangende onderdeel overeenkomt met je originele onderdeel en dat je alle onderdelen uit het oude frame hebt verwijderd om over te zetten naar je nieuwe frame.
-
Het kan zijn dat je nieuwe scherm niet met de kleine, metalen speakerbescherming over de naar voren gerichte speakersgrilles wordt gelevrd. Ga, in dat geval, verder met de volgende stap. Als je scherm deze speakerbescherming wel bevat, kun je hier stoppen.
note to self - upon reassembly the battery low display flashed on - but the power button didn’t work … so after a hour, took the cover off and re-seated the ribbon wire that comes from the power button - then the power button worked normally (although still trying to get the speaker guards to snap in but those are probably cosmetic anyway)
also, mine was off for more than a year and had to reset phone by running recovery restart boot-loader … (reset) described in (volume down and power) https://support.motorola.com/us/en/produ...
-
-
-
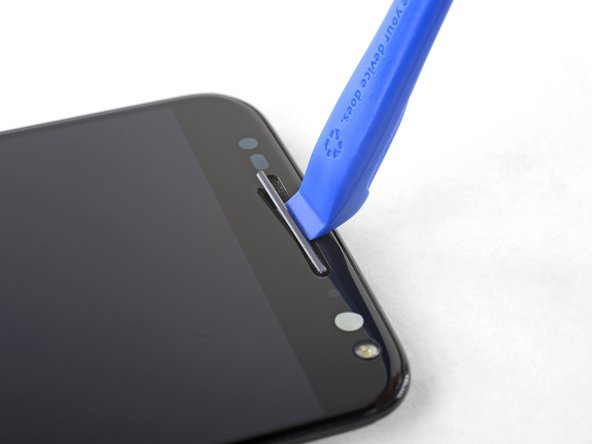
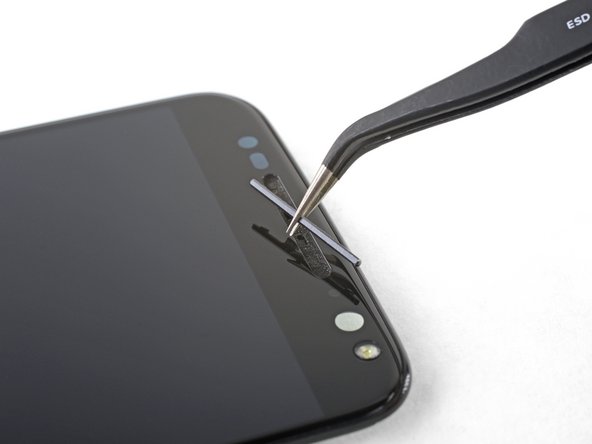
Herhaal de vorige stap om de onderste speakerbeschermer ook te verwijderen.
-
Om de beschermers weer te installeren, breng je de kleine lipjes op de beschermers op een lijn met de gaten in de grill om de beschermers vervolgens recht naar beneden in de grill vast te drukken.
I’ve cracked two screens attempting to reinstall the guards. Be REALLY careful doing this.
Any tips? I can’t get mine to go back in. They came out so easily!
Use the tweezers to hold the guard and also as a spacer to keep it centered up and down. Then press in one of the tabs and once its in move the tweezers out of the way and press in the other tab.
-


Vergelijk je vervangende onderdeel met het originele onderdeel om te zien of je nog onderdelen van je oude naar je nieuwe deel moet overzetten of om te zien of er folie verwijderd moet worden voordat je je nieuwe onderdeel kunt bevestigen.
Om je toestel weer in elkaar te zetten, volg je deze instructies in omgekeerde volgorde.
Breng je e-afval naar een door R2 of e-Stewards gecertificeerde recycler.
Ging je reparatie niet zoals gepland? Check dan ons antwoordenforum voor hulp bij het oplossen van je probleem.
Annuleren: ik heb deze handleiding niet afgemaakt.
18 andere personen hebben deze handleiding voltooid.
Met dank aan deze vertalers:
92%

Thomas Keulemans helpt ons de wereld te herstellen! Wil je bijdragen?
Begin met vertalen ›

3 opmerkingen
what i needed to know how to replace speaker covers
I have Motorola moto x pure edition that the LCD screen went bad/ blacked out. I found a replacement screen. Now the left half of the screen works perfectly but the right half is scrambled. What causes this? Is there a bad component that I can replace to fix this? Has anyone else experienced this? Is it a bad motherboard?
I have 2 of these phones, but really needed to replace the screen on the latest one to get data off it. I thought I’d get the walnut back off the first phone, but I found it wasn’t as easy as the rubber backing, perhaps heat transfer issues, and super hard to get it started, I have a small crack at that point.