Ga door naar hoofdinhoud

Deze versie kan foutieve bewerkingen bevatten. Schakel over naar de recentste gecontroleerde momentopname.

Wat je nodig hebt

  1. Deze stap is niet vertaald. Help het te vertalen

    : stap 1, afbeelding 1 van 3 : stap 1, afbeelding 2 van 3 : stap 1, afbeelding 3 van 3
    • Insert the SIM card eject tool into the hole in the side of the SIM card tray and push to eject the tray.

    • Remove the SIM card tray.

    • If the SIM card does not fall free from the tray on its own, simply remove it with your fingers.

  2. Deze stap is niet vertaald. Help het te vertalen

    : stap 2, afbeelding 1 van 3 : stap 2, afbeelding 2 van 3 : stap 2, afbeelding 3 van 3
    • In the following steps you will be releasing the clips holding the phone's cases together. However, the back case is also secured with an adhesive pad. After separating the clips you will use an iOpener to allow the case to fully open. Do not attempt to fully open the phone before loosening the adhesive.

    • Insert a plastic opening tool into the seam between the front and rear covers near the SIM card slot.

    • Slide the plastic opening tool along the seam toward the upper corner.

  3. Deze stap is niet vertaald. Help het te vertalen

    : stap 3, afbeelding 1 van 2 : stap 3, afbeelding 2 van 2
    • Carefully slide the plastic opening tool around the corner, freeing it from clips.

  4. Deze stap is niet vertaald. Help het te vertalen

    : stap 4, afbeelding 1 van 2 : stap 4, afbeelding 2 van 2
    • Pry around the top right corner of the phone between the two covers.

  5. Deze stap is niet vertaald. Help het te vertalen

    : stap 5, afbeelding 1 van 3 : stap 5, afbeelding 2 van 3 : stap 5, afbeelding 3 van 3
    • Run the opening tool along the seam around all four sides, separating the remaining clips holding the cover on.

    • The plastic on the front cover is thinner near the buttons, and the buttons may move around. Go slowly to avoid damaging the buttons or the front cover.

    • Do not push the opening tool deep into phone, or you may damage internal components.

  6. Deze stap is niet vertaald. Help het te vertalen

    : stap 6, afbeelding 1 van 1
    • Heat an iOpener and lay it over the phone for approximately 90 seconds to loosen the adhesive securing the back cover.

  7. Deze stap is niet vertaald. Help het te vertalen

    : stap 7, afbeelding 1 van 3 : stap 7, afbeelding 2 van 3 : stap 7, afbeelding 3 van 3
    • Starting from the SIM slot side, carefully peel the back cover off of the phone.

    • The back cover is very flexible, but you don't want to damage any internal components by being too hasty.

    • There is a chance that the NFC coil may remain stubbornly adhered to the back cover. If that's the case, stop peeling the cover and reapply a heated iOpener to the back cover.

    • Do not separate the back cover entirely; it is still connected to the phone by the camera flash cable.

    • The flash cable is attached on the power/volume button side of the phone.

  8. Deze stap is niet vertaald. Help het te vertalen

    : stap 8, afbeelding 1 van 1
    • Gently set the back cover down in a way that exposes the camera flash cable connector, but does not put strain on it.

  9. Deze stap is niet vertaald. Help het te vertalen

    : stap 9, afbeelding 1 van 3 : stap 9, afbeelding 2 van 3 : stap 9, afbeelding 3 van 3
    • Use the tip of a spudger to flip up the retaining flap on the flash cable ZIF connector.

    • Be sure to pry only on the flap itself, not on the connector.

    • Pull the flash cable straight out of its socket.

  10. Deze stap is niet vertaald. Help het te vertalen

    : stap 10, afbeelding 1 van 1
    • Separate the back cover from the phone.

  11. Deze stap is niet vertaald. Help het te vertalen

    : stap 11, afbeelding 1 van 1
    • Remove the four 3 mm T3 Torx screws securing the lower antenna assembly to the phone.

  12. Deze stap is niet vertaald. Help het te vertalen

    : stap 12, afbeelding 1 van 3 : stap 12, afbeelding 2 van 3 : stap 12, afbeelding 3 van 3
    • Use the flat end of a spudger to pry up the lower antenna assembly and free it from the phone.

    • Remove the antenna assembly.

  13. Deze stap is niet vertaald. Help het te vertalen

    : stap 13, afbeelding 1 van 3 : stap 13, afbeelding 2 van 3 : stap 13, afbeelding 3 van 3
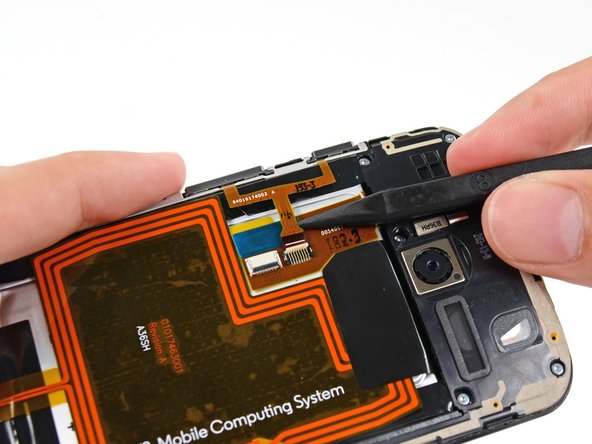
    • Insert the tip of a spudger under the battery cable near the connector to lift it straight up from its socket.

    • Use the flat end of a spudger to disconnect the NFC antenna cable connector.

  14. Deze stap is niet vertaald. Help het te vertalen

    : stap 14, afbeelding 1 van 3 : stap 14, afbeelding 2 van 3 : stap 14, afbeelding 3 van 3
    • Use the tip of a spudger to flip up the ZIF retaining flap from the button assembly cable connector.

    • Slide the tip of the spudger under the button assembly cable near the connector to pull the cable straight out of its socket.

  15. Deze stap is niet vertaald. Help het te vertalen

    : stap 15, afbeelding 1 van 2 : stap 15, afbeelding 2 van 2
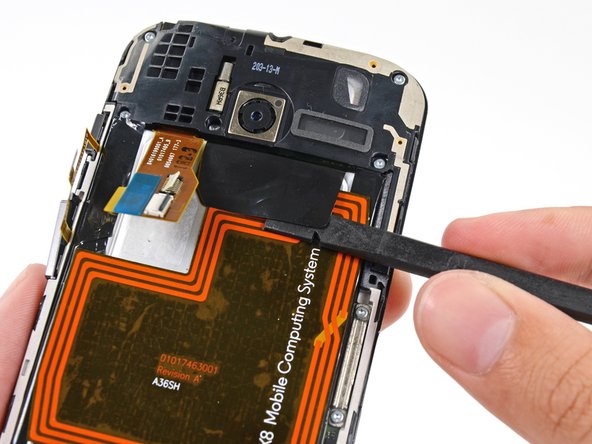
    • Insert the flat end of a spudger under the interconnect cable to free it from the adhesive holding it to the battery.

  16. Deze stap is niet vertaald. Help het te vertalen

    : stap 16, afbeelding 1 van 2 : stap 16, afbeelding 2 van 2
    • Use the flat end of a spudger to peel the adhesive pull-tab off the top of battery.

  17. Deze stap is niet vertaald. Help het te vertalen

    : stap 17, afbeelding 1 van 3 : stap 17, afbeelding 2 van 3 : stap 17, afbeelding 3 van 3
    Gereedschap gebruikt in deze stap:
    Tesa 61395 Tape
    $5.99
    Koop
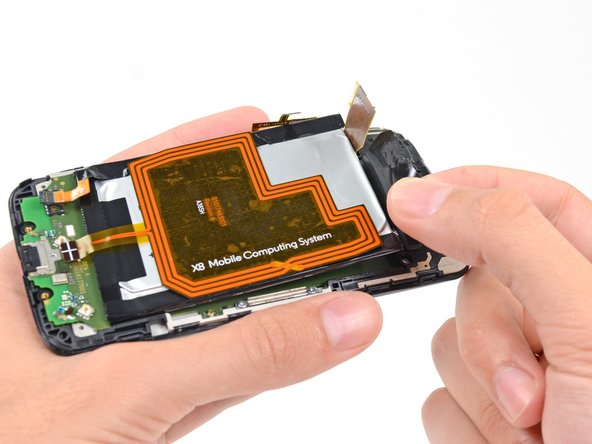
    • Use the adhesive pull-tab to lift the battery from its recess.

    • The battery is secured to the motherboard with mild adhesive. Peel slowly, and be careful not to bend or puncture the battery.

    • Remove the battery from the phone.

    • When reassembling your phone secure the battery with double-sided tape or pre-cut adhesive strips.

  18. Deze stap is niet vertaald. Help het te vertalen

    : stap 18, afbeelding 1 van 1
    • Proceed only if you want to transfer the NFC antenna from the old battery to the new battery.

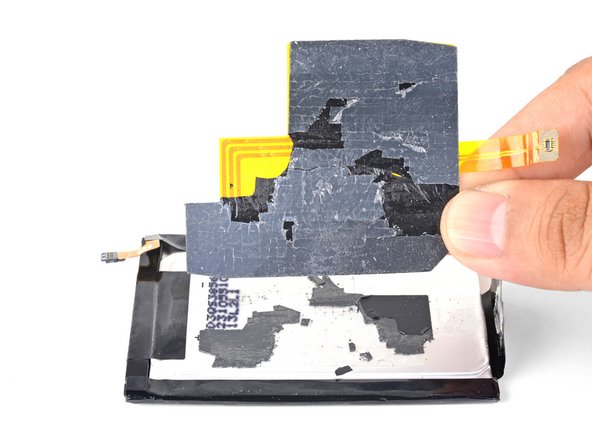
    • If you choose not to, or if you damage the coil, your phone will work without it, but lose its NFC capabilities.

    • Apply a heated iOpener to the NFC antenna for 90 seconds.

  19. Deze stap is niet vertaald. Help het te vertalen

    : stap 19, afbeelding 1 van 3 : stap 19, afbeelding 2 van 3 : stap 19, afbeelding 3 van 3
    • Insert an opening pick under one of the corners of the NFC antenna and slowly slide it along the edge to cut through the black adhesive.

    • While it is not imperative to keep the black adhesive layer intact, try to cut underneath it so that it comes off in one piece.

  20. Deze stap is niet vertaald. Help het te vertalen

    : stap 20, afbeelding 1 van 3 : stap 20, afbeelding 2 van 3 : stap 20, afbeelding 3 van 3
    • Continue using the opening pick to cut around the NFC antenna, loosening the remaining black adhesive.

    • The NFC antenna should still function normally as long as the plastic layer is not ripped.

  21. Deze stap is niet vertaald. Help het te vertalen

    : stap 21, afbeelding 1 van 2 : stap 21, afbeelding 2 van 2
    Gereedschap gebruikt in deze stap:
    Tesa 61395 Tape
    $5.99
    Koop
    • Remove the NFC antenna from the old battery.

    • Use pre-cut double sided tape or Tesa tape to reattach the NFC coil to the replacement battery.

    • Before installing the NFC antenna, install the replacement battery and plug in the NFC antenna, to make sure that the antenna is properly aligned.

Eindstreep

114 andere personen hebben deze handleiding voltooid.

Sam Goldheart

Lid sinds: 10/18/12

465.602 Reputatie

538 handleidingen geschreven

Team

iFixit Lid van iFixit

Staff

135 Leden

16.718 handleidingen geschreven

35 opmerkingen

Cool but where to buy the spare battery?

Thanks

Roman Senkyr - Antwoord

Nice, detailed guide. In fact so detailed, I do not trust myself making this repair. Does anyone offer this as a service (for a fee)?

thenikonknight - Antwoord

OEM is the Motorola EX34, all over Ebay for $12-20

Jeff - Antwoord

This doesn't address the antenna stuck on (but separate) from the battery. It's easy enough to see in the pictures, but it doesn't come off easily in one piece. I think mine still works, but definitely needs addressing.

Kim Schaffer - Antwoord

Yes - getting the antenna off is a bear. I - well, my cell-phone guy - didn't bother because I don't use NFC for anything, so I hope that was okay!

Jessica Montena - Antwoord

Voeg opmerking toe

Weergavestatistieken:

Afgelopen 24 uren: 3

Afgelopen 7 dagen: 45

Afgelopen 30 dagen: 107

Altijd: 203,250