Ga door naar hoofdinhoud

Motorola Moto G4 Speaker Replacement

Wat je nodig hebt

  1. Motorola Moto G4 Speaker Replacement, Back Cover: stap 1, afbeelding 1 van 3 Motorola Moto G4 Speaker Replacement, Back Cover: stap 1, afbeelding 2 van 3 Motorola Moto G4 Speaker Replacement, Back Cover: stap 1, afbeelding 3 van 3
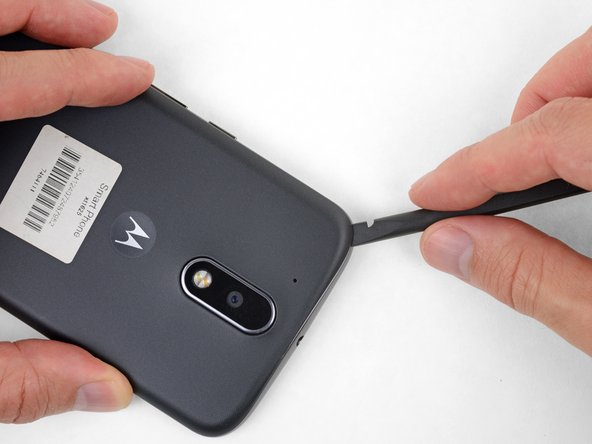
    • Insert a fingernail or a spudger into the notch on the bottom edge of the phone, near the charge port.

    • Gently twist or pry to open a small gap between the back cover and the body of the phone.

    • While keeping your tool (or fingernail) inserted into the gap between the back cover and the body of the phone, slide it around the corner to begin loosening the plastic clips holding the cover in place.

  2. Motorola Moto G4 Speaker Replacement: stap 2, afbeelding 1 van 2 Motorola Moto G4 Speaker Replacement: stap 2, afbeelding 2 van 2
    • Slide your tool all along the side of the phone to separate more of the clips securing the back cover.

  3. Motorola Moto G4 Speaker Replacement: stap 3, afbeelding 1 van 3 Motorola Moto G4 Speaker Replacement: stap 3, afbeelding 2 van 3 Motorola Moto G4 Speaker Replacement: stap 3, afbeelding 3 van 3
    • Keep your tool inserted slightly under the back cover, and slide it around the top corner.

    • If necessary, continue prying around the remaining edges of the phone until the back cover comes free.

  4. Motorola Moto G4 Speaker Replacement: stap 4, afbeelding 1 van 2 Motorola Moto G4 Speaker Replacement: stap 4, afbeelding 2 van 2
    • Remove the back cover.

    • To install the back cover, carefully position it over the phone and then press gently all around the edges until you feel the clips snap into place.

  5. Motorola Moto G4 Speaker Replacement, Midframe: stap 5, afbeelding 1 van 3 Motorola Moto G4 Speaker Replacement, Midframe: stap 5, afbeelding 2 van 3 Motorola Moto G4 Speaker Replacement, Midframe: stap 5, afbeelding 3 van 3
    • Push to eject and remove the MicroSD and SIM cards (if installed).

  6. Motorola Moto G4 Speaker Replacement: stap 6, afbeelding 1 van 2 Motorola Moto G4 Speaker Replacement: stap 6, afbeelding 2 van 2
    • Use a spudger to pry up the rubber cover for the camera flash connector.

  7. Motorola Moto G4 Speaker Replacement: stap 7, afbeelding 1 van 1
    • Remove the rubber cover.

  8. Motorola Moto G4 Speaker Replacement: stap 8, afbeelding 1 van 2 Motorola Moto G4 Speaker Replacement: stap 8, afbeelding 2 van 2
    • Use a spudger to disconnect the camera flash connector by prying it straight up.

  9. Motorola Moto G4 Speaker Replacement: stap 9, afbeelding 1 van 1
    • Use a T3 Torx driver to remove the nineteen identical 3.1 mm screws securing the midframe.

  10. Motorola Moto G4 Speaker Replacement: stap 10, afbeelding 1 van 1
    • Insert a spudger under the midframe at the top left corner, and gently twist to separate it from the body of the phone.

  11. Motorola Moto G4 Speaker Replacement: stap 11, afbeelding 1 van 1
    • Remove the midframe.

  12. Motorola Moto G4 Speaker Replacement, Battery Disconnection: stap 12, afbeelding 1 van 2 Motorola Moto G4 Speaker Replacement, Battery Disconnection: stap 12, afbeelding 2 van 2
    • Insert a thin tool (such as one of your tweezer tips) under the red and black battery wires, and slide it underneath the battery connector.

    • Gently pry straight up to disconnect the battery.

    • Pry only from the side where the wires attach to the connector—if you pry anywhere else, you may break the socket.

    • During reassembly, align the connector in its socket and then press straight down to reconnect it, wiggling slightly as you press to help it seat correctly.

  13. Motorola Moto G4 Speaker Replacement, Speaker: stap 13, afbeelding 1 van 3 Motorola Moto G4 Speaker Replacement, Speaker: stap 13, afbeelding 2 van 3 Motorola Moto G4 Speaker Replacement, Speaker: stap 13, afbeelding 3 van 3
    • Strong adhesive secures the earpiece speaker. If necessary, apply heat or a few drops of isopropyl alcohol to help weaken the adhesive and make it easier to remove.

    • Pry up the speaker with a pry tool or a pair of tweezers. Be careful not to damage any surrounding components.

    • If you plan to re-use the speaker, be careful not to pry at it anywhere other than on its black plastic frame, as the speaker is easily damaged.

    • Check the condition of the adhesive around the bottom of the earpiece speaker when you reinstall it. A little heat from a hair dryer or iOpener can help soften the adhesive and make it sticky again.

    • The back of the speaker is magnetic. Be careful to not touch it to other parts of the motherboard.

Conclusie

To reassemble your device, follow these instructions in reverse order.

6 andere personen hebben deze handleiding voltooid.

Kierra Schau

Lid sinds: 09/28/17

1.511 Reputatie

4 handleidingen geschreven

Team

USF Tampa, Team S11-G2, Passmore Fall 2017 Lid van USF Tampa, Team S11-G2, Passmore Fall 2017

USFT-PASSMORE-F17S11G2

3 Leden

13 handleidingen geschreven

4 opmerkingen

i have problem with speaker. no sound. tried direct connecting external speaker . still no sound. so seems like its not sending signal. i checked all the settings

SHAIK Rahman - Antwoord

You should have clearly told us not to use the tweezers in such a way as to touch the bottom side of that speaker box. I accidentally touched the other side with my tweezer while removing which caused a hole in the thin metal membrane. Now my speaker works but has an incredible amount of distortion. You MUST put a warning for these things. Now I have to buy a new speaker module.

The warning should have told us to touch only the plastic black parts with the pointy end of the tweezers

Anu S - Antwoord

will use on my other phone, people can hear me, I can’t hear them after a drop. Now I know how to check the phone speaker. Thanks

gabriel johnson - Antwoord

Is it essential to disconnect the battery? Or is that more safety protocol?

Andy Morley - Antwoord

Voeg opmerking toe

Weergavestatistieken:

Afgelopen 24 uren: 0

Afgelopen 7 dagen: 4

Afgelopen 30 dagen: 15

Altijd: 9,102