Ga door naar hoofdinhoud

Motorola Moto E 2nd Generation Earpiece Speaker Replacement

Wat je nodig hebt

  1. Motorola Moto E 2nd Generation Earpiece Speaker Replacement, Display Assembly: stap 1, afbeelding 1 van 1
    • Turn off the device before beginning your repair.

    • Using a heat gun, carefully apply heat around the edges of the display to soften the glue. Heat should be applied to the point where the phone isn't too hot to touch, but close enough.

  2. Motorola Moto E 2nd Generation Earpiece Speaker Replacement: stap 2, afbeelding 1 van 3 Motorola Moto E 2nd Generation Earpiece Speaker Replacement: stap 2, afbeelding 2 van 3 Motorola Moto E 2nd Generation Earpiece Speaker Replacement: stap 2, afbeelding 3 van 3
    • Using the small plastic opening tool, pry and slide all the way around the phone while carefully lifting up on the display.

    • The screen is secured by two-sided tape located on the edge.

  3. Motorola Moto E 2nd Generation Earpiece Speaker Replacement: stap 3, afbeelding 1 van 3 Motorola Moto E 2nd Generation Earpiece Speaker Replacement: stap 3, afbeelding 2 van 3 Motorola Moto E 2nd Generation Earpiece Speaker Replacement: stap 3, afbeelding 3 van 3
    • Once display is fully unglued from the frame, carefully lift it up and locate the display connector.

    • Using the same small plastic tool, carefully remove the yellow tape off the connector.

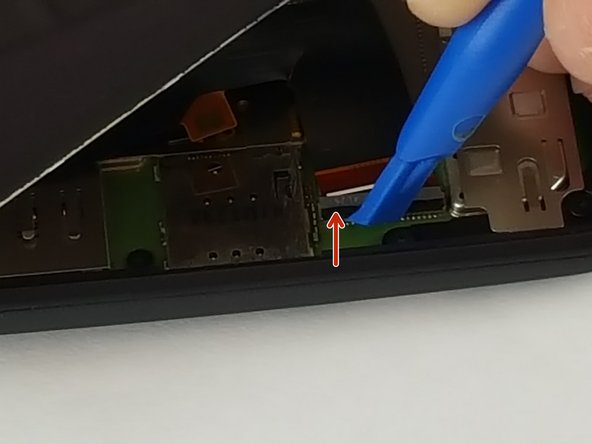
    • Now carefully undo the black connector lock by lifting it up in the direction of the red arrow.

    • Do not pry on the gray part of the connector.

    • Lastly slide the display cable off the connector. It should easily slide off, if not make sure the black lock is fully unlatched.

  4. Motorola Moto E 2nd Generation Earpiece Speaker Replacement, Earpiece Speaker: stap 4, afbeelding 1 van 3 Motorola Moto E 2nd Generation Earpiece Speaker Replacement, Earpiece Speaker: stap 4, afbeelding 2 van 3 Motorola Moto E 2nd Generation Earpiece Speaker Replacement, Earpiece Speaker: stap 4, afbeelding 3 van 3
    • Now that the display is out, remove the aluminum shield off the motherboard.

    • Unscrew the single 4mm screw located on the top using a T4 Torx bit.

    • After screw is out, gently remove the aluminum shield off the motherboard.

    • Working on a magnet board is recommended as the screws are small and can be easily misplaced.

  5. Motorola Moto E 2nd Generation Earpiece Speaker Replacement: stap 5, afbeelding 1 van 2 Motorola Moto E 2nd Generation Earpiece Speaker Replacement: stap 5, afbeelding 2 van 2
    • Using the metal spudger tool, very carefully remove the speaker by first gently prying up on the right side and then the bottom.

    • The ear piece is held by double sided tape and clips to the motherboard so be very careful.

Conclusie

To reassemble your device, follow these instructions in reverse order.

10 andere personen hebben deze handleiding voltooid.

Andre Romualdo

Lid sinds: 02/08/16

3.765 Reputatie

5 handleidingen geschreven

Team

USF Tampa, Team 12-3, Eyestone Spring 2016 Lid van USF Tampa, Team 12-3, Eyestone Spring 2016

USFT-EYESTONE-S16S12G3

3 Leden

14 handleidingen geschreven

3 opmerkingen

Olá André. Gostaria de saber se aquela peça a direita do earpiece speaker é outro falante.

Questiono pq o meu Moto E2 apresenta um som meio chiado nas ligações, porém no viva voz ou reproduzindo mídia o som é limpo, normal.

Obrigado.

Caio Andrade - Antwoord

I almost bought another phone but I read it was common for these phones to have ear piece issues like mine does.

Thank You so much for the information it was perfect, I just ordered the ear piece.

sarjpr - Antwoord

Ciao Andre e grazie davvero!

enricolag - Antwoord

Voeg opmerking toe

Weergavestatistieken:

Afgelopen 24 uren: 0

Afgelopen 7 dagen: 1

Afgelopen 30 dagen: 2

Altijd: 10,535