Deze versie kan foutieve bewerkingen bevatten. Schakel over naar de recentste gecontroleerde momentopname.
Wat je nodig hebt
-
Deze stap is niet vertaald. Help het te vertalen
-
Slide the battery cover toward the bottom edge of the phone.
-
Remove the battery cover from the rear of the phone.
-
-
Deze stap is niet vertaald. Help het te vertalen
-
Lift the battery out of the Droid 2 from the edge closest to the bottom of the phone.
-
Remove the battery from the Droid 2.
-
-
Deze stap is niet vertaald. Help het te vertalen
-
Using the tip of a spudger, peel up one corner of the silver ribbon below the battery compartment.
-
Peel the ribbon off the phone.
-
-
Deze stap is niet vertaald. Help het te vertalen
-
Insert the flat end of a spudger and pry the plastic camera cover up off the phone.
-
-
Deze stap is niet vertaald. Help het te vertalen
-
Use the tip of a spudger to remove the camera bezel stuck to the rear case.
-
-
Deze stap is niet vertaald. Help het te vertalen
-
Remove the seven 5.5 mm T5 Torx screws securing the rear case to the inner case.
-
-
Deze stap is niet vertaald. Help het te vertalen
-
Insert the flat end of a spudger and pry downwards to release the plastic tab holding the rear case to the motherboard screw.
-
-
Deze stap is niet vertaald. Help het te vertalen
-
Gently insert a spudger between the rear case and front case at the top of the phone, near the audio jack.
-
Carefully pry the top edge of the rear case up from the rest of the phone.
-
-
Deze stap is niet vertaald. Help het te vertalen
-
With the spudger still inserted between the rear case and front case, slide the spudger along the right edge of the device, moving toward the bottom, prying as you go.
-
Continue prying along the bottom edge of the device from right to left, freeing it from the front panel.
-
-
Deze stap is niet vertaald. Help het te vertalen
-
Continue prying the rear case from the front case along the left side, moving from bottom to top.
-
Lift the rear case up out of the phone.
-
-
Deze stap is niet vertaald. Help het te vertalen
-
Carefully lift the speaker/antenna assembly up and out of the phone.
-
-
-
Deze stap is niet vertaald. Help het te vertalen
-
Use a spudger to pry the antenna cable connectors from their respective sockets on the motherboard and the speaker/antenna board.
-
De-route the antenna cable by pulling it out of the metal clips along the side of the front case.
-
-
Deze stap is niet vertaald. Help het te vertalen
-
Peel the black rubber sheet covering the side button and display ribbon connectors on the motherboard.
-
-
Deze stap is niet vertaald. Help het te vertalen
-
Disconnect the power button/volume button connector from its socket on the motherboard using the flat end of a spudger.
-
-
Deze stap is niet vertaald. Help het te vertalen
-
Disconnect the display ribbon connector from its socket on the motherboard using the flat end of a spudger.
-
-
Deze stap is niet vertaald. Help het te vertalen
-
Use the flat end of a spudger to remove the small black plastic piece stuck to the battery connector.
-
-
Deze stap is niet vertaald. Help het te vertalen
-
Remove three 3.8 mm T5 Torx screws securing the motherboard to the front case.
-
-
Deze stap is niet vertaald. Help het te vertalen
-
Disconnect the keypad connector by prying it straight up off its socket on the motherboard.
-
Remove the motherboard from the Droid 2.
-
-
Deze stap is niet vertaald. Help het te vertalen
-
Disconnect the camera button/vibrator connector by prying it straight up off its socket on the speaker board with a spudger.
-
-
Deze stap is niet vertaald. Help het te vertalen
-
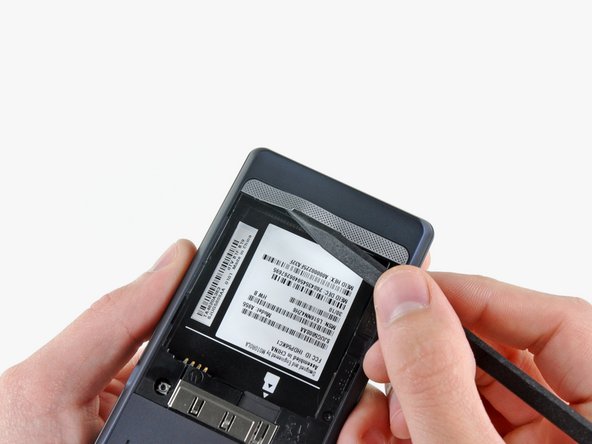
Remove the large sticker stuck to the inner face of the battery compartment.
-
-
Deze stap is niet vertaald. Help het te vertalen
-
Lift up the edge of the black plastic rim that includes the speaker board from the side closest to the keypad.
-
Continue lifting the side of the rim until it is almost vertical, and wiggle it free from the back of the LCD assembly.
-
-
Deze stap is niet vertaald. Help het te vertalen
-
Remove the EMI shield by releasing the clips shown with the tip of a spudger.
-
-
Deze stap is niet vertaald. Help het te vertalen
-
Remove the five 2.5 mm T3 Torx screws along the outer edge of the slider panel.
-
-
Deze stap is niet vertaald. Help het te vertalen
-
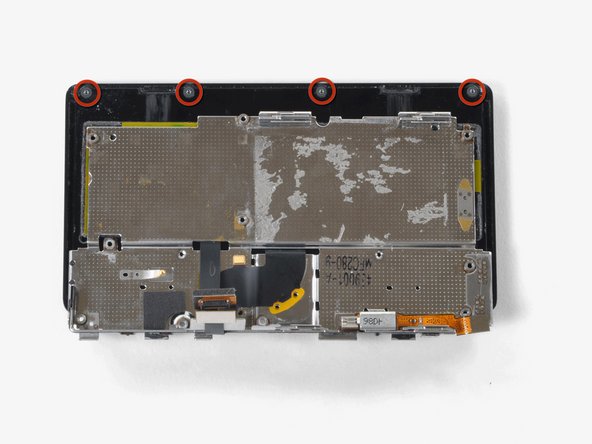
Remove the four 2.5 mm T3 Torx screws along the outer edge of the slider.
-
-
Deze stap is niet vertaald. Help het te vertalen
-
Peel the display ribbon up from the keypad's metal backing.
-
-
Deze stap is niet vertaald. Help het te vertalen
-
Insert a spudger between the back and front case of the display assembly, and peel the two ribbon cables off the two adhesive pads along the back case of the display assembly.
-
-
Deze stap is niet vertaald. Help het te vertalen
-
Use the flat end of a spudger to lift the board that contains the ambient light sensor and display data cable connector out of the screen housing.
-
-
Deze stap is niet vertaald. Help het te vertalen
-
Use the tip of a spudger to lift the speaker out of the screen housing.
-
-
Deze stap is niet vertaald. Help het te vertalen
-
Peel off the black tape to reveal the front panel connector.
-
-
Deze stap is niet vertaald. Help het te vertalen
-
Remove the front panel ribbon cable from the ZIF connector on the board that is attached to the display ribbon.
-


Annuleren: ik heb deze handleiding niet afgemaakt.
22 andere personen hebben deze handleiding voltooid.

3 opmerkingen
This phone is also called the Motorola Milestone 2. On my phone the keyboard screws were T3 as stated. It did not have the rubber cover over the battery connector in step 16. I had to replace the screen so I heated the old one slightly over a gas flame to help remove the adhesive and carefully lifted it off the front panel after step 32. The new screen already had a self adhesive backing so just dropped into place. I'm not sure it was necessary to peel back the LCD ribbon in step 26 as I was not replacing the LCD?