Ga door naar hoofdinhoud

Motorola Atrix 4G Motherboard Replacement

Wat je nodig hebt

  1. Motorola Atrix 4G Motherboard Replacement, Battery: stap 1, afbeelding 1 van 1
    • Pry the back cover off the back of the phone.

  2. Motorola Atrix 4G Motherboard Replacement: stap 2, afbeelding 1 van 2 Motorola Atrix 4G Motherboard Replacement: stap 2, afbeelding 2 van 2
    Gereedschap gebruikt in deze stap:
    Spudger
    $3.99
    • Insert a spudger into the small notch at the base of the battery.

    • Lift the battery out of the phone.

  3. Motorola Atrix 4G Motherboard Replacement, Antenna: stap 3, afbeelding 1 van 2 Motorola Atrix 4G Motherboard Replacement, Antenna: stap 3, afbeelding 2 van 2
    Gereedschap gebruikt in deze stap:
    T5 Torx Screwdriver
    $5.49
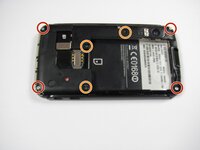
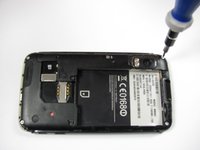
    • Remove the four 5.0 mm T5 Torx screws using a T5 Torx Screwdriver.

    • Remove the three 5.5 mm T5 Torx screws using a T5 Torx Screwdriver.

    • Use gentle force while unscrewing to avoid stripping the screws.

  4. Motorola Atrix 4G Motherboard Replacement: stap 4, afbeelding 1 van 1
    Gereedschap gebruikt in deze stap:
    iFixit Opening Tool
    $1.99
  5. Motorola Atrix 4G Motherboard Replacement: stap 5, afbeelding 1 van 2 Motorola Atrix 4G Motherboard Replacement: stap 5, afbeelding 2 van 2
    Gereedschap gebruikt in deze stap:
    iFixit Opening Tool
    $1.99
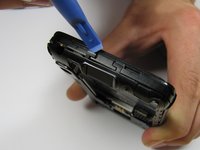
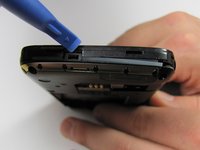
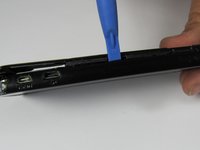
    • Gently lift the tabs located at the top of the phone using an opening tool.

    • Gently lift the tab located at the bottom of the phone with the same tool.

    • Use an opening tool, not your fingers, because the plastic tabs are easily broken.

  6. Motorola Atrix 4G Motherboard Replacement: stap 6, afbeelding 1 van 2 Motorola Atrix 4G Motherboard Replacement: stap 6, afbeelding 2 van 2
    Gereedschap gebruikt in deze stap:
    iFixit Opening Tool
    $1.99
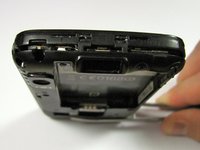
    • Insert an opening tool between the front and back of the case.

    • Slide the tool down the side of the phone.

    • Repeat the same process for the other side.

    • There should be a noticeable gap between the front and back cases. If not, repeat this step.

  7. Motorola Atrix 4G Motherboard Replacement: stap 7, afbeelding 1 van 1
    • Carefully lift the back case off the phone.

    • Do not completely separate the back case from the phone. The antenna is connected to both cases.

  8. Motorola Atrix 4G Motherboard Replacement: stap 8, afbeelding 1 van 1
    Gereedschap gebruikt in deze stap:
    iFixit Opening Tool
    $1.99
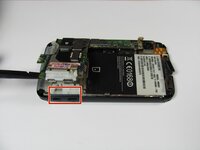
    • Slide an opening tool beneath the antenna and lift straight up from the motherboard.

    • Lift straight upwards, not at an angle, to avoid damaging the socket underneath.

  9. Motorola Atrix 4G Motherboard Replacement: stap 9, afbeelding 1 van 1
    • Ease the antenna from out of its guide along the side of the phone

    • Remove the back case and the antenna from the phone.

    • The antenna is soldered to the back case. When reassembling, do not pull it with too much force.

  10. Motorola Atrix 4G Motherboard Replacement, Motherboard: stap 10, afbeelding 1 van 2 Motorola Atrix 4G Motherboard Replacement, Motherboard: stap 10, afbeelding 2 van 2
    Gereedschap gebruikt in deze stap:
    Spudger
    $3.99
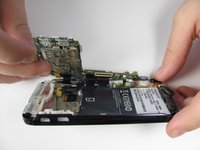
    • Insert a spudger between the black plastic and the motherboard.

    • Lift upwards with the spudger to dislodge the board.

    • The motherboard should lift up easily. If the white rubber piece shifts, move it back to its original place.

  11. Motorola Atrix 4G Motherboard Replacement: stap 11, afbeelding 1 van 1
    Gereedschap gebruikt in deze stap:
    Spudger
    $3.99
    • Disconnect the press connectors using a spudger.

    • If you are unfamiliar with using connectors, consult this guide.

  12. Motorola Atrix 4G Motherboard Replacement: stap 12, afbeelding 1 van 1
    Gereedschap gebruikt in deze stap:
    Spudger
    $3.99
    • Lift the white latch on the ZIF connector using a spudger.

    • Gently pull the black ribbon down and away from the latch.

  13. Motorola Atrix 4G Motherboard Replacement: stap 13, afbeelding 1 van 1
    • There should be five distinct parts of the phone: the back cover, the back case, the front case, the battery, and the motherboard.

Conclusie

To reassemble your device, follow these instructions in reverse order.

5 andere personen hebben deze handleiding voltooid.

Derek Walker

Lid sinds: 04/19/12

297 Reputatie

4 handleidingen geschreven

Team

Cal Poly, Team 9-42, Regan Spring 2012 Lid van Cal Poly, Team 9-42, Regan Spring 2012

CPSU-REGAN-S12S9G42

6 Leden

15 handleidingen geschreven

0 opmerkingen

Voeg opmerking toe

Weergavestatistieken:

Afgelopen 24 uren: 0

Afgelopen 7 dagen: 12

Afgelopen 30 dagen: 29

Altijd: 6,517