Deze versie kan foutieve bewerkingen bevatten. Schakel over naar de recentste gecontroleerde momentopname.
Wat je nodig hebt
-
Deze stap is niet vertaald. Help het te vertalen
-
Remove the following 8 Phillips #1 screws:
-
One 22 mm Phillips #1 in the bottom right corner of the back panel.
-
One 18 mm Phillips #1 in the top middle of the back panel.
-
Six 18 mm Phillips #1 in the rest of the back panel.
-
-
Deze stap is niet vertaald. Help het te vertalen
-
Pull the back panel off of the television by gripping the sides and rotating it down.
-
-
Deze stap is niet vertaald. Help het te vertalen
-
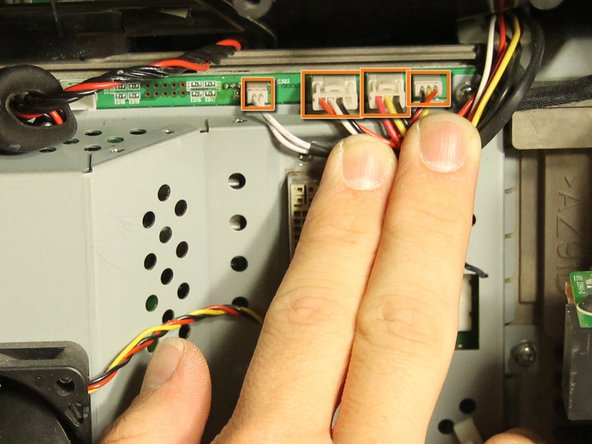
Disconnect the light engine power cable by holding its white tab and pulling straight back.
-
Disconnect the four connections above the black data connection by gently pulling the plugs out of the sockets (some of the connections have a tab that must be pressed when pulling to disconnect).
-
-
Deze stap is niet vertaald. Help het te vertalen
-
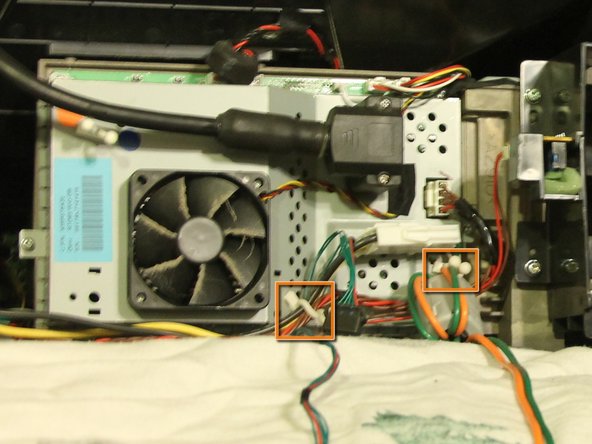
Disconnect lamp ballast power and data connections in front of the light engine by pressing their corresponding tabs and pulling them apart.
-
Release the cables from the white cable ties by twisting the white cable clasps and pulling the cables out of the clasps.
-
-
-
Deze stap is niet vertaald. Help het te vertalen
-
Loosen the two secured Phillips #00 screws securing the black data connection to the light engine.
-
Gently pull the black connector off the light engine.
-
-
Deze stap is niet vertaald. Help het te vertalen
-
Use pliers to remove the two securing bolts from above and below the data port by rotating counterclockwise.
-
Remove the seven 8 mm Phillips #0 screws holding the plate to the light engine board.
-
Gently hold each side of the metal frame and pull it straight back to reveal the board and heat sinks underneath.
-
-
Deze stap is niet vertaald. Help het te vertalen
-
Disconnect the last connection from the light engine by holding the white tab and pulling straight back.
-
-
Deze stap is niet vertaald. Help het te vertalen
-
Remove the two 15 mm Phillips #0 screws holding the DLP heat sink to the light engine board.
-
-
Deze stap is niet vertaald. Help het te vertalen
-
Carefully pull the board to expose the two cables that connect to the back of the board.
-
Use pliers and tweezers to disconnect the ribbon cable by pulling it straight out of its socket and the data connector by holding its tab and pulling it straight back from the board.
-
Replacing the ribbon cable is the hardest step when you reassemble. You'll need to align the board with the bolt holes, and using fingers or tweezers line the ribbon with the slot (which you can't see) and push fairly hard to mate the connector. This cable goes to the color wheel. Be careful not to flip it upside down.
-
Tip: Plugging the holes with some painter's tape may make it harder for the wires to slip into the light engine once detached.
-
-
Deze stap is niet vertaald. Help het te vertalen
-
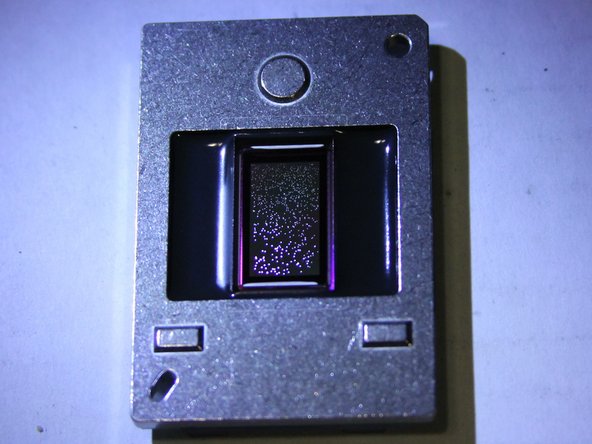
Lay the board facedown on a smooth surface.
-
Use a small flathead screwdriver to turn the locking screw half a turn counterclockwise.
-
Remove DLP chip from the light engine board by pulling it straight back.
-


Annuleren: ik heb deze handleiding niet afgemaakt.
5 andere personen hebben deze handleiding voltooid.
Team

Cal Poly, Team 18-39, Regan Fall 2012 Lid van Cal Poly, Team 18-39, Regan Fall 2012
CPSU-REGAN-F12S18G39
4 Leden
6 handleidingen geschreven
7 opmerkingen
Great guide... I found another similar guide on FixYourDLP website by googling "Replacing the 4719-001997 DLP Chip" and used a merger of both to fix my TV. The big difference was the number of steps and the detail to which both guides follow.
Here is the link:
Thanks to this guide my Mitzubishi TV is as good as new. Bought a DLP chip on line for $130 and used this guide to replace it and no more white dots!
The pictures and steps in this guide perfectly depicted my TV so completed the whole chip replacement in about 1/2 hour. Thanks!