Inleiding
The front brakes on your car do most of the work, often about 70% of the braking force.
Replacing the pads is one of the simplest ways to keep your front brakes working effectively.
Learn how here. Please keep in mind that brake fluid is corrosive to paint so try to keep it from getting on your car's paint. Be sure to rinse it off if any does land on your paint.
When replacing your front pads, be sure to check your rotors for excess wear. If necessary, have the rotor re-surface or replace the rotor along with the pads.
Wat je nodig hebt
-
-
The pad removal process in this guide is performed with the caliper off of the vehicle. The installation process is documented with it on the vehicle. Both procedures can be done with the caliper on the vehicle. The calipers were off of this car for cleaning, since the soft rubber hoses were being replaced too.
-
You'll need to remove your wheels to perform this work.
-
The first step is to remove the brake pad wear sensors. First, disconnect them from the sensor harness bolted to the caliper.
-
Then use a needle nose plier to remove the sensors from the old pads. The wires may break as they did on this set, but you can still grab the sensor body to remove it.
-
These sensors cannot be re-used. They should be replaced with the pads.
-
-
-
Next use a punch and hammer to tap the pad spring retaining springs out of the caliper.
-
Note that there are several styles of springs and pins, depending on the brand of caliper and the age of your W123. Some pins have cotters holding them in place that you would need to remove before punching them out. See the rear brake pad replacement guide to see this style.
-
-
-
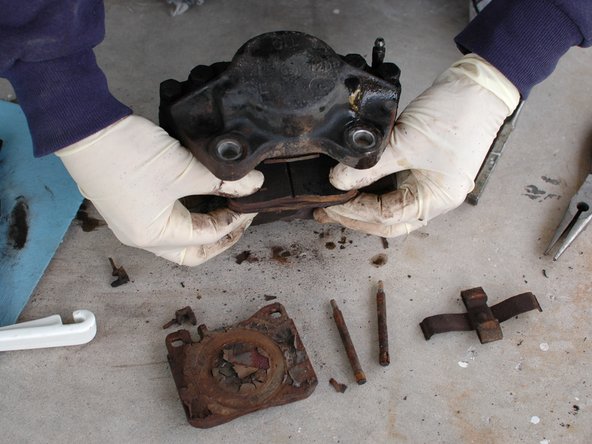
The old pads can now be slid out of the caliper. With the caliper off of the car they can slip out either direction. With the caliper on the car they will only slip out away from the brake rotor.
-
If your pads look this dirty and rusty upon removal, consider removing the calipers for inspection and cleaning.
-
-
-
-
Now that the pads are removed you will need to move the pistons in the caliper back so that the new, thicker pads will fit in.
-
First, you should remove a bit of brake fluid from the system. As the old pads wore down, there was room for more fluid in the system and the level was likely topped off. With the new thicker pads in place there will be more fluid in the system that there is room for, potentially.
-
Begin with this process by removing the cap on the brake fluid reservoir.
-
-
-
With some fluid removed and the top left off of the brake fluid reservoir, use a large pry tool to gently pry the pistons back in to the body of the caliper.
-
Always use the flat surface of the pry, never the tip, and try to push the piston back in as straight and evenly as possible.
-
Alternately, you can purchase the proper brake caliper piston compression tool from Mercedes...but this pry bar technique works if you are careful.
-
Repeat this on all four pistons. Watch the brake fluid level as your proceed to ensure it does not overflow the reservoir. Remove more if necessary.
-
-
-
Tap them in with a hammer, finishing with a punch to get them all the way in.
-
These pins are a compression fit. Your pins may have cotters that hold them in place. If you had to remove cotters in order to get the pins out, be sure to use cotters in the same manner when you re-install them.
-
-
-
Then push your new brake pad sensors in to the holes made for them in the pads. There is one hole on each pad. Make sure the sensor seats in the clip on the top of the pad securely.
-
Then push the tips of the sensor in to the sensor harness that is bolted to the caliper.
-
Be certain to top off the brake fluid reservoir before driving, if necessary.
-


When you've finished, go for a test drive. Be sure to follow the bedding-in procedures from the manufacturer of your pads to ensure maximum performance. In many cases, this means moderate driving for the first 500 miles or so, with no aggressive stops. However, check with the manufacturer.
When you've finished, go for a test drive. Be sure to follow the bedding-in procedures from the manufacturer of your pads to ensure maximum performance. In many cases, this means moderate driving for the first 500 miles or so, with no aggressive stops. However, check with the manufacturer.
Annuleren: ik heb deze handleiding niet afgemaakt.
18 andere personen hebben deze handleiding voltooid.

Team
