Ga door naar hoofdinhoud
Word lid van de reparatiegemeenschap - Account aanmaken

Marco UP Series Electric Pump Electronic Sensor Replacement

Wat je nodig hebt

  1. Marco UP Series Electric Pump Electronic Sensor Replacement, Prepare the tools: stap 1, afbeelding 1 van 1
    • The additional sensor with the joint and the heat shrink tubing is available as a replacement kit on www.marco.it .

    • Kits are only available as a registered user, and can be seen for each pump in their dedicated tab on the page.

    Vraag FixBot
  2. Marco UP Series Electric Pump Electronic Sensor Replacement, Cut the plastic tie: stap 2, afbeelding 1 van 1
    • Free the cables by cutting the plastic tie.

    • Don't cut the cables that connect the sensor to the pump.

    • Dont' damage the cables' insulation while cutting the plastic tie.

    Vraag FixBot
  3. Marco UP Series Electric Pump Electronic Sensor Replacement, Cut the joint between the sensor and the motor: stap 3, afbeelding 1 van 2 Marco UP Series Electric Pump Electronic Sensor Replacement, Cut the joint between the sensor and the motor: stap 3, afbeelding 2 van 2
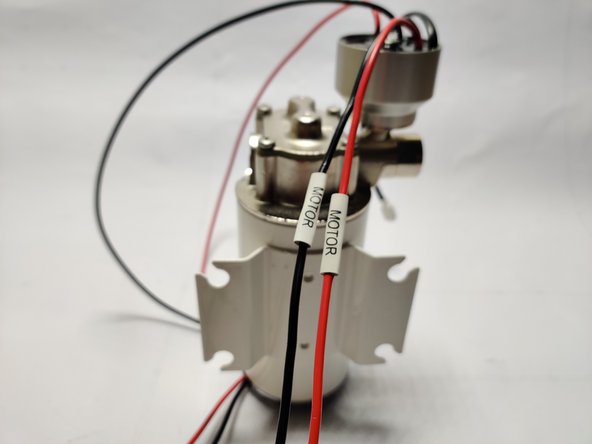
    • Use the pliers to cut the red and black cables before and after the joint.

    Vraag FixBot
  4. Marco UP Series Electric Pump Electronic Sensor Replacement, Remove the old sensor: stap 4, afbeelding 1 van 2 Marco UP Series Electric Pump Electronic Sensor Replacement, Remove the old sensor: stap 4, afbeelding 2 van 2
    • Use the 17mm wrench to unscrew the sensor.

    Vraag FixBot
  5. Marco UP Series Electric Pump Electronic Sensor Replacement, Screw in the new sensor: stap 5, afbeelding 1 van 3 Marco UP Series Electric Pump Electronic Sensor Replacement, Screw in the new sensor: stap 5, afbeelding 2 van 3 Marco UP Series Electric Pump Electronic Sensor Replacement, Screw in the new sensor: stap 5, afbeelding 3 van 3
    • Screw the new sensor by hand for the initial part.

    Vraag FixBot
  6. Marco UP Series Electric Pump Electronic Sensor Replacement, Tighten the sensor: stap 6, afbeelding 1 van 1
    • Use the wrench to tighten it in place.

    • Don't over-tighten the screw!

    • Don't add PTFE tape on the screw: there's already an o-ring to seal the connection and it may cause problems to the non-return valve (check valve) underneath.

    Vraag FixBot
  7. Marco UP Series Electric Pump Electronic Sensor Replacement, Check how long you want to strip off the cable: stap 7, afbeelding 1 van 1
    • Use the joint as a reference on how much you need to remove.

    • Keep in mind that you want to have as much wire inside as possible, but you want to avoid that the peeled wire exits the joint.

    Vraag FixBot
    • Use the cutting plier or (if you have it) the stripping plier to remove the sheath.

    • Try to be careful: you don't want to cut the wires inside, especially on the larger pumps.

    Vraag FixBot
  8. Marco UP Series Electric Pump Electronic Sensor Replacement, Insert the heat shrink tubing: stap 9, afbeelding 1 van 3 Marco UP Series Electric Pump Electronic Sensor Replacement, Insert the heat shrink tubing: stap 9, afbeelding 2 van 3 Marco UP Series Electric Pump Electronic Sensor Replacement, Insert the heat shrink tubing: stap 9, afbeelding 3 van 3
    • Insert the heat shink tubing on both motor's cables.

    Vraag FixBot
  9. Marco UP Series Electric Pump Electronic Sensor Replacement, Insert the metal joints: stap 10, afbeelding 1 van 1
    • The cable has to be totally inside the metal joint: if you have a longer peeled cable, cut it a little to have it aligned as in picture.

    • Don't insert the plastic sheath inside the metal joint: it worsens the connection and may cause overheating in the large pumps!

    Vraag FixBot
  10. Marco UP Series Electric Pump Electronic Sensor Replacement, Press the metal joint: stap 11, afbeelding 1 van 3 Marco UP Series Electric Pump Electronic Sensor Replacement, Press the metal joint: stap 11, afbeelding 2 van 3 Marco UP Series Electric Pump Electronic Sensor Replacement, Press the metal joint: stap 11, afbeelding 3 van 3
    • Start on the motor side, and press the metal joint on the cable.

    • To have a stronger force in closing the joint use the internal part of the plier, as showed in the picture.

    • Proceed with by inserting the other end, the short cable coming from the sensor.

    • Repeat the process also for the other cable.

    Vraag FixBot
  11. Marco UP Series Electric Pump Electronic Sensor Replacement, Cover the metal joints with the heat shrink tubing: stap 12, afbeelding 1 van 3 Marco UP Series Electric Pump Electronic Sensor Replacement, Cover the metal joints with the heat shrink tubing: stap 12, afbeelding 2 van 3 Marco UP Series Electric Pump Electronic Sensor Replacement, Cover the metal joints with the heat shrink tubing: stap 12, afbeelding 3 van 3
    • Insert the heat shrink tubing.

    • Make sure that it covers perfectly the joint (it must be centered!) on both ends .

    Vraag FixBot
  12. Marco UP Series Electric Pump Electronic Sensor Replacement, Heat the tubes: stap 13, afbeelding 1 van 2 Marco UP Series Electric Pump Electronic Sensor Replacement, Heat the tubes: stap 13, afbeelding 2 van 2
    • Heat the tubes until they shink on the joint evenly.

    • Don't heat too much: you may melt the cables.

    • If you don't have a heat gun, you may also use a lighter, but don't touch the plastic with the flame: keep some distance.

    Vraag FixBot
  13. Marco UP Series Electric Pump Electronic Sensor Replacement, Loop the wires: stap 14, afbeelding 1 van 3 Marco UP Series Electric Pump Electronic Sensor Replacement, Loop the wires: stap 14, afbeelding 2 van 3 Marco UP Series Electric Pump Electronic Sensor Replacement, Loop the wires: stap 14, afbeelding 3 van 3
    • Loop the wires as shown in the pictures.

    Vraag FixBot
  14. Marco UP Series Electric Pump Electronic Sensor Replacement, Add the plastic strap: stap 15, afbeelding 1 van 3 Marco UP Series Electric Pump Electronic Sensor Replacement, Add the plastic strap: stap 15, afbeelding 2 van 3 Marco UP Series Electric Pump Electronic Sensor Replacement, Add the plastic strap: stap 15, afbeelding 3 van 3
    • Fix the cables using the plastic strap.

    • Cut the excess of the plastic strap using the cutting pliers.

    Vraag FixBot
  15. Marco UP Series Electric Pump Electronic Sensor Replacement, You're done!: stap 16, afbeelding 1 van 1
    • You can now enjoy your updated sensor!

    Vraag FixBot
Eindstreep

2 andere personen hebben deze handleiding voltooid.

Marco Spa

Lid sinds: 12/04/15

1.531 Reputatie

5 handleidingen geschreven

1Gids Commentaar

Hello. Does this pumps works the same in horizontal or verItical position?

I have an horizontal installation and we always have air leaks to circuit problems.

Kind regards

Juan Correa - Antwoord Deel

Voeg opmerking toe

Weergavestatistieken:

Afgelopen 24 uren: 2

Afgelopen 7 dagen: 17

Afgelopen 30 dagen: 94

Altijd: 4,635