Inleiding
Use this guide to replace a broken trackpad.
Wat je nodig hebt
-
-
With the case closed, place the Unibody top-side down on a flat surface.
-
Depress the grooved side of the access door release latch enough to grab the free end. Lift the release latch until it is vertical.
-
-
-
Grab the white plastic tab and pull the battery up and out of the Unibody.
Great tutorial ! great step !
-
-
-
Remove the following eight screws securing the lower case to the chassis:
-
One 3 mm Phillips screw.
-
Three 13.5 mm Phillips screws.
-
Four 3.5 mm Phillips screws.
Make sure you have a good quality Phillips screwdriver. Mine had removable tips and had a small play at the connection. As a result I didn't have a good feel and damaged my screws (those securing the fan and the top left in step 23). Game over for me installing new thermal paste...
Be very carefull with your screws! Especially those on the inside.
You can get away with a Phillips #00 for many of the screws involved but the 4 at the bottom case split are likely to strip if you don’t use a JIS #00 or, in a pinch, a Phillips #000.
I used the Phillips #00 tip from my Pro Tech Toolkit, and it worked well enough. But yes, maybe #000 might have been better on the lower row of screws. Note to myself: Always read the comments first.
When replacing these screws, the order to replace them in is as follows:
1, Top left
2. Top right
3. Top center-left
4. Top center-right
5. Bottom center-right
6. Bottom center-left
7. Bottom right
8. Bottom left
I hope this information is helpful.
I followed my usual process of putting in all the screws loosely, then tightening them gradually in distributed pattern, to help ensure that the panel settles in place evenly. But maybe some orders are better.
-
-
-
Using both hands, lift and remove the lower case off the upper case.
Thanks for the guide!
It's implicit in the two photos, but worth mentioning because it blocked my progress in this step for a bit: You have to put the release latch back into its horizontal, closed position before you can lift off the lower-case panel.
-
-
-
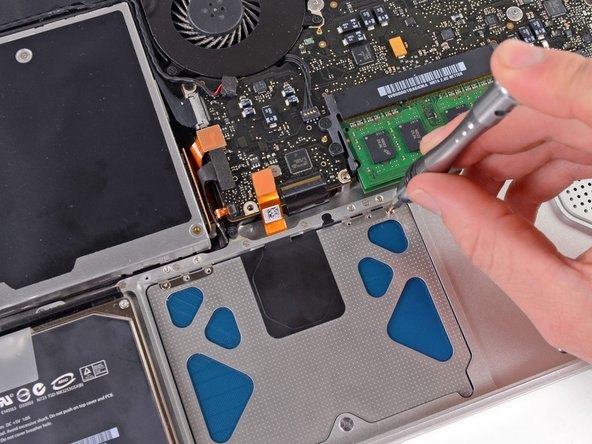
Remove the four 10.3 mm Phillips screws securing the mid wall to the upper case.
-
-
-
-
Remove the two 5 mm Phillips screws securing the keyboard flex bracket to the upper case.
-
Lift the keyboard flex bracket out of the upper case.
-
-
-
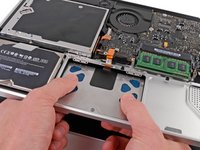
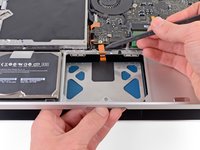
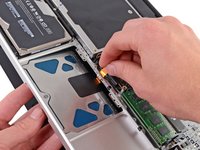
Remove the six 1.4 mm Y0 Tri-point screws securing the trackpad to the upper case.
These screw heads/slots are nasty small! I ordered the special screw driver with the trackpad because I didn’t have it, but it really doesn’t seem to be small enough to do the job properly. I guess I’ll blame Apple for the screws, but be warned that it is a stretch to get these screws out with the driver. I stripped 2 of the screws and had to drill the heads off them. Fortunately I had 4 left to reassemble the trackpad! Maybe iFixit should provide some of these screws, since they are so easily damaged.
-
-
-
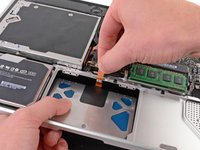
Pull the trackpad away from the outer edge of the upper case.
-
Remove the old trackpad and set it aside.
Immediately after step 12, it is possible to replace the two brackets that secure the upper edge of the trackpad in the top case of the MacBook (from which the six 1.4 mm Y0 tri-point screws were removed in step 10). My replacement trackpad was supplied with spare brackets, so I was able to replace one that was bent out of shape.
-
-
-
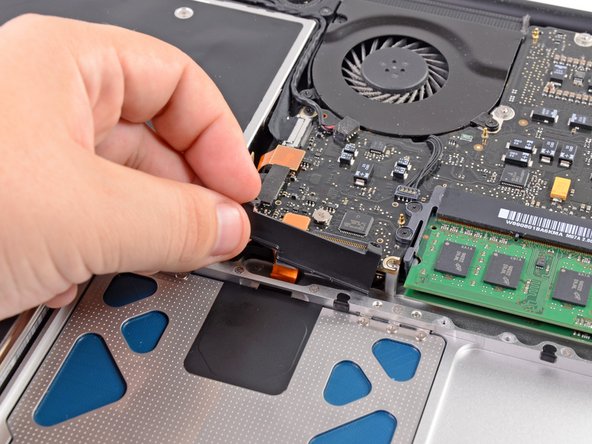
Carefully insert the cable from your new trackpad through its slot cut into the upper case.
-
Use one hand to hold the trackpad cable in place as you insert the two retaining tabs on the outer edge of the trackpad under the lip on the upper case.
-
Pull the trackpad cable as you seat the trackpad into its void in the upper case.
-
-
-
Tighten the outer two screws along the inner edge of the trackpad and check the alignment of it on the outer side of the upper case.
-
If its alignment looks good, install the rest of the Tri-point screws along the inner edge of the trackpad.
-
Before reassembling your machine, verify that the set screw is still installed in a position so the mouse will click correctly.
Overall this helped me alot. I was using the iFixit tool kit to make this repair. The Y-drive in this kit (only one in kit) was too small for the battery removal screws. I also made the mistake of tightening the trackpad screw too tight (Step 15) the first time and then had to take it apart and reassemble again. Overall very good descriptive procedure. Our A1278 was a 2011 model and had a few holders and guides that were slightly different than these directions but it still was very informative. Cheers and thanks. Peter V.
-


To reassemble your device, follow these instructions in reverse order.
To reassemble your device, follow these instructions in reverse order.
Annuleren: ik heb deze handleiding niet afgemaakt.
59 andere personen hebben deze handleiding voltooid.

12 opmerkingen
The one thing I would be interested in: Where can I get the screwdriver this person is using in step 15? By this I am not referring to the low quality tools that are advertised alongside the tutorial.
--> can answer my own question. This is it: http://www.ifixit.com/Tools/Pro-Tech-Too...
Before going to the trouble and expense of removing the trackpad make sure you don't just have a problem with the battery. My trackpad was giving me fits by not responding or needing excessive pressure, etc. The only problem was that the battery was swollen and putting pressure up on the trackpad. Replaced the battery and the problem was solved.
I agree with Rich M - check the battery first! Swollen battery will impede the trackpad.
awesome instructions, thank you!
Moin,
mein Vorgänger sollte seinen Hut essen, derY0 Tri-Point passt einwandfrei!
Es ist eine großartige Anleitung, ich habe lediglich eine halbe Stunde benötigt!!! Vielen Dank!
If you have a Harbor Freight Tools near you, they carry a kit that includes the Y0 Tri-Point:
Great guide - took me about 25 minutes to replace my trackpad. I didn't follow step 13 as I simply kept the existing Y1 tri-point screw in place without any adjustment and the click felt fine. Routing the cable through the slot in step 14 requires a little care to avoid damage but isn't too tricky. At step 15, I noted that my trackpad was well aligned, so I replaced and fully tightened all of the screws and skipped steps 16 onwards, simply re-assembling all the other components in the order I took them out.
This is not a a1278 unibody MacBook Pro. A1278 MacBooks backs are one solid metal piece not two separate pieces. This guide is for a different MacBook Pro.
Brad Burgeson - Antwoord
This guide isn’t for a pro; it’s a MacBook unibody.
Nicholas -
So, it turns out that Apple used the model code A1278 for quite a few different Mac models, including both Pro and non-Pro versions! This guide is for the non-Pro Macbooks. There’s also one for the Pro models with the same A1278 identifier.
tempelmann - Antwoord