Ga door naar hoofdinhoud
Word lid van de reparatiegemeenschap - Account aanmaken

MacBook Pro 17" Models A1151 A1212 A1229 and A1261 Upper Case Replacement

Wat je nodig hebt

  1. MacBook Pro 17" Models A1151 A1212 A1229 and A1261 Upper Case Replacement, Battery: stap 1, afbeelding 1 van 1
    • Use your fingers to push both battery release tabs away from the battery and lift the battery out of the computer.

    Vraag FixBot

    Voeg opmerking toe

  2. MacBook Pro 17" Models A1151 A1212 A1229 and A1261 Upper Case Replacement, RAM Shield: stap 2, afbeelding 1 van 1
    • Remove the four identical Phillips 3.4 mm screws from the memory door. These screws have 4 mm diameter heads rather than the 3 mm heads on the body screws.

    Vraag FixBot

    Voeg opmerking toe

  3. MacBook Pro 17" Models A1151 A1212 A1229 and A1261 Upper Case Replacement: stap 3, afbeelding 1 van 1
    • Lift the memory door up enough to get a grip on it, and slide it toward you, pulling it away from the casing.

    Vraag FixBot

    Voeg opmerking toe

  4. MacBook Pro 17" Models A1151 A1212 A1229 and A1261 Upper Case Replacement, Upper Case: stap 4, afbeelding 1 van 1
    • Remove the three Phillips screws in the battery compartment near the latch. Apple was nice enough to tilt these screws at a slight angle to make them easier to remove. On the A1261 these screws have 4 mm diameter heads rather than the 3 mm heads on the body screws.

    Vraag FixBot

    Voeg opmerking toe

  5. MacBook Pro 17" Models A1151 A1212 A1229 and A1261 Upper Case Replacement: stap 5, afbeelding 1 van 1
    • Remove the following six screws:

    • Two 14.5 mm T6 Torx screws on either side of the RAM slot.

    • Four 3.4 mm Phillips screws along the hinge.

    Vraag FixBot

    Voeg opmerking toe

  6. MacBook Pro 17" Models A1151 A1212 A1229 and A1261 Upper Case Replacement: stap 6, afbeelding 1 van 1
    • Remove the four 3.4 mm Phillips screws on the port side of the computer.

    Vraag FixBot

    Voeg opmerking toe

  7. MacBook Pro 17" Models A1151 A1212 A1229 and A1261 Upper Case Replacement: stap 7, afbeelding 1 van 1
    • Rotate the computer 90 degrees and remove the two Phillips screws from the rear of the computer.

    Vraag FixBot

    Voeg opmerking toe

  8. MacBook Pro 17" Models A1151 A1212 A1229 and A1261 Upper Case Replacement: stap 8, afbeelding 1 van 1
    • Rotate the computer 90 degrees again and remove the four Phillips screws from the side of the computer.

    Vraag FixBot

    Voeg opmerking toe

  9. MacBook Pro 17" Models A1151 A1212 A1229 and A1261 Upper Case Replacement: stap 9, afbeelding 1 van 1
    • Do not yank the upper case off quickly. The case is attached to the logic board via a ribbon cable.

    • Lift up the back of the case and work your fingers along the sides, freeing the case as you go. Once you have freed the sides, you may need to rock the case up and down to free the front of the upper case.

    Vraag FixBot

    Voeg opmerking toe

  10. MacBook Pro 17" Models A1151 A1212 A1229 and A1261 Upper Case Replacement: stap 10, afbeelding 1 van 1
    • Disconnect the trackpad and keyboard ribbon cable from the logic board.

    • Remove the upper case.

    Vraag FixBot

    Voeg opmerking toe

  11. MacBook Pro 17" Models A1151 A1212 A1229 and A1261 Upper Case Replacement, Upper Case: stap 11, afbeelding 1 van 1
    • Use a spudger to pry up the translucent plastic sheath covering the keyboard connector.

    Vraag FixBot

    Voeg opmerking toe

  12. MacBook Pro 17" Models A1151 A1212 A1229 and A1261 Upper Case Replacement: stap 12, afbeelding 1 van 1
    • Use the tip of a spudger to flip up the black plastic flaps locking down the keyboard and keyboard backlight ribbon cables.

    Vraag FixBot

    Voeg opmerking toe

  13. MacBook Pro 17" Models A1151 A1212 A1229 and A1261 Upper Case Replacement: stap 13, afbeelding 1 van 1
    • Slide the orange keyboard backlight ribbon out of its connector.

    Vraag FixBot

    Voeg opmerking toe

  14. MacBook Pro 17" Models A1151 A1212 A1229 and A1261 Upper Case Replacement: stap 14, afbeelding 1 van 1
    • Peel up the orange tape covering the keyboard backlight connector.

    Vraag FixBot

    Voeg opmerking toe

  15. MacBook Pro 17" Models A1151 A1212 A1229 and A1261 Upper Case Replacement: stap 15, afbeelding 1 van 1
    • Use the tip of a spudger to flip up the brown plastic flap locking down the keyboard backlight ribbon cable.

    Vraag FixBot

    Voeg opmerking toe

  16. MacBook Pro 17" Models A1151 A1212 A1229 and A1261 Upper Case Replacement: stap 16, afbeelding 1 van 1
    • Use a spudger or your finger to slide the keyboard backlight ribbon out of its connector.

    Vraag FixBot

    Voeg opmerking toe

  17. MacBook Pro 17" Models A1151 A1212 A1229 and A1261 Upper Case Replacement: stap 17, afbeelding 1 van 1
    • Carefully peel up the orange ribbon cable which carries the power and sleep signals.

    Vraag FixBot

    Voeg opmerking toe

  18. MacBook Pro 17" Models A1151 A1212 A1229 and A1261 Upper Case Replacement: stap 18, afbeelding 1 van 1
    • Peel up the two black protective sheaths on the bottom of the keyboard. It is not necessary to fully remove these, but only to peel them back enough to access the screws beneath.

    Vraag FixBot

    Voeg opmerking toe

  19. MacBook Pro 17" Models A1151 A1212 A1229 and A1261 Upper Case Replacement: stap 19, afbeelding 1 van 2 MacBook Pro 17" Models A1151 A1212 A1229 and A1261 Upper Case Replacement: stap 19, afbeelding 2 van 2
    • If you have a MacBook Pro 17" Model A1151 or A1212, refer to the first picture to remove the ten identical Phillips screws attaching the keyboard to the casing.

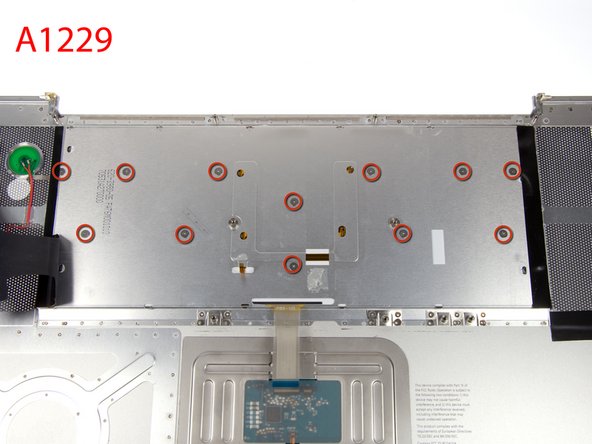
    • If you have a MacBook Pro 17" Model A1229, refer to the second picture to remove the twelve identical Phillips screws attaching the keyboard to the casing.

    Vraag FixBot

    Voeg opmerking toe

  20. MacBook Pro 17" Models A1151 A1212 A1229 and A1261 Upper Case Replacement: stap 20, afbeelding 1 van 2 MacBook Pro 17" Models A1151 A1212 A1229 and A1261 Upper Case Replacement: stap 20, afbeelding 2 van 2
    • If you have a MacBook Pro 17" Model A1151 or A1212, refer to the first picture. There are four locking tabs along the back edge of the keyboard holding it in place. These tabs must be straightened before you can remove the keyboard.

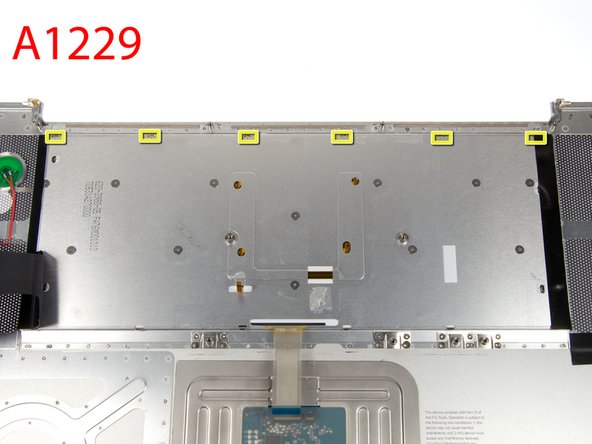
    • If you have a MacBook Pro 17" Model A1229, refer to the first picture. There are six locking tabs along the back edge of the keyboard holding it in place. These tabs must be straightened before you can remove the keyboard.

    Vraag FixBot

    Voeg opmerking toe

  21. MacBook Pro 17" Models A1151 A1212 A1229 and A1261 Upper Case Replacement: stap 21, afbeelding 1 van 1
    • The first frame shows a tab in the "locked" position and the second frame shows the same tab in the "unlocked" position.

    • Use needlenose pliers or a spudger to bend each of the four tabs so that they are all in the "unlocked" position.

    Vraag FixBot

    Voeg opmerking toe

  22. MacBook Pro 17" Models A1151 A1212 A1229 and A1261 Upper Case Replacement: stap 22, afbeelding 1 van 1
    • Slide the keyboard ribbon out of its connector.

    • If the keyboard ribbon won't slide out, make sure that the black plastic flap holding the ribbon in place is vertical.

    Vraag FixBot

    Voeg opmerking toe

  23. MacBook Pro 17" Models A1151 A1212 A1229 and A1261 Upper Case Replacement: stap 23, afbeelding 1 van 1
    • Place the upper casing on its edge and use a spudger to push the keyboard away from the casing, poking the spudger through the central keyboard screw hole. Grasp the keyboard as it separates from the casing.

    Vraag FixBot

    Voeg opmerking toe

  24. MacBook Pro 17" Models A1151 A1212 A1229 and A1261 Upper Case Replacement: stap 24, afbeelding 1 van 1
    • Maintaining your hold on the keyboard, lay the casing flat and gently bow the keyboard until the two tabs on either side of the keyboard come free.

    • Slide the keyboard away from the trackpad and out of the upper case.

    Vraag FixBot

    Voeg opmerking toe

  25. MacBook Pro 17" Models A1151 A1212 A1229 and A1261 Upper Case Replacement: stap 25, afbeelding 1 van 1
    • Upper case remains.

    • To install your replacement upper case, install your current keyboard into the replacement case and reassemble your computer.

    Vraag FixBot

    Voeg opmerking toe

Conclusie

To reassemble your device, follow these instructions in reverse order.

Annuleren: ik heb deze handleiding niet afgemaakt.

16 andere personen hebben deze handleiding voltooid.

iRobot

Lid sinds: 09/24/09

1 Reputatie

636 handleidingen geschreven

0Gids Commentaar

Voeg opmerking toe

Weergavestatistieken:

Afgelopen 24 uren: 1

Afgelopen 7 dagen: 13

Afgelopen 30 dagen: 85

Altijd: 24,845