Deze versie kan foutieve bewerkingen bevatten. Schakel over naar de recentste gecontroleerde momentopname.
Wat je nodig hebt
-
Deze stap is niet vertaald. Help het te vertalen
-
Use your fingers to push both battery release tabs away from the battery and lift the battery out of the computer.
-
-
Deze stap is niet vertaald. Help het te vertalen
-
Remove the four identical Phillips 3.4 mm screws from the memory door. These screws have 4 mm diameter heads rather than the 3 mm heads on the body screws.
-
-
Deze stap is niet vertaald. Help het te vertalen
-
Lift the memory door up enough to get a grip on it, and slide it toward you, pulling it away from the casing.
-
-
Deze stap is niet vertaald. Help het te vertalen
-
Remove the three Phillips screws in the battery compartment near the latch. Apple was nice enough to tilt these screws at a slight angle to make them easier to remove. On the A1261 these screws have 4 mm diameter heads rather than the 3 mm heads on the body screws.
-
-
Deze stap is niet vertaald. Help het te vertalen
-
Remove the following six screws:
-
Two 14.5 mm T6 Torx screws on either side of the RAM slot.
-
Four 3.4 mm Phillips screws along the hinge.
-
-
-
Deze stap is niet vertaald. Help het te vertalen
-
Remove the four 3.4 mm Phillips screws on the port side of the computer.
-
-
Deze stap is niet vertaald. Help het te vertalen
-
Rotate the computer 90 degrees and remove the two Phillips screws from the rear of the computer.
-
-
Deze stap is niet vertaald. Help het te vertalen
-
Rotate the computer 90 degrees again and remove the four Phillips screws from the side of the computer.
-
-
Deze stap is niet vertaald. Help het te vertalen
-
Lift up the back of the case and work your fingers along the sides, freeing the case as you go. Once you have freed the sides, you may need to rock the case up and down to free the front of the upper case.
-
-
Deze stap is niet vertaald. Help het te vertalen
-
Disconnect the trackpad and keyboard ribbon cable from the logic board.
-
Remove the upper case.
-
-
Deze stap is niet vertaald. Help het te vertalen
-
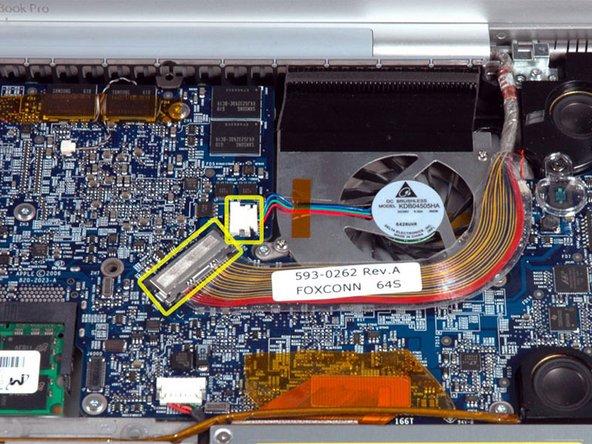
Disconnect the display data cable and right fan cable from the logic board.
-
-
Deze stap is niet vertaald. Help het te vertalen
-
Remove the three silver T6 Torx screws securing the right fan.
-
-
Deze stap is niet vertaald. Help het te vertalen
-
Lift the right fan and its metal bracket out of the logic board.
-


Annuleren: ik heb deze handleiding niet afgemaakt.
82 andere personen hebben deze handleiding voltooid.

3 opmerkingen
-thanks for the tips and prompt delivery to Canada from ifixit.com...took me 5 minutes. Use a tweezer with one hand as I did in the video ( http://goo.gl/3EZ5N5)
-recommend placing he mac on a soft towel to prevent scratches.
-Use precision screwdrivers (http://goo.gl/qRK4IF)
-use a compressed air canister to clean surrounding areas
Works like a charm now...