Ga door naar hoofdinhoud

MacBook Pro 17" Models A1151 A1212 A1229 and A1261 Right Fan Replacement

Wat je nodig hebt

  1. MacBook Pro 17" Models A1151 A1212 A1229 and A1261 Right Fan Replacement, Battery: stap 1, afbeelding 1 van 1
    • Use your fingers to push both battery release tabs away from the battery and lift the battery out of the computer.

  2. MacBook Pro 17" Models A1151 A1212 A1229 and A1261 Right Fan Replacement, RAM Shield: stap 2, afbeelding 1 van 1
    • Remove the four identical Phillips 3.4 mm screws from the memory door. These screws have 4 mm diameter heads rather than the 3 mm heads on the body screws.

  3. MacBook Pro 17" Models A1151 A1212 A1229 and A1261 Right Fan Replacement: stap 3, afbeelding 1 van 1
    • Lift the memory door up enough to get a grip on it, and slide it toward you, pulling it away from the casing.

  4. MacBook Pro 17" Models A1151 A1212 A1229 and A1261 Right Fan Replacement, Upper Case: stap 4, afbeelding 1 van 1
    • Remove the three Phillips screws in the battery compartment near the latch. Apple was nice enough to tilt these screws at a slight angle to make them easier to remove. On the A1261 these screws have 4 mm diameter heads rather than the 3 mm heads on the body screws.

  5. MacBook Pro 17" Models A1151 A1212 A1229 and A1261 Right Fan Replacement: stap 5, afbeelding 1 van 1
    • Remove the following six screws:

    • Two 14.5 mm T6 Torx screws on either side of the RAM slot.

    • Four 3.4 mm Phillips screws along the hinge.

  6. MacBook Pro 17" Models A1151 A1212 A1229 and A1261 Right Fan Replacement: stap 6, afbeelding 1 van 1
    • Remove the four 3.4 mm Phillips screws on the port side of the computer.

  7. MacBook Pro 17" Models A1151 A1212 A1229 and A1261 Right Fan Replacement: stap 7, afbeelding 1 van 1
    • Rotate the computer 90 degrees and remove the two Phillips screws from the rear of the computer.

  8. MacBook Pro 17" Models A1151 A1212 A1229 and A1261 Right Fan Replacement: stap 8, afbeelding 1 van 1
    • Rotate the computer 90 degrees again and remove the four Phillips screws from the side of the computer.

  9. MacBook Pro 17" Models A1151 A1212 A1229 and A1261 Right Fan Replacement: stap 9, afbeelding 1 van 1
    • Do not yank the upper case off quickly. The case is attached to the logic board via a ribbon cable.

    • Lift up the back of the case and work your fingers along the sides, freeing the case as you go. Once you have freed the sides, you may need to rock the case up and down to free the front of the upper case.

  10. MacBook Pro 17" Models A1151 A1212 A1229 and A1261 Right Fan Replacement: stap 10, afbeelding 1 van 1
    • Disconnect the trackpad and keyboard ribbon cable from the logic board.

    • Remove the upper case.

  11. MacBook Pro 17" Models A1151 A1212 A1229 and A1261 Right Fan Replacement, Right Fan: stap 11, afbeelding 1 van 2 MacBook Pro 17" Models A1151 A1212 A1229 and A1261 Right Fan Replacement, Right Fan: stap 11, afbeelding 2 van 2
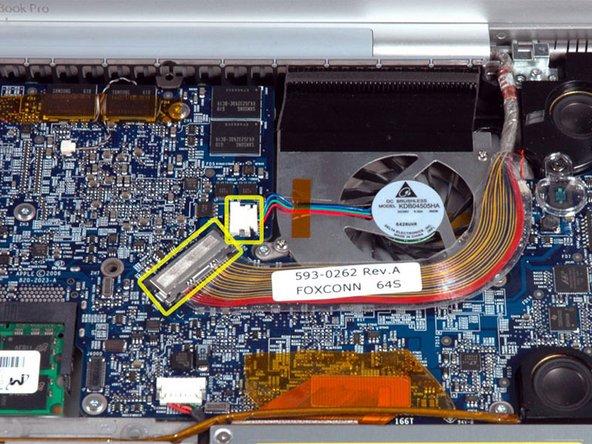
    • Disconnect the display data cable and right fan cable from the logic board.

    • If you have a MacBook Pro 17" Model A1229 or A1212, the connectors have different compositions and are highlighted in the second picture.

    • For models A1229 and/or A1212, carefully wedge the flat end of a spudger underneath the right fan cable to pry it up off its socket. Failure to do so may result in the whole socket coming off the motherboard instead of just the cable.

  12. MacBook Pro 17" Models A1151 A1212 A1229 and A1261 Right Fan Replacement: stap 12, afbeelding 1 van 1
    • Remove the three silver T6 Torx screws securing the right fan.

  13. MacBook Pro 17" Models A1151 A1212 A1229 and A1261 Right Fan Replacement: stap 13, afbeelding 1 van 1
    • Lift the right fan and its metal bracket out of the logic board.

Conclusie

To reassemble your device, follow these instructions in reverse order.

82 andere personen hebben deze handleiding voltooid.

iRobot

Lid sinds: 09/24/09

1 Reputatie

636 handleidingen geschreven

3 opmerkingen

Easy job, super guide, vacuum the the cooling grill when fan is out, changed both fans, because one fan got very loud, it's a 2007 Mac book Pro, so no reason not to change both, went from 6000 rpm to 3000 rpm, nice, big thanx to ifixit…

jjhomann - Antwoord

-thanks for the tips and prompt delivery to Canada from ifixit.com...took me 5 minutes. Use a tweezer with one hand as I did in the video ( http://goo.gl/3EZ5N5)

-recommend placing he mac on a soft towel to prevent scratches.

-Use precision screwdrivers (http://goo.gl/qRK4IF)

-use a compressed air canister to clean surrounding areas

Works like a charm now...

SRIBULUSU - Antwoord

do you know if is it needed to change the black tape, how do i replace it?

where can you find the same tape?

i have done that but the fan is no more sticking to anything.. help!

jacopo - Antwoord

Voeg opmerking toe

Weergavestatistieken:

Afgelopen 24 uren: 0

Afgelopen 7 dagen: 4

Afgelopen 30 dagen: 15

Altijd: 44,694