Ga door naar hoofdinhoud

MacBook Pro 15" Unibody Mid 2009 Optical Drive Replacement

Alleen vereisten
Deze handleiding is alleen bedoeld als vereiste voor andere handleidingen. Het staat niet op zichzelf.

Wat je nodig hebt

  1. MacBook Pro 15" Unibody Mid 2009 Optical Drive Replacement, Optical Drive: stap 1, afbeelding 1 van 1
    • Apple sticks a small strip of clear plastic with adhesive applied to one side to the logic board behind the camera cable connector to keep it in its socket. When moving it out of the way, be sure not to break any surface-mount components off the logic board.

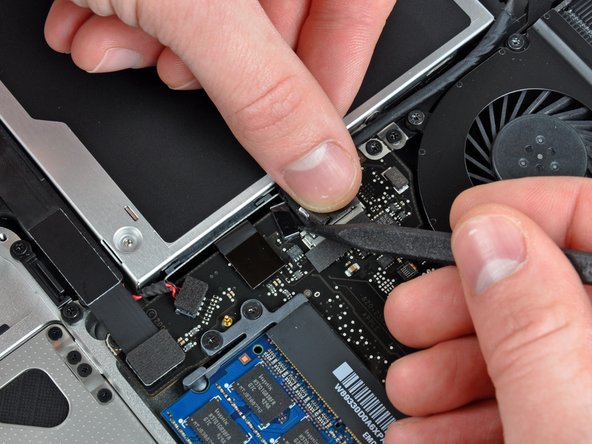
    • Hold the end of the cable retainer down with one finger while you use the tip of a spudger to slightly lift the other end and rotate it away from the camera cable connector.

    I found it quite easy to carefully remove the drive from under the camera cable without disconnecting it, and guide the new drive back in under. It saved time and the danger of damaging those fragile connectors.

    Glenn Richards - Antwoord

  2. MacBook Pro 15" Unibody Mid 2009 Optical Drive Replacement: stap 2, afbeelding 1 van 2 MacBook Pro 15" Unibody Mid 2009 Optical Drive Replacement: stap 2, afbeelding 2 van 2
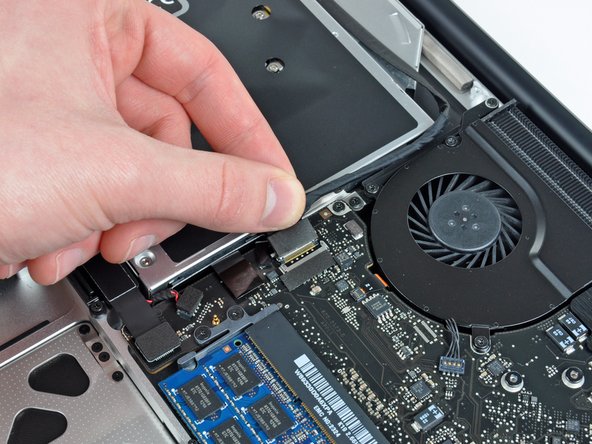
    • Disconnect the camera cable by pulling the male end straight away from its socket.

    • Pull the connector parallel to the face of the logic board, not straight up.

    I would recommend leaving the camera cable plugged into the motherboard, and simply sliding the optical drive out from underneath it carefully. If you mistakenly life this connector straight up (as I did) you can damage either the cable connector or the motherboard socket. I damaged the connector on the cable and now the wifi antenna doesn't work. Replacing this damaged cable is about 10X more of a pain (in time and money) than the effort to slide the optical drive out from beneath this cable instead of disconnecting it.

    Frank Stickney - Antwoord

    I agree, the same issue happened to me (My MBP no longer recognizes its wi-fi adapter). The black connector is very fragile, and very hard to slide back in after you take it out. Try not to disconnect it if you can.

    Dave Yu - Antwoord

    Totally agree here, my wifi card is no longer recognized by the computer. Not sure what to do now.

    raj grainger - Antwoord

    100% true! Thanx for confirming

    cj67 - Antwoord

  3. MacBook Pro 15" Unibody Mid 2009 Optical Drive Replacement: stap 3, afbeelding 1 van 1
    • Peel the camera cable off the adhesive securing it to the optical drive.

    When reassembling, which adhesive should be used to reattach the camera cable?

    Daniele Tamponi - Antwoord

  4. MacBook Pro 15" Unibody Mid 2009 Optical Drive Replacement: stap 4, afbeelding 1 van 2 MacBook Pro 15" Unibody Mid 2009 Optical Drive Replacement: stap 4, afbeelding 2 van 2
    • This step is only required if you have an anti-glare display. If you have a glossy display, skip this step.

    • Disconnect the Bluetooth cable by pulling the male end straight away from its socket.

    • Pull the connector parallel to the face of the logic board, not straight up.

    • Use the flat end of a spudger to pry the Bluetooth antenna cable from its socket on the board.

    How can I determine if I have an antiglare display?

    Thanks!

    Dan

    Dan Neunaber - Antwoord

    If you have the part in step 10, you do. If you don’t, you don’t (looks like pic in step 9).

    maccentric -

    As already pointed out in a comment to step 8, it is possible to slide carefully out the drive from underneath the bluetooth board without touching it, and to insert the replacement drive in the same way, avoiding to perform this step and the next one.

    spiderbatbug spiderbatbug - Antwoord

  5. MacBook Pro 15" Unibody Mid 2009 Optical Drive Replacement: stap 5, afbeelding 1 van 2 MacBook Pro 15" Unibody Mid 2009 Optical Drive Replacement: stap 5, afbeelding 2 van 2
    • This step is only required if you have an anti-glare display.

    • Remove the two 8 mm Phillips screws securing the Bluetooth/camera cable retainer to the upper case.

    • One of the screws may remain captive in the Bluetooth/camera cable ground loop. If replacing the display, be sure to transfer this screw to the new unit.

    • Lift the Bluetooth board/cable retainer assembly out of the upper case.

  6. MacBook Pro 15" Unibody Mid 2009 Optical Drive Replacement: stap 6, afbeelding 1 van 1
    • Use a spudger to pry the optical drive connector straight up off the logic board.

  7. MacBook Pro 15" Unibody Mid 2009 Optical Drive Replacement: stap 7, afbeelding 1 van 1
    • Remove the single 3.5 mm Phillips screw securing the inner side of the optical drive to the upper case.

    Totally stripped this screw, no idea what to do know.

    What - Antwoord

  8. MacBook Pro 15" Unibody Mid 2009 Optical Drive Replacement: stap 8, afbeelding 1 van 1
    • Remove the two 3.5 mm Phillips screws securing the outer side of the optical drive to the upper case.

    When installing the HD bay, the screws here will not go back. Not sure if the bracket/holes are somehow different. After completing the install, everything seems secure. Does anyone think not having these screws is critical beyond securing the drive?

    toddfletcher - Antwoord

  9. MacBook Pro 15" Unibody Mid 2009 Optical Drive Replacement: stap 9, afbeelding 1 van 1
    • Lift the optical drive from its left edge and pull it out of the upper case.

Conclusie

To reassemble your device, follow these instructions in reverse order.

0 opmerkingen

Voeg opmerking toe

Weergavestatistieken:

Afgelopen 24 uren: 0

Afgelopen 7 dagen: 0

Afgelopen 30 dagen: 0

Altijd: 783