Ga door naar hoofdinhoud

Deze versie kan foutieve bewerkingen bevatten. Schakel over naar de recentste gecontroleerde momentopname.

Wat je nodig hebt

  1. , Onderste behuizing: stap 1, afbeelding 1 van 1
    • Verwijder de volgende tien schroeven die de onderste behuizing aan de bovenste behuizing bevestigen:

    • Drie 13.5 mm (14.1 mm) lange Phillips schroeven.

    • Zeven 3 mm lange Phillips schroeven.

    • Let er bij het verwijderen van deze schroeven op dat ze met een lichte hoek uit de laptop komen. Het is de bedoeling dat je ze op eenzelfde wijze terugschroeft.

  2. : stap 2, afbeelding 1 van 1
    • Til de onderste behuizing met beide handen omhoog vanaf de ventilatieopening om deze zodoende los te maken uit de twee klemmen die deze aan de bovenste behuizing bevestigen.

    • Verwijder de onderste behuizing en leg deze weg.

  3. , Batterijaansluiting: stap 3, afbeelding 1 van 2 , Batterijaansluiting: stap 3, afbeelding 2 van 2
    • Let op: voor sommige reparaties (eg. harde schijf) is het niet noodzakelijk de batterij te verwijderen. Toch wordt het altijd aangeraden aangezien je hiermee voorkomt dat je apparaat per ongeluk kortsluiting maakt op het moederbord. Wees, als je de batterij niet verwijdert, voorzichtig aangezien sommige delen van het moederbord geladen kunnen zijn.

    • Gebruik de platte kant van een spudger om de batterijaansluiting uit het contact op het logic board omhoog te duwen.

    • Het is vaak handig om de batterijaansluiting om de beurt via beide zijden omhoog te duwen, zodat je de aansluiting als het ware uit het contact laat "lopen".

  4. : stap 4, afbeelding 1 van 1
    • Buig de batterijkabel lichtjes weg van het contact op het logic board om te voorkomen dat deze tijdens de reparatie per ongeluk contact maakt.

  5. Deze stap is niet vertaald. Help het te vertalen

    : stap 5, afbeelding 1 van 1
    • Remove the three 3.4 mm T6 Torx screws securing the left fan to the logic board.

    • In some models, these T6 Torx screws may be 3.1 mm long.

  6. Deze stap is niet vertaald. Help het te vertalen

    : stap 6, afbeelding 1 van 3 : stap 6, afbeelding 2 van 3 : stap 6, afbeelding 3 van 3
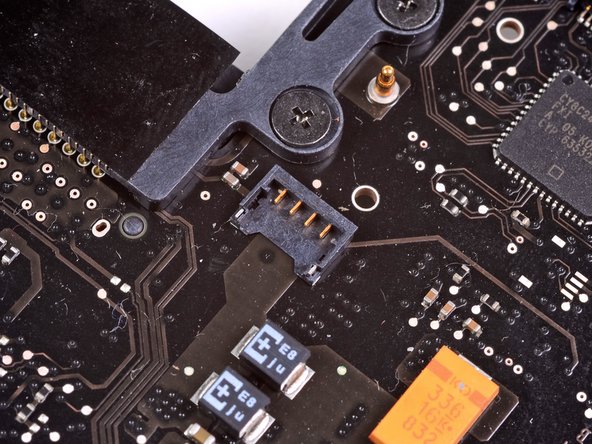
    • Use the flat end of a spudger to disconnect the left fan connector from the logic board.

    • It is useful to twist the spudger axially from beneath the fan cable wires to release the connector.

    • The fan socket and the fan connector can be seen in the second and third pictures. Be careful not to break the plastic fan socket off the logic board as you use your spudger to lift the fan connector straight up and out of its socket. The layout of the logic board shown in the second picture may look slightly different than your machine but the fan socket is the same.

  7. Deze stap is niet vertaald. Help het te vertalen

    : stap 7, afbeelding 1 van 1
    • Lift the left fan out of the upper case.

Eindstreep

61 andere personen hebben deze handleiding voltooid.

7 opmerkingen

IT is unclear as to which is the LEFT fan. Not having opened the case. It appears that the LEFT FAN is on the right as you look at the screen monitor. yes?

Karen Ratte - Antwoord

I agree that this has confused ma as well as I just ordered a right side fan from Amazon which matches the pictures of left side in this thread. Usually left and right should refer to the location of the laptop lid open and keyboard in working position - but that appears to be a wish only.

marbordom - Antwoord

I'd assume that the left fan is on the left side of the computer when you're using it. The pictures show that after the back plate is off, he's working on the right side of the computer. When I did this, i ordered the left fan, and when i flipped the computer over to replace it, the fan i ordered worked.

jrthom96 - Antwoord

Super facile, et quel silence ... enfin.

Goulven Bazire - Antwoord

I tore the connectors off the logic board when removing the fan connector. Wasted my time and money on the new fans. Hopefully machine will operate with only one fan since that’s all I have now.

rockportcentennial - Antwoord

Voeg opmerking toe

Weergavestatistieken:

Afgelopen 24 uren: 0

Afgelopen 7 dagen: 15

Afgelopen 30 dagen: 55

Altijd: 43,980