Ga door naar hoofdinhoud

MacBook Pro 15" Retina Display Mid 2015 Battery Replacement (Legacy)

Gearchiveerde handleiding
Deze handleiding wordt enkel nog bijgehouden voor historische doeleinden. Gebruik de laatste versie van deze gids om uw reparatie uit te voeren.

Wat je nodig hebt

  1. MacBook Pro 15" Retina Display Mid 2015 Battery Replacement (Legacy), Lower Case: stap 1, afbeelding 1 van 1
    • Remove the following P5 pentalobe screws securing the lower case to the MacBook Pro:

    • Eight 3.1 mm

    • Two 2.3 mm

  2. MacBook Pro 15" Retina Display Mid 2015 Battery Replacement (Legacy): stap 2, afbeelding 1 van 2 MacBook Pro 15" Retina Display Mid 2015 Battery Replacement (Legacy): stap 2, afbeelding 2 van 2
    • Lifting from the edge nearest the clutch cover, lift the lower case off the MacBook Pro.

  3. MacBook Pro 15" Retina Display Mid 2015 Battery Replacement (Legacy): stap 3, afbeelding 1 van 3 MacBook Pro 15" Retina Display Mid 2015 Battery Replacement (Legacy): stap 3, afbeelding 2 van 3 MacBook Pro 15" Retina Display Mid 2015 Battery Replacement (Legacy): stap 3, afbeelding 3 van 3
    • The lower case has two plastic pegs (red) that fit into plastic clips in the upper case (orange).

    • During reassembly, gently push down the center of the lower case to reattach the case to its two plastic clips.

  4. MacBook Pro 15" Retina Display Mid 2015 Battery Replacement (Legacy), Battery Connector: stap 4, afbeelding 1 van 1
    • Peel back the sticker covering the battery connector.

  5. MacBook Pro 15" Retina Display Mid 2015 Battery Replacement (Legacy): stap 5, afbeelding 1 van 3 MacBook Pro 15" Retina Display Mid 2015 Battery Replacement (Legacy): stap 5, afbeelding 2 van 3 MacBook Pro 15" Retina Display Mid 2015 Battery Replacement (Legacy): stap 5, afbeelding 3 van 3
    • Gently lift each side of the battery connector to pry the connector out of its socket on the logic board.

    • Bend the connector back toward the battery, ensuring that the battery connector doesn't accidentally make contact with the logic board.

  6. MacBook Pro 15" Retina Display Mid 2015 Battery Replacement (Legacy), AirPort/Camera Cables: stap 6, afbeelding 1 van 3 MacBook Pro 15" Retina Display Mid 2015 Battery Replacement (Legacy), AirPort/Camera Cables: stap 6, afbeelding 2 van 3 MacBook Pro 15" Retina Display Mid 2015 Battery Replacement (Legacy), AirPort/Camera Cables: stap 6, afbeelding 3 van 3
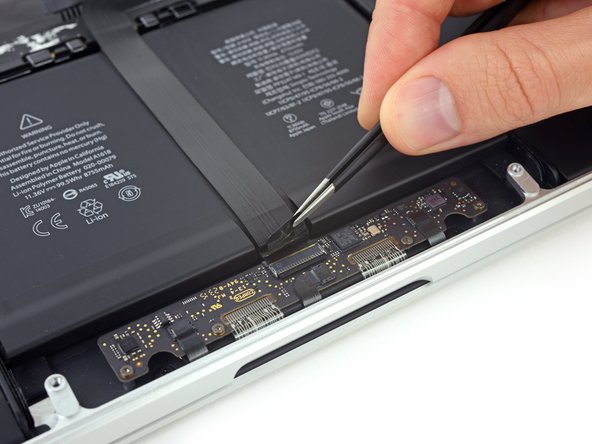
    • Use a spudger or tweezers to pry the three AirPort antenna cables straight up off of their sockets on the AirPort board, and bend them up and out of the way.

    • The cable connection points are very fragile. Be careful to lift only on the connector, and not on the socket or cable.

    • To reconnect, align the connector carefully into position over the socket, and press it down firmly with the flat of your spudger.

  7. MacBook Pro 15" Retina Display Mid 2015 Battery Replacement (Legacy): stap 7, afbeelding 1 van 2 MacBook Pro 15" Retina Display Mid 2015 Battery Replacement (Legacy): stap 7, afbeelding 2 van 2
    • Peel the right rubber cover up off the fan and fold it out of the way.

  8. MacBook Pro 15" Retina Display Mid 2015 Battery Replacement (Legacy): stap 8, afbeelding 1 van 2 MacBook Pro 15" Retina Display Mid 2015 Battery Replacement (Legacy): stap 8, afbeelding 2 van 2
    • Use the tip of a spudger to push the camera cable connector out of its socket on the logic board.

    • Be sure to push parallel to the board, pushing first on one side, then the other to "walk" the connector out of its socket.

  9. MacBook Pro 15" Retina Display Mid 2015 Battery Replacement (Legacy): stap 9, afbeelding 1 van 3 MacBook Pro 15" Retina Display Mid 2015 Battery Replacement (Legacy): stap 9, afbeelding 2 van 3 MacBook Pro 15" Retina Display Mid 2015 Battery Replacement (Legacy): stap 9, afbeelding 3 van 3
    • Use your fingers to pull the AirPort/Camera cables up off the fan.

    • The cables are adhered to the fan, so peel them up carefully to avoid damaging them.

    • Carefully de-route the cables from the plastic cable guide.

    • On reassembly, there should be enough adhesive still on these cables to stick them back down to the fan.

  10. MacBook Pro 15" Retina Display Mid 2015 Battery Replacement (Legacy), I/O Board Cable (Top): stap 10, afbeelding 1 van 1
    • Remove the four 2.2 mm T5 Torx screws securing the I/O board cable connector covers.

  11. MacBook Pro 15" Retina Display Mid 2015 Battery Replacement (Legacy): stap 11, afbeelding 1 van 2 MacBook Pro 15" Retina Display Mid 2015 Battery Replacement (Legacy): stap 11, afbeelding 2 van 2
    • Remove the left connector cover.

    • Use the flat end of a spudger to pry the left end of the I/O board cable up from its socket on the logic board.

  12. MacBook Pro 15" Retina Display Mid 2015 Battery Replacement (Legacy): stap 12, afbeelding 1 van 2 MacBook Pro 15" Retina Display Mid 2015 Battery Replacement (Legacy): stap 12, afbeelding 2 van 2
    • Remove the right connector cover.

    • Use the flat end of a spudger to pry the right end of the I/O board cable up from its socket on the logic board.

  13. MacBook Pro 15" Retina Display Mid 2015 Battery Replacement (Legacy): stap 13, afbeelding 1 van 1
    • Peel the I/O board cable up from the adhesive securing it to the fan.

    • Remove the cable.

  14. MacBook Pro 15" Retina Display Mid 2015 Battery Replacement (Legacy), Right Fan: stap 14, afbeelding 1 van 1
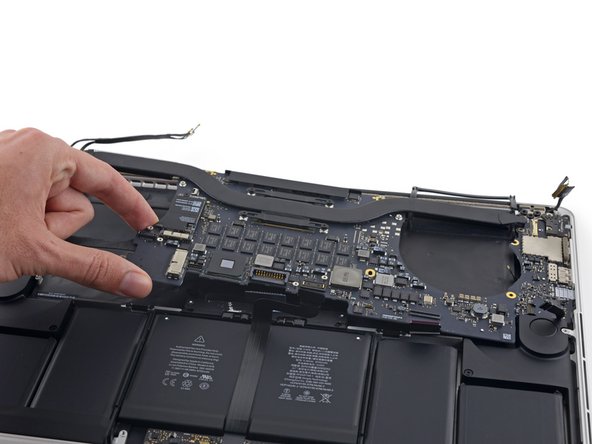
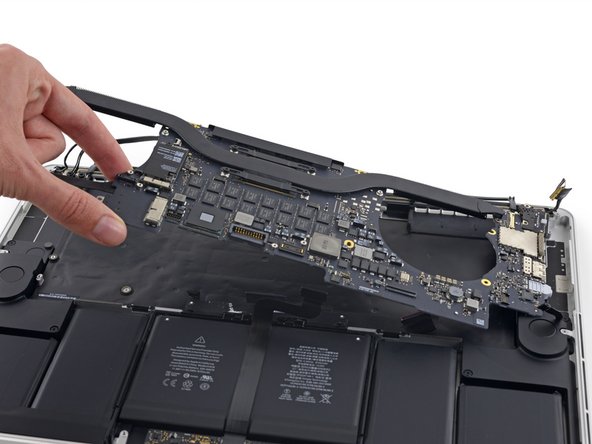
    • Use a T5 Torx driver to remove the following three screws securing the right fan to the logic board:

    • One 5.0 mm screw with a 2.0 mm long shoulder

    • One 4.0 mm screw with a wide head

    • One 4.4 mm screw

  15. MacBook Pro 15" Retina Display Mid 2015 Battery Replacement (Legacy): stap 15, afbeelding 1 van 3 MacBook Pro 15" Retina Display Mid 2015 Battery Replacement (Legacy): stap 15, afbeelding 2 van 3 MacBook Pro 15" Retina Display Mid 2015 Battery Replacement (Legacy): stap 15, afbeelding 3 van 3
    • Use the tip of a spudger to flip up the retaining flap on the right fan ribbon cable ZIF socket.

    • Be sure you are prying up on the hinged retaining flap, not the socket itself.

  16. MacBook Pro 15" Retina Display Mid 2015 Battery Replacement (Legacy): stap 16, afbeelding 1 van 2 MacBook Pro 15" Retina Display Mid 2015 Battery Replacement (Legacy): stap 16, afbeelding 2 van 2
    • Lift the fan and push it gently towards the back edge of the MacBook to free the fan cable from its socket.

    • The fan cable may be adhered to the logic board—to avoid tearing the cable, gently peel it up while lifting the fan.

    • Remove the fan.

  17. MacBook Pro 15" Retina Display Mid 2015 Battery Replacement (Legacy), Left Fan: stap 17, afbeelding 1 van 2 MacBook Pro 15" Retina Display Mid 2015 Battery Replacement (Legacy), Left Fan: stap 17, afbeelding 2 van 2
    • Peel the left rubber cover up off the fan and fold it out of the way.

  18. MacBook Pro 15" Retina Display Mid 2015 Battery Replacement (Legacy): stap 18, afbeelding 1 van 1
    • Remove the following three screws securing the left fan to the logic board:

    • One 3.6 mm T5 Torx screw with a wide head

    • One 5.0 mm T5 Torx screw with a 2.0 mm long shoulder

    • One 4.4 mm T5 Torx screw

  19. MacBook Pro 15" Retina Display Mid 2015 Battery Replacement (Legacy): stap 19, afbeelding 1 van 2 MacBook Pro 15" Retina Display Mid 2015 Battery Replacement (Legacy): stap 19, afbeelding 2 van 2
    • Use the tip of a spudger to flip up the retaining flap on the left fan ribbon cable ZIF socket.

    • Be sure you are prying up on the hinged retaining flap, not the socket itself.

  20. MacBook Pro 15" Retina Display Mid 2015 Battery Replacement (Legacy): stap 20, afbeelding 1 van 2 MacBook Pro 15" Retina Display Mid 2015 Battery Replacement (Legacy): stap 20, afbeelding 2 van 2
    • Lift the fan and push it gently towards the back edge of the MacBook to free the fan cable from its socket.

    • The fan cable may be adhered to the logic board—to avoid tearing the cable, gently peel it up while lifting the fan.

    • Remove the fan.

  21. MacBook Pro 15" Retina Display Mid 2015 Battery Replacement (Legacy), SSD: stap 21, afbeelding 1 van 1
    • Remove the single 2.9 mm T5 Torx screw securing the SSD to the logic board.

  22. MacBook Pro 15" Retina Display Mid 2015 Battery Replacement (Legacy): stap 22, afbeelding 1 van 3 MacBook Pro 15" Retina Display Mid 2015 Battery Replacement (Legacy): stap 22, afbeelding 2 van 3 MacBook Pro 15" Retina Display Mid 2015 Battery Replacement (Legacy): stap 22, afbeelding 3 van 3
    • Lift the end of the SSD up enough to pass over the speaker directly behind it.

    • Do not lift the SSD too high, or you could damage the contacts or socket.

    • Pull the SSD straight out of its socket on the logic board.

  23. MacBook Pro 15" Retina Display Mid 2015 Battery Replacement (Legacy): stap 23, afbeelding 1 van 3 MacBook Pro 15" Retina Display Mid 2015 Battery Replacement (Legacy): stap 23, afbeelding 2 van 3 MacBook Pro 15" Retina Display Mid 2015 Battery Replacement (Legacy): stap 23, afbeelding 3 van 3
    • Use the point of a spudger to flip up the locking mechanism on the I/O board connector.

    • Flip the spudger around and use the flat end to slide the I/O cable out of the connector.

    • Push on the opened locking mechanism for an easy way to slide the I/O cable out of the connector. This could help prevent accidental damage to the cable or connector contacts.

  24. MacBook Pro 15" Retina Display Mid 2015 Battery Replacement (Legacy): stap 24, afbeelding 1 van 1
    • Remove the two 3.1 mm T5 Torx screws from the I/O board.

  25. MacBook Pro 15" Retina Display Mid 2015 Battery Replacement (Legacy): stap 25, afbeelding 1 van 2 MacBook Pro 15" Retina Display Mid 2015 Battery Replacement (Legacy): stap 25, afbeelding 2 van 2
    • Slightly lift the interior edge of the I/O board and pull it toward the center of the MacBook, away from the side of the case.

    • Remove the I/O board.

  26. MacBook Pro 15" Retina Display Mid 2015 Battery Replacement (Legacy), Logic Board Assembly: stap 26, afbeelding 1 van 2 MacBook Pro 15" Retina Display Mid 2015 Battery Replacement (Legacy), Logic Board Assembly: stap 26, afbeelding 2 van 2
    • Remove the two 2.2 mm Torx T5 screws securing the touchpad cable connector cover to the logic board.

    • Remove the cover.

  27. MacBook Pro 15" Retina Display Mid 2015 Battery Replacement (Legacy): stap 27, afbeelding 1 van 3 MacBook Pro 15" Retina Display Mid 2015 Battery Replacement (Legacy): stap 27, afbeelding 2 van 3 MacBook Pro 15" Retina Display Mid 2015 Battery Replacement (Legacy): stap 27, afbeelding 3 van 3
    • Use the flat end of a spudger to disconnect the touchpad cable connector from its socket in the logic board.

    • Slightly twisting the flat end of a spudger is an easy way to pry up the cable connector from these types of sockets.

    • Be careful to only pry up against the connector, and not the logic board socket.

  28. MacBook Pro 15" Retina Display Mid 2015 Battery Replacement (Legacy): stap 28, afbeelding 1 van 1
    • Remove a small rubber cap off the screw at the end of the heat sink.

  29. MacBook Pro 15" Retina Display Mid 2015 Battery Replacement (Legacy): stap 29, afbeelding 1 van 1
    • Remove the following six screws securing the logic board assembly to the upper case.

    • One 3.8 mm T5 Torx screw

    • Two 5.7 mm T5 Torx screws

    • One 5.6 mm T5 Torx screw (this one is silver and has a taller head than the others)

    • One 2.6 mm T5 Torx screw

    • One 3.2 mm T5 Torx screw

    • On reassembly, start all six screws but do not tighten any of them. Move the logic board around until all of the screws are centered in their holes and the ports are lined up with their openings in the side of the upper case. Then tighten all of the screws.

  30. MacBook Pro 15" Retina Display Mid 2015 Battery Replacement (Legacy): stap 30, afbeelding 1 van 1
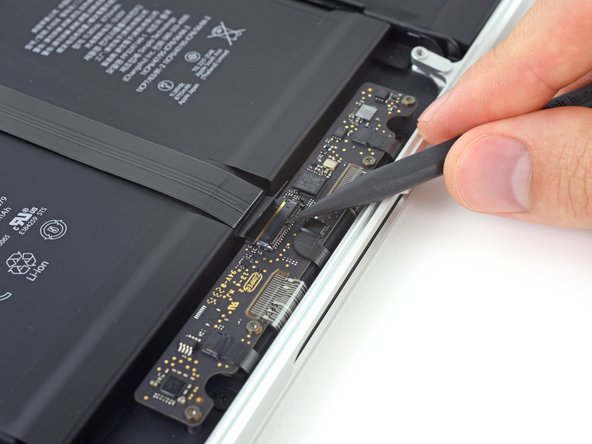
    • The following steps will detail disconnecting these six connectors. Be sure to read each step, as these connectors come in different styles that disconnect differently.

    • Microphone cable

    • Left speaker cable

    • Keyboard data cable

    • Right speaker cable

    • Keyboard backlight cable
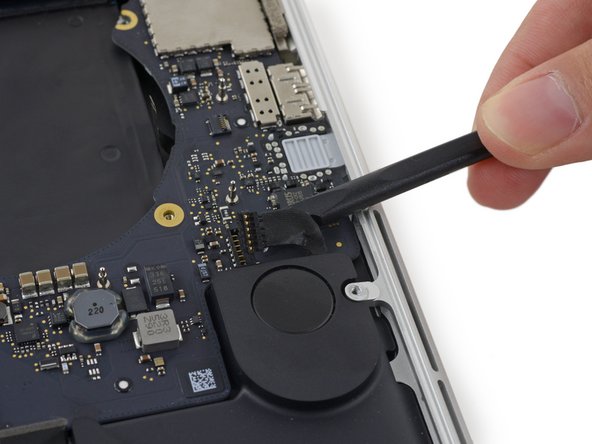
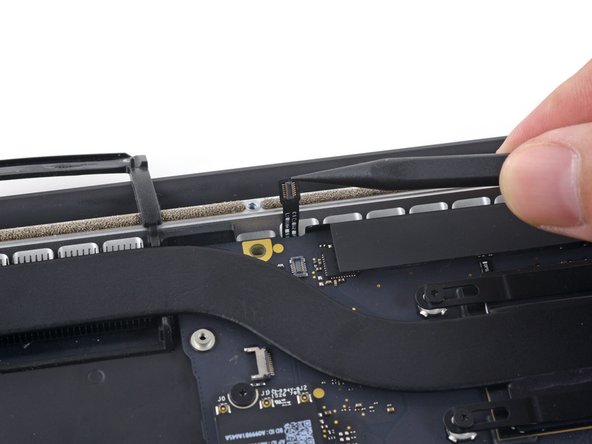
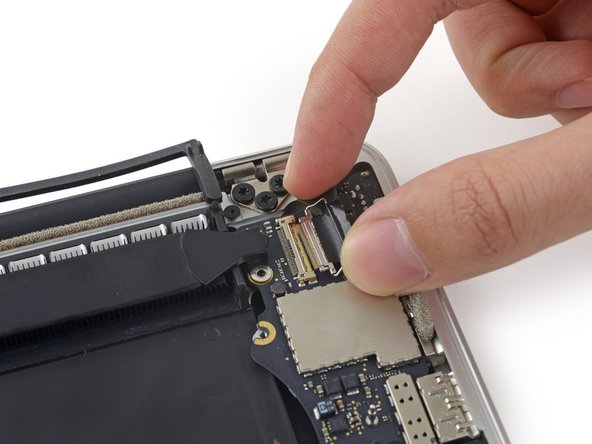
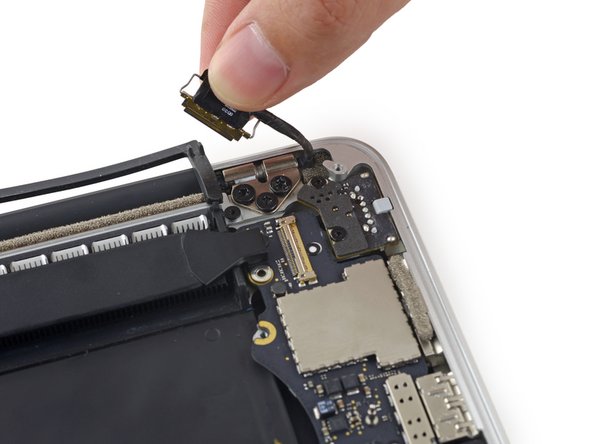
    • Display data cable

    • On reassembly, check to make sure all of these connectors are connected and fully seated in their sockets.

  31. MacBook Pro 15" Retina Display Mid 2015 Battery Replacement (Legacy): stap 31, afbeelding 1 van 3 MacBook Pro 15" Retina Display Mid 2015 Battery Replacement (Legacy): stap 31, afbeelding 2 van 3 MacBook Pro 15" Retina Display Mid 2015 Battery Replacement (Legacy): stap 31, afbeelding 3 van 3
    • Use the tip of a spudger to flip up the retaining flap on the microphone ribbon cable ZIF socket.

    • Pull the microphone ribbon cable out of its socket, parallel to the logic board.

  32. MacBook Pro 15" Retina Display Mid 2015 Battery Replacement (Legacy): stap 32, afbeelding 1 van 3 MacBook Pro 15" Retina Display Mid 2015 Battery Replacement (Legacy): stap 32, afbeelding 2 van 3 MacBook Pro 15" Retina Display Mid 2015 Battery Replacement (Legacy): stap 32, afbeelding 3 van 3
    • Use the flat end of a spudger to pry the left speaker connector up and out of its socket on the logic board.

    • Be sure to pry on the cable connector and not on the socket on the logic board. Prying on the socket may cause it to separate from the logic board.

    • Gently fold the cable up and out of the way of the logic board.

  33. MacBook Pro 15" Retina Display Mid 2015 Battery Replacement (Legacy): stap 33, afbeelding 1 van 2 MacBook Pro 15" Retina Display Mid 2015 Battery Replacement (Legacy): stap 33, afbeelding 2 van 2
    • Peel back the tape covering the top of the keyboard data cable connector.

  34. MacBook Pro 15" Retina Display Mid 2015 Battery Replacement (Legacy): stap 34, afbeelding 1 van 3 MacBook Pro 15" Retina Display Mid 2015 Battery Replacement (Legacy): stap 34, afbeelding 2 van 3 MacBook Pro 15" Retina Display Mid 2015 Battery Replacement (Legacy): stap 34, afbeelding 3 van 3
    • Use the tip of a spudger to flip up the retaining flap on the keyboard data cable ZIF socket.

    • Be sure you are prying up on the hinged retaining flap, not the socket itself.

    • Pull the keyboard data cable out of its ZIF socket. Be sure to pull parallel to the logic board, and not straight up.

  35. MacBook Pro 15" Retina Display Mid 2015 Battery Replacement (Legacy): stap 35, afbeelding 1 van 3 MacBook Pro 15" Retina Display Mid 2015 Battery Replacement (Legacy): stap 35, afbeelding 2 van 3 MacBook Pro 15" Retina Display Mid 2015 Battery Replacement (Legacy): stap 35, afbeelding 3 van 3
    • Use the tip of a spudger to pry the right speaker connector up and out of its socket on the logic board.

    • Be sure to pry on the cable connector and not on the socket on the logic board. Prying on the socket may cause it to separate from the logic board.

    • Gently fold the cable up and out of the way of the logic board.

  36. MacBook Pro 15" Retina Display Mid 2015 Battery Replacement (Legacy): stap 36, afbeelding 1 van 2 MacBook Pro 15" Retina Display Mid 2015 Battery Replacement (Legacy): stap 36, afbeelding 2 van 2
    • Use the point of a spudger to pry the keyboard backlight connector up from its socket on the logic board.

  37. MacBook Pro 15" Retina Display Mid 2015 Battery Replacement (Legacy): stap 37, afbeelding 1 van 2 MacBook Pro 15" Retina Display Mid 2015 Battery Replacement (Legacy): stap 37, afbeelding 2 van 2
    • Use the tip of a spudger to flip up the display data cable lock and rotate it toward the MagSafe 2 power port side of the computer.

  38. MacBook Pro 15" Retina Display Mid 2015 Battery Replacement (Legacy): stap 38, afbeelding 1 van 3 MacBook Pro 15" Retina Display Mid 2015 Battery Replacement (Legacy): stap 38, afbeelding 2 van 3 MacBook Pro 15" Retina Display Mid 2015 Battery Replacement (Legacy): stap 38, afbeelding 3 van 3
    • Pull the display data cable straight out of its socket on the logic board.

    • Do not lift up on the display data cable, as its socket is very fragile. Pull the cable parallel to the face of the logic board.

    • Do not touch the contacts on the data connector or its socket with your fingers or any tools, as you may deposit oils or damage the pins.

    • Gently bend the display data cable toward the display hinge, to expose the screws on the MagSafe 2 board.

  39. MacBook Pro 15" Retina Display Mid 2015 Battery Replacement (Legacy): stap 39, afbeelding 1 van 1
    • Remove the two 4.0 mm T5 Torx screws from the MagSafe 2 board.

  40. MacBook Pro 15" Retina Display Mid 2015 Battery Replacement (Legacy): stap 40, afbeelding 1 van 3 MacBook Pro 15" Retina Display Mid 2015 Battery Replacement (Legacy): stap 40, afbeelding 2 van 3 MacBook Pro 15" Retina Display Mid 2015 Battery Replacement (Legacy): stap 40, afbeelding 3 van 3
    • Lift and pull the entire logic board assembly away from the wall of the upper case.

    • When reassembling, be sure to line up the ports with their cutouts in the upper case.

  41. MacBook Pro 15" Retina Display Mid 2015 Battery Replacement (Legacy), Left Speaker: stap 41, afbeelding 1 van 1
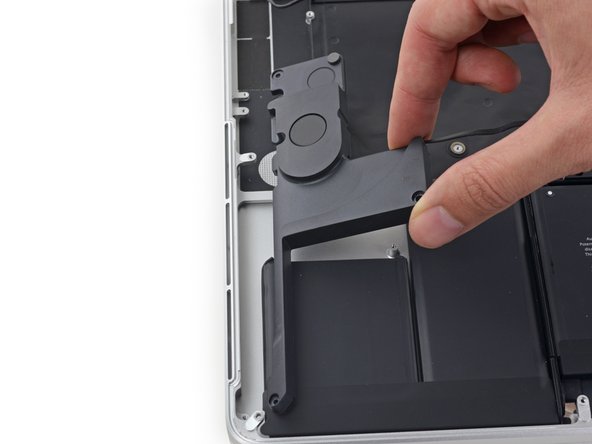
    • Remove the following screws securing the left speaker to the upper case:

    • 2.7 mm T5 Torx screw

    • 6.9 mm T5 Torx screw (with 4.5 mm shoulder)

    • 5.6 mm T5 Torx screw

  42. MacBook Pro 15" Retina Display Mid 2015 Battery Replacement (Legacy): stap 42, afbeelding 1 van 2 MacBook Pro 15" Retina Display Mid 2015 Battery Replacement (Legacy): stap 42, afbeelding 2 van 2
    • Remove the left speaker by pulling it slightly away from the side of the upper case, and out from under the aluminum tab blocking it in.

  43. MacBook Pro 15" Retina Display Mid 2015 Battery Replacement (Legacy), Right Speaker: stap 43, afbeelding 1 van 1
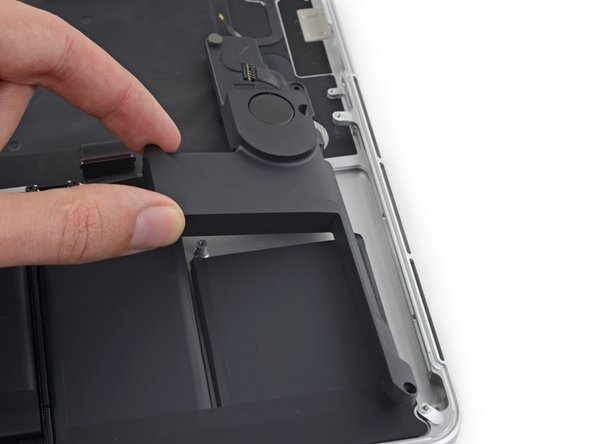
    • Remove the following screws securing the right speaker to the upper case:

    • 2.7 mm T5 Torx screw

    • 6.9 mm T5 Torx screw (with 4.5 mm shoulder)

    • 5.6 mm T5 Torx screw

  44. MacBook Pro 15" Retina Display Mid 2015 Battery Replacement (Legacy): stap 44, afbeelding 1 van 2 MacBook Pro 15" Retina Display Mid 2015 Battery Replacement (Legacy): stap 44, afbeelding 2 van 2
    • The right speaker cable is lightly adhered to the upper case.

    • Peel the right speaker cable up to free it from the upper case.

    • On reassembly, tuck the cable up against the aluminum frame above the battery.

  45. MacBook Pro 15" Retina Display Mid 2015 Battery Replacement (Legacy): stap 45, afbeelding 1 van 2 MacBook Pro 15" Retina Display Mid 2015 Battery Replacement (Legacy): stap 45, afbeelding 2 van 2
    • Remove the right speaker by pulling it slightly away from the side of the upper case, and out from under the aluminum tab blocking it in.

  46. MacBook Pro 15" Retina Display Mid 2015 Battery Replacement (Legacy), Battery: stap 46, afbeelding 1 van 2 MacBook Pro 15" Retina Display Mid 2015 Battery Replacement (Legacy), Battery: stap 46, afbeelding 2 van 2
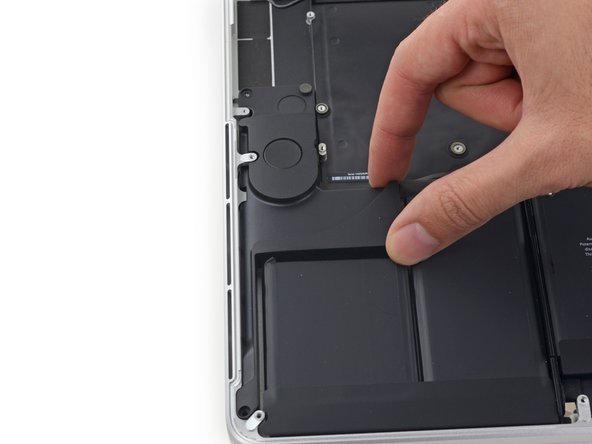
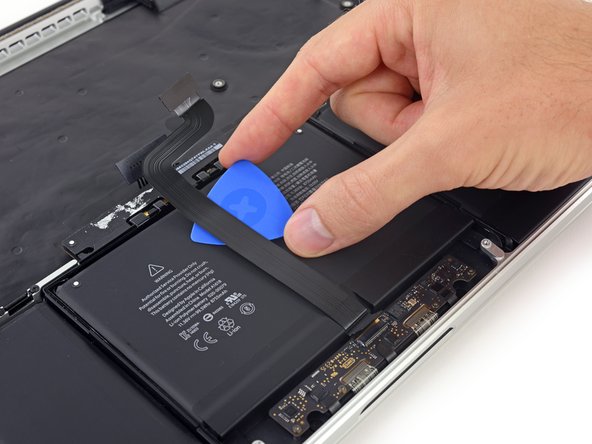
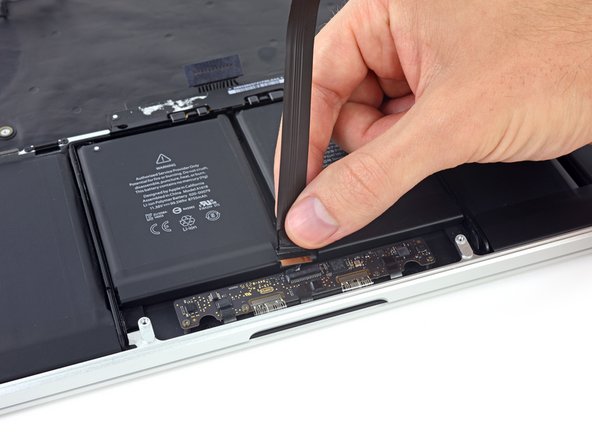
    • Peel back the tape covering the trackpad connector ribbon cable, near the front edge of the MacBook Pro.

  47. MacBook Pro 15" Retina Display Mid 2015 Battery Replacement (Legacy): stap 47, afbeelding 1 van 2 MacBook Pro 15" Retina Display Mid 2015 Battery Replacement (Legacy): stap 47, afbeelding 2 van 2
    • Use the tip of a spudger to flip up the black locking tab on the trackpad ribbon cable ZIF connector.

  48. MacBook Pro 15" Retina Display Mid 2015 Battery Replacement (Legacy): stap 48, afbeelding 1 van 3 MacBook Pro 15" Retina Display Mid 2015 Battery Replacement (Legacy): stap 48, afbeelding 2 van 3 MacBook Pro 15" Retina Display Mid 2015 Battery Replacement (Legacy): stap 48, afbeelding 3 van 3
    • Insert an opening pick between the trackpad ribbon cable and the battery.

    • Carefully slide your pick underneath the length of the ribbon cable to separate the adhesive securing it to the battery.

    • The ribbon cable is easily damaged. If necessary, use a little heat from an iOpener or hair dryer to soften the adhesive so you can remove it with less force.

  49. MacBook Pro 15" Retina Display Mid 2015 Battery Replacement (Legacy): stap 49, afbeelding 1 van 2 MacBook Pro 15" Retina Display Mid 2015 Battery Replacement (Legacy): stap 49, afbeelding 2 van 2
    • Remove the trackpad ribbon cable.

  50. MacBook Pro 15" Retina Display Mid 2015 Battery Replacement (Legacy): stap 50, afbeelding 1 van 1
    • Remove the two 3.2 mm T5 Torx screws securing the battery board.

  51. MacBook Pro 15" Retina Display Mid 2015 Battery Replacement (Legacy): stap 51, afbeelding 1 van 1
    • The liquid adhesive remover provided in your kit can affect the antireflective coating on your MacBook Pro's display.

    • To protect your display, place a sheet of aluminum foil between the display and keyboard and leave it there while you work.

  52. MacBook Pro 15" Retina Display Mid 2015 Battery Replacement (Legacy): stap 52, afbeelding 1 van 2 MacBook Pro 15" Retina Display Mid 2015 Battery Replacement (Legacy): stap 52, afbeelding 2 van 2
    • With the front edge of the MacBook Pro facing you, lift the right side and prop it up at a slight angle, using a sturdy foam block or book.

    • In the following steps, you'll apply liquid adhesive remover to the right (outer) edge of the battery. Keeping this side of the MacBook Pro elevated will help the adhesive remover flow underneath the battery.

  53. MacBook Pro 15" Retina Display Mid 2015 Battery Replacement (Legacy): stap 53, afbeelding 1 van 2 MacBook Pro 15" Retina Display Mid 2015 Battery Replacement (Legacy): stap 53, afbeelding 2 van 2
    • Now that your MacBook Pro is fully prepped, it's time to prep yourself.

    • iFixit adhesive remover contains acetone, a mild skin and eye irritant.

    • Wear eye protection when handling and applying the adhesive remover. (Eye protection is included in your kit.)

    • Do not wear contact lenses without eye protection.

    • Protective gloves are also included in your kit. If you are concerned about skin irritation, put your gloves on now.

  54. MacBook Pro 15" Retina Display Mid 2015 Battery Replacement (Legacy): stap 54, afbeelding 1 van 2 MacBook Pro 15" Retina Display Mid 2015 Battery Replacement (Legacy): stap 54, afbeelding 2 van 2
    • Open your container of adhesive remover.

    • Fill the syringe included in your kit with a small amount (approximately 1-2 milliliters) of adhesive remover.

    • It's best to fill the syringe with no more than about 1-2 milliliters of adhesive remover at a time, so as to avoid accidentally applying too much.

    • Refill your syringe as needed throughout the rest of this procedure.

  55. MacBook Pro 15" Retina Display Mid 2015 Battery Replacement (Legacy): stap 55, afbeelding 1 van 2 MacBook Pro 15" Retina Display Mid 2015 Battery Replacement (Legacy): stap 55, afbeelding 2 van 2
    • Apply a small amount of adhesive remover (approximately 1 ml) evenly along the elevated edge of the outer right battery cell.

    • Wait 2-3 minutes for the liquid adhesive remover to penetrate underneath the battery cell before you proceed to the next step.

  56. MacBook Pro 15" Retina Display Mid 2015 Battery Replacement (Legacy): stap 56, afbeelding 1 van 3 MacBook Pro 15" Retina Display Mid 2015 Battery Replacement (Legacy): stap 56, afbeelding 2 van 3 MacBook Pro 15" Retina Display Mid 2015 Battery Replacement (Legacy): stap 56, afbeelding 3 van 3
    Gereedschap gebruikt in deze stap:
    Plastic Cards
    $2.99
    Koop
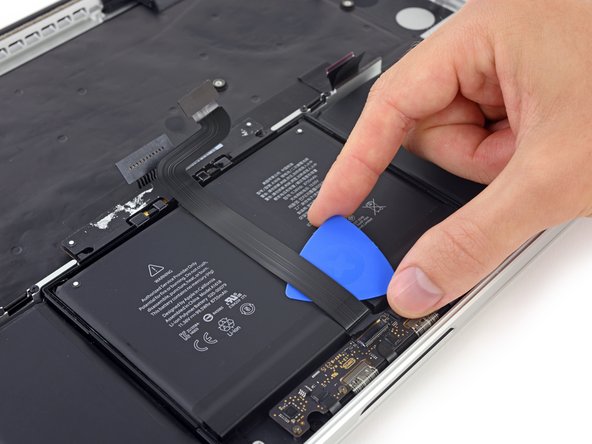
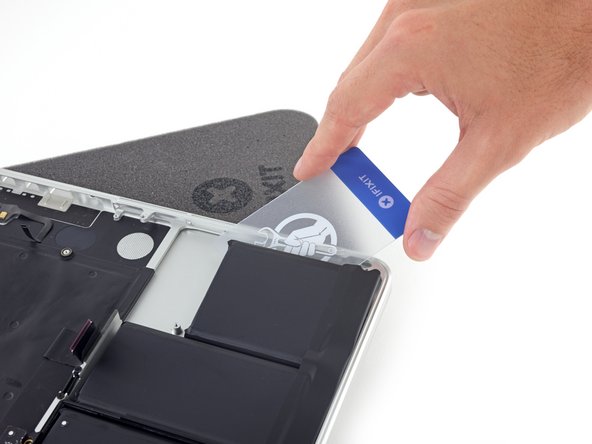
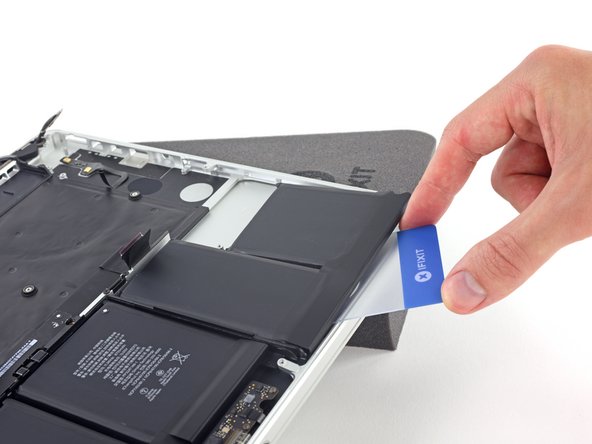
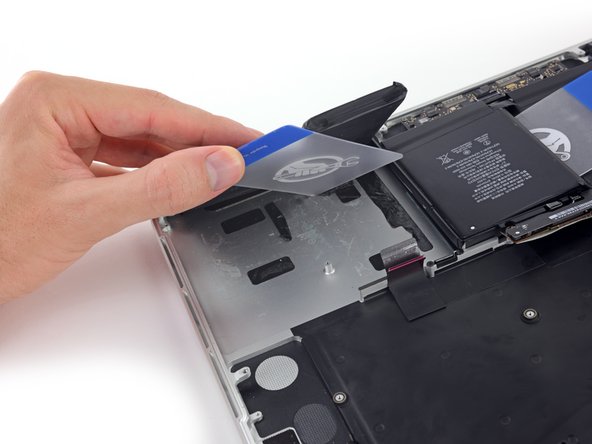
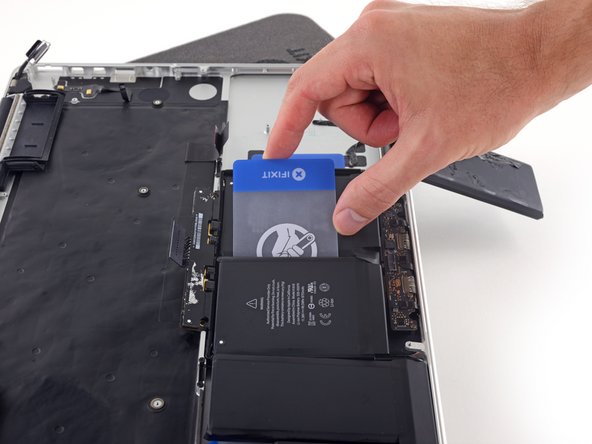
    • Slide one corner of a plastic card under the outer edge of the battery cell.

    • It may help to gently twist the card to open up a slight gap between the battery cell and the MacBook Pro's case.

    • Slide the card farther underneath the battery cell to separate it from the adhesive securing it to the MacBook Pro's upper case.

  57. MacBook Pro 15" Retina Display Mid 2015 Battery Replacement (Legacy): stap 57, afbeelding 1 van 2 MacBook Pro 15" Retina Display Mid 2015 Battery Replacement (Legacy): stap 57, afbeelding 2 van 2
    • Lift the battery cell to separate it from the MacBook Pro's upper case, but don't try to remove it.

    • Leave the plastic card underneath the battery cell to prevent it from re-adhering as you proceed to the next step.

  58. MacBook Pro 15" Retina Display Mid 2015 Battery Replacement (Legacy): stap 58, afbeelding 1 van 3 MacBook Pro 15" Retina Display Mid 2015 Battery Replacement (Legacy): stap 58, afbeelding 2 van 3 MacBook Pro 15" Retina Display Mid 2015 Battery Replacement (Legacy): stap 58, afbeelding 3 van 3
    • Apply a small amount of adhesive remover (approximately 1 ml) evenly along the elevated edge of the next battery cell.

    • Wait 2-3 minutes for the liquid adhesive remover to penetrate underneath the battery cell before you proceed to the next step.

  59. MacBook Pro 15" Retina Display Mid 2015 Battery Replacement (Legacy): stap 59, afbeelding 1 van 3 MacBook Pro 15" Retina Display Mid 2015 Battery Replacement (Legacy): stap 59, afbeelding 2 van 3 MacBook Pro 15" Retina Display Mid 2015 Battery Replacement (Legacy): stap 59, afbeelding 3 van 3
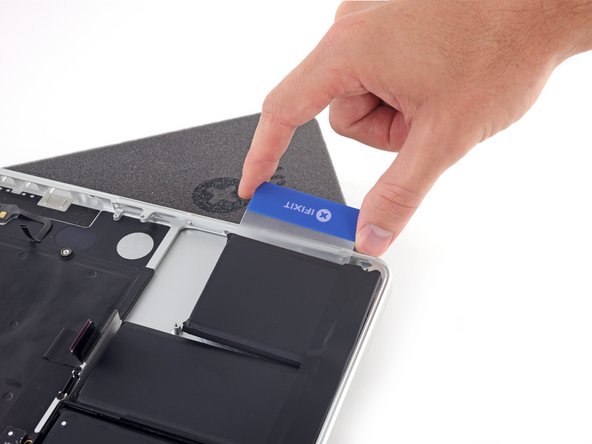
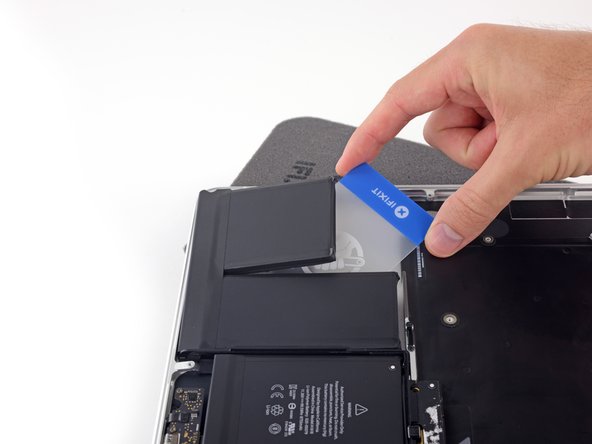
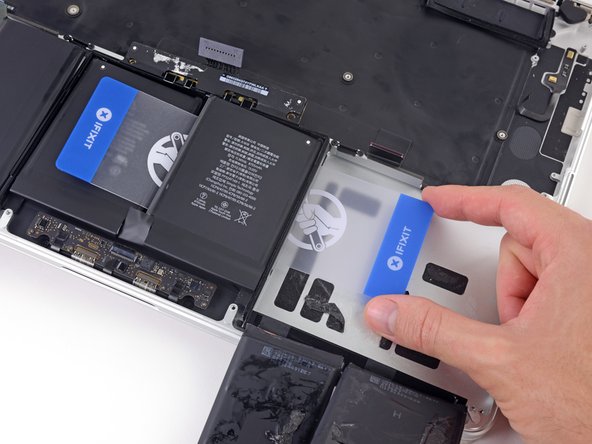
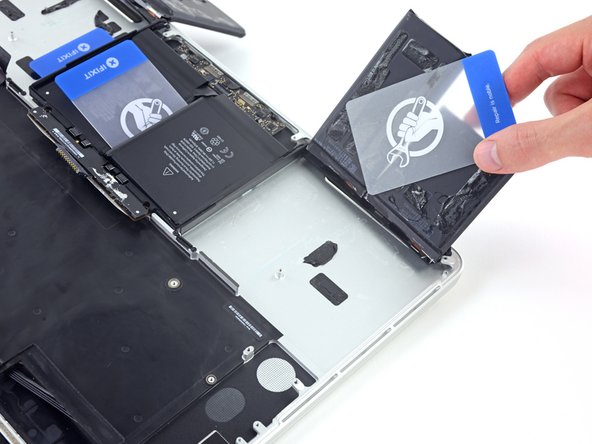
    • Slide one corner of your plastic card underneath the second battery cell.

    • Push the card underneath the second battery cell, and slide it side to side to separate the adhesive underneath.

    • Leave the plastic card underneath both battery cells (or flip them over) to prevent them from re-adhering as you proceed to the next step.

  60. MacBook Pro 15" Retina Display Mid 2015 Battery Replacement (Legacy): stap 60, afbeelding 1 van 2 MacBook Pro 15" Retina Display Mid 2015 Battery Replacement (Legacy): stap 60, afbeelding 2 van 2
    • It's time to switch sides. Remove your book or foam block and place it under the opposite side of your MacBook Pro.

  61. MacBook Pro 15" Retina Display Mid 2015 Battery Replacement (Legacy): stap 61, afbeelding 1 van 3 MacBook Pro 15" Retina Display Mid 2015 Battery Replacement (Legacy): stap 61, afbeelding 2 van 3 MacBook Pro 15" Retina Display Mid 2015 Battery Replacement (Legacy): stap 61, afbeelding 3 van 3
    • Repeat the procedure from the prior steps to separate the two battery cells on this side:

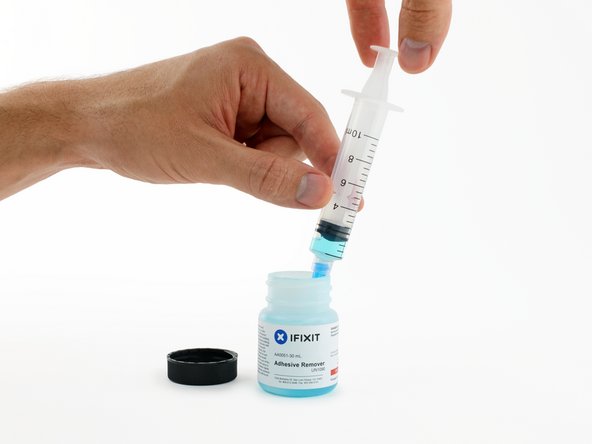
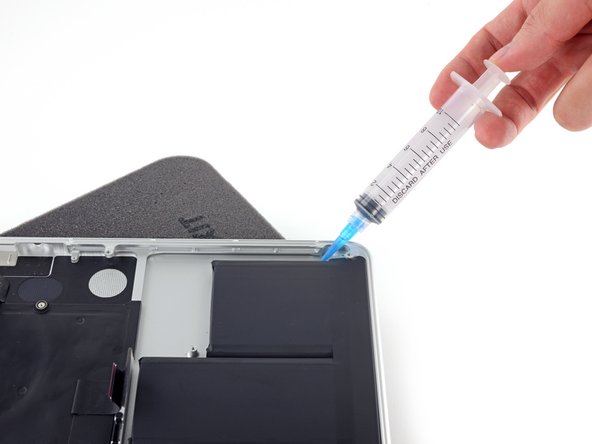
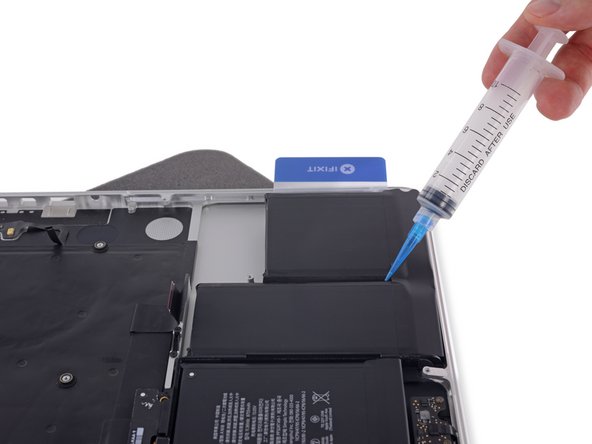
    • Apply your adhesive remover to the elevated edge of the outer left battery cell, and wait 2-3 minutes for it to penetrate.

    • Work one corner of a plastic card underneath the battery cell, and slide the card fully underneath the battery cell to separate it.

    • Do the same for the adjacent cell.

    • Leave your plastic card in place or flip the battery cells over to prevent them from re-adhering during the following steps.

  62. MacBook Pro 15" Retina Display Mid 2015 Battery Replacement (Legacy): stap 62, afbeelding 1 van 2 MacBook Pro 15" Retina Display Mid 2015 Battery Replacement (Legacy): stap 62, afbeelding 2 van 2
    • With the left edge of your MacBook Pro still propped up, apply a small amount (about 1 ml) of adhesive remover down the center line between the two middle battery cells.

    • Wait 2-3 minutes for the adhesive remover to penetrate before you continue.

  63. MacBook Pro 15" Retina Display Mid 2015 Battery Replacement (Legacy): stap 63, afbeelding 1 van 3 MacBook Pro 15" Retina Display Mid 2015 Battery Replacement (Legacy): stap 63, afbeelding 2 van 3 MacBook Pro 15" Retina Display Mid 2015 Battery Replacement (Legacy): stap 63, afbeelding 3 van 3
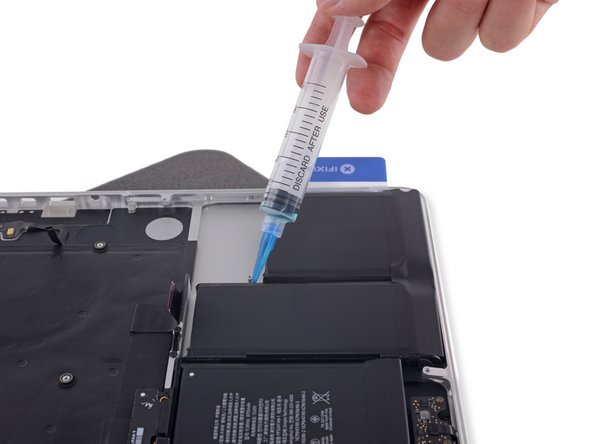
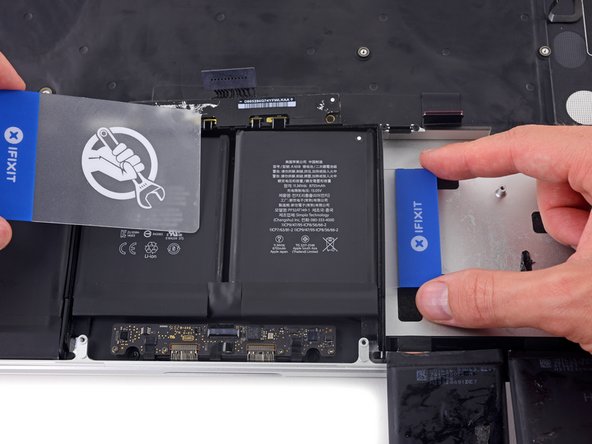
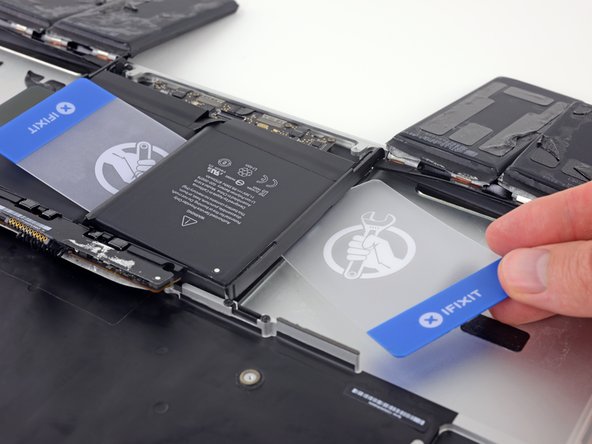
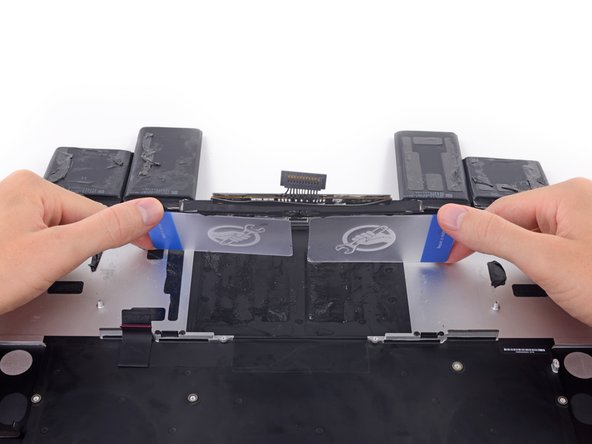
    • Slide one corner of a plastic card between the middle two cells, and under the elevated edge of the center-right battery cell.

    • Slide the card farther underneath the battery cell to slice through the adhesive securing it in place.

    • Don't try to fully separate this battery cell yet. Leave your plastic card in place to prevent it from re-adhering.

  64. MacBook Pro 15" Retina Display Mid 2015 Battery Replacement (Legacy): stap 64, afbeelding 1 van 2 MacBook Pro 15" Retina Display Mid 2015 Battery Replacement (Legacy): stap 64, afbeelding 2 van 2
    • Flip the two de-adhered right-hand battery cells over the front edge of the MacBook Pro, if you haven’t already. This will allow access to the outside edge of the center cell.

  65. MacBook Pro 15" Retina Display Mid 2015 Battery Replacement (Legacy): stap 65, afbeelding 1 van 3 MacBook Pro 15" Retina Display Mid 2015 Battery Replacement (Legacy): stap 65, afbeelding 2 van 3 MacBook Pro 15" Retina Display Mid 2015 Battery Replacement (Legacy): stap 65, afbeelding 3 van 3
    • Push one corner of a plastic card below the plastic battery frame and underneath the remaining adhered edge of the lower center cell.

    • Do not pry along the edge nearest the battery connector, or you risk damaging the keyboard ribbon cable.

    • Slide your card all the way under the battery cell, and leave it to prevent the battery cell from re-adhering.

  66. MacBook Pro 15" Retina Display Mid 2015 Battery Replacement (Legacy): stap 66, afbeelding 1 van 3 MacBook Pro 15" Retina Display Mid 2015 Battery Replacement (Legacy): stap 66, afbeelding 2 van 3 MacBook Pro 15" Retina Display Mid 2015 Battery Replacement (Legacy): stap 66, afbeelding 3 van 3
    • Remove the first plastic card that you inserted under the center-right battery cell.

    • Push the other card in a little further and leave it in place to prevent the battery cell from re-adhering as you continue.

  67. MacBook Pro 15" Retina Display Mid 2015 Battery Replacement (Legacy): stap 67, afbeelding 1 van 2 MacBook Pro 15" Retina Display Mid 2015 Battery Replacement (Legacy): stap 67, afbeelding 2 van 2
    • Remove your book or foam block.

    • With the front edge of the MacBook Pro facing you, lift the right side and prop it up once again.

  68. MacBook Pro 15" Retina Display Mid 2015 Battery Replacement (Legacy): stap 68, afbeelding 1 van 2 MacBook Pro 15" Retina Display Mid 2015 Battery Replacement (Legacy): stap 68, afbeelding 2 van 2
    • Apply a small amount (about 1 ml) of adhesive remover between the two center battery cells, so that it flows underneath the remaining battery cell.

    • Wait 2-3 minutes for the adhesive remover to penetrate before you continue.

  69. MacBook Pro 15" Retina Display Mid 2015 Battery Replacement (Legacy): stap 69, afbeelding 1 van 3 MacBook Pro 15" Retina Display Mid 2015 Battery Replacement (Legacy): stap 69, afbeelding 2 van 3 MacBook Pro 15" Retina Display Mid 2015 Battery Replacement (Legacy): stap 69, afbeelding 3 van 3
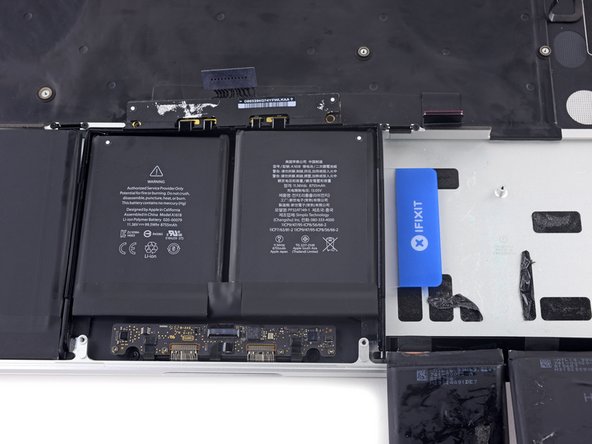
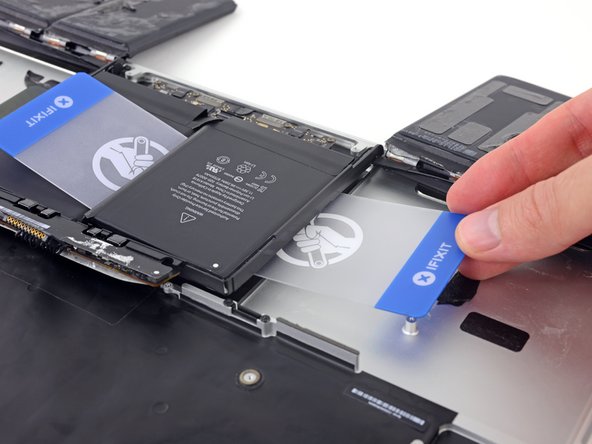
    • Slide one corner of a plastic card under the elevated edge of the final battery cell.

    • Push the card farther underneath the battery cell to slice through the adhesive securing it in place.

    • Don't try to fully separate this battery cell yet. Leave your plastic card in place to prevent it from re-adhering.

  70. MacBook Pro 15" Retina Display Mid 2015 Battery Replacement (Legacy): stap 70, afbeelding 1 van 2 MacBook Pro 15" Retina Display Mid 2015 Battery Replacement (Legacy): stap 70, afbeelding 2 van 2
    • If you haven't already done so, lift and flip the two outer left battery cells to clear access to the outside edge of the final battery cell.

  71. MacBook Pro 15" Retina Display Mid 2015 Battery Replacement (Legacy): stap 71, afbeelding 1 van 3 MacBook Pro 15" Retina Display Mid 2015 Battery Replacement (Legacy): stap 71, afbeelding 2 van 3 MacBook Pro 15" Retina Display Mid 2015 Battery Replacement (Legacy): stap 71, afbeelding 3 van 3
    • Repeat the process you used on the center-right battery cell to finish separating the adhesive on the center-left cell:

    • Push one corner of a plastic card below the plastic battery frame and underneath the remaining adhered edge of the final battery cell.

    • Slide your card all the way underneath the battery cell, and leave it to prevent the battery cell from re-adhering.

  72. MacBook Pro 15" Retina Display Mid 2015 Battery Replacement (Legacy): stap 72, afbeelding 1 van 2 MacBook Pro 15" Retina Display Mid 2015 Battery Replacement (Legacy): stap 72, afbeelding 2 van 2
    • Remove the first card that you inserted under the final battery cell.

  73. MacBook Pro 15" Retina Display Mid 2015 Battery Replacement (Legacy): stap 73, afbeelding 1 van 2 MacBook Pro 15" Retina Display Mid 2015 Battery Replacement (Legacy): stap 73, afbeelding 2 van 2
    • With one plastic card underneath each of the two center battery cells, twist and lift both cards to fully separate the battery cells, together with the plastic frame and battery board, from the MacBook Pro.

  74. MacBook Pro 15" Retina Display Mid 2015 Battery Replacement (Legacy): stap 74, afbeelding 1 van 2 MacBook Pro 15" Retina Display Mid 2015 Battery Replacement (Legacy): stap 74, afbeelding 2 van 2
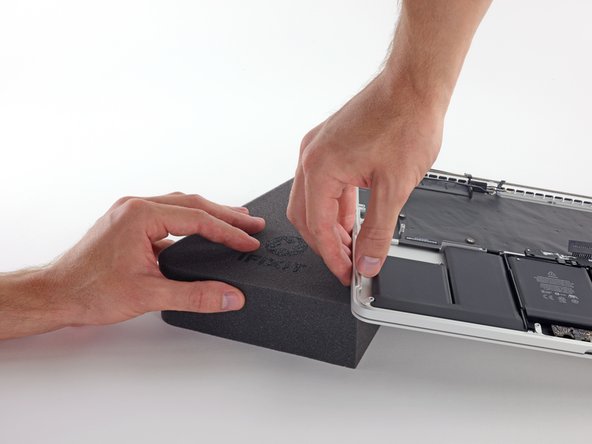
    • Lift and remove the battery.

    • Before installing your new battery, remove all the old adhesive from the MacBook Pro's case.

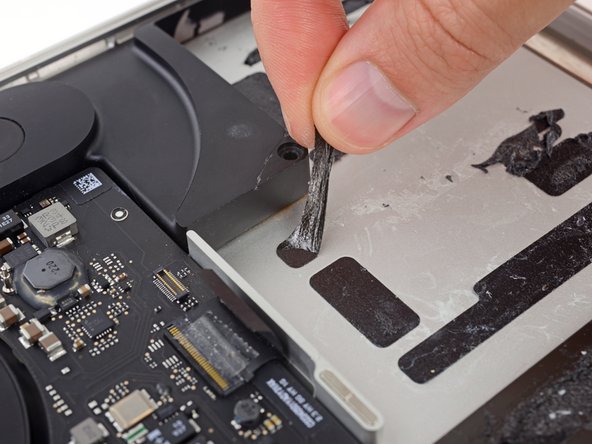
    • With a little luck, you can slowly pull out each strip of adhesive with your fingers.

    • Otherwise, soak each strip of adhesive with a bit of adhesive remover for 2-3 minutes, and then scrape it out with a plastic tool. This can take quite a bit of work, so be patient.

    • Mop up any remaining adhesive remover and give your MacBook Pro a few minutes to air dry.

    • The replacement battery included in your iFixit kit comes with adhesive pre-installed. Test the battery's fit and alignment carefully before peeling off the film covering the adhesive, and then press each cell firmly into place. If any additional films/liners are present that weren't on your original battery, remove them now.

    • Calibrate your battery before using it: allow it to drain overnight, then charge it to 100% and drain it again until your MacBook Pro shuts down automatically. Charge it again and use it normally.

    • If you notice any unusual behavior or problems after installing your new battery, you may need to reset your MacBook Pro's SMC.

Conclusie

To reassemble your device, follow these instructions in reverse order.

4 andere personen hebben deze handleiding voltooid.

Jeff Suovanen

Lid sinds: 08/06/13

428.098 Reputatie

259 handleidingen geschreven

Team

iFixit Lid van iFixit

Staff

135 Leden

16.817 handleidingen geschreven

0 opmerkingen

Voeg opmerking toe

Weergavestatistieken:

Afgelopen 24 uren: 0

Afgelopen 7 dagen: 0

Afgelopen 30 dagen: 0

Altijd: 1,193