Deze versie kan foutieve bewerkingen bevatten. Schakel over naar de recentste gecontroleerde momentopname.
Wat je nodig hebt
-
-
Verwijder de volgende P5-pentalobe schroeven die de onderste behuizing aan de MacBook Pro bevestigen:
-
Acht 3.1 mm lange schroeven
-
Twee 2.3 mm lange schroeven
-
-
-
-
Trek de sticker die over de batterijaansluiting is heen geplakt los.
-
-
-
Til beide kanten van de batterijaansluiting voorzichtig omhoog om de aansluiting uit het contact op het logic board te duwen.
-
Buig de aansluiting naar achteren richting de batterij om zo te zorgen dat de aansluiting tijdens de reparatie geen contact maakt met het logic board en je laptop inschakelt.
-
-
Deze stap is niet vertaald. Help het te vertalen
-
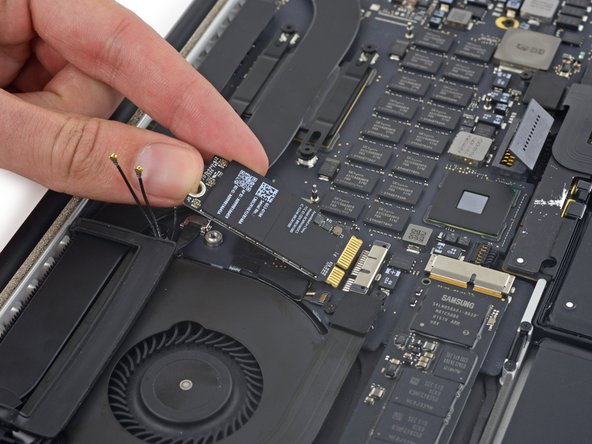
Disconnect the three airport Antenna cable connectors from their sockets on the AirPort board and bend them up and out of the way.
-
-
Deze stap is niet vertaald. Help het te vertalen
-
Remove the single 2.9 mm T5 Torx screw securing the AirPort board.
-
-
Deze stap is niet vertaald. Help het te vertalen
-
Lift the end of the AirPort board up enough to pass over the heat sink directly behind it.
-
Pull the AirPort board straight out of its socket on the logic board.
-


Annuleren: ik heb deze handleiding niet afgemaakt.
20 andere personen hebben deze handleiding voltooid.

5 opmerkingen
Hi! I need to replace the cable with the 3 prongs on the end. Do you have a video for that and would you be able to tell me where I can buy the cable?
Hello Maria - Did you ever find the cable and how a guide to replace it? Anyone on ifixit know where to get this part? I need one too.
Tony -
Yea this cable is easily damaged. Just broke mine trying to put in the new cord…the contact got bent and is no longer able to fit on the little button like socket. So annoying! Definitely need a replacement cable now…
Bonjour,
c'est possible de la changer aussi sur le Macbook pro 13" de mi-2012 ?