Deze versie kan foutieve bewerkingen bevatten. Schakel over naar de recentste gecontroleerde momentopname.
Wat je nodig hebt
-
-
Verwijder de volgende 10 schroeven uit de onderste behuizing van de MacBook Pro 13" Unibody:
-
Zeven 3 mm lange kruiskopschroeven.
-
Drie 13.5 mm lange kruiskopschroeven.
-
-
-
Til de voorkant onderste behuizing iets omhoog en duw de behuizing richting de achterkant van de laptop om de behuizing volledig los te krijgen.
-
-
Deze stap is niet vertaald. Help het te vertalen
-
Use the flat end of a spudger to lift the battery connector up out of its socket on the logic board.
-
-
Deze stap is niet vertaald. Help het te vertalen
-
Remove two Phillips screws securing the hard drive bracket to the upper case.
-
-
-
Deze stap is niet vertaald. Help het te vertalen
-
Lift the the retaining bracket out of the upper case.
-
-
Deze stap is niet vertaald. Help het te vertalen
-
Lift the hard drive by its pull tab and pull it out of the chassis, minding the cable attaching it to the computer.
-
-
Deze stap is niet vertaald. Help het te vertalen
-
Remove the hard drive cable by pulling its connector straight away from the hard drive.
-
-
Deze stap is niet vertaald. Help het te vertalen
-
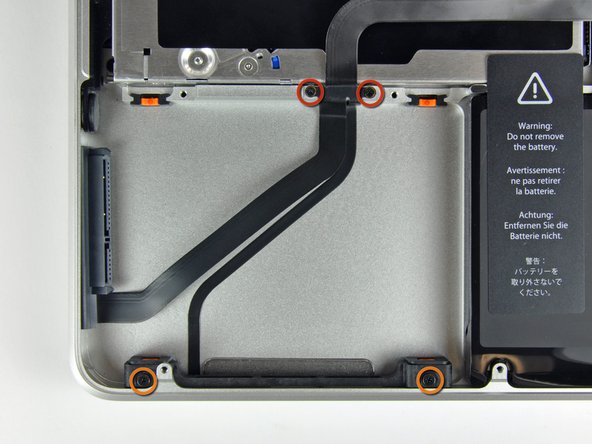
Remove the following four screws securing the hard drive and IR sensor cable to the upper case:
-
Two 1.5 mm Phillips screws.
-
Two 9.5 mm Phillips screws.
-
-
Deze stap is niet vertaald. Help het te vertalen
-
Slide the hard drive and IR sensor bracket away from the edge of the upper case.
-
Carefully peel the hard drive and IR sensor cable from the upper case.
-
-
Deze stap is niet vertaald. Help het te vertalen
-
Use the flat end of a spudger to pry the hard drive cable connector up off the logic board.
-
-
Deze stap is niet vertaald. Help het te vertalen
-
Lift the hard drive/IR sensor cable assembly out of the upper case.
-


Annuleren: ik heb deze handleiding niet afgemaakt.
292 andere personen hebben deze handleiding voltooid.

7 opmerkingen
Used a Phillips #00 and a creditcard. It's an easy job, takes about 10 minutes. :)
In step #8 the two small screws were very tight in my computer. The Phillips #00 was too large and damaging the screws. I changed to a Phillips #000 applied substantial pressure and voila, the screws came off.
Reassembly: placing the IR sensor cable (the one you"peeled off" in step #9) is a bit tricky. Start from the side opposite the IR sensor (the side with the two small screws of step 8) and press first along the short vertical side and then across towards the IR section. There should be a little left for a vertical section at the IR sensor end.
if i change the HDD cable and get the same results what could be the the real problem , because the original problem as we all know was the we were getting the question mark on the white screen .