Inleiding
Gebruik deze handleiding om de linkerspeaker te vervangen.
Wat je nodig hebt
-
-
Verwijder de volgende tien schroeven die de onderste behuizing aan de bovenste behuizing bevestigen:
-
Twee 2.3 mm lange P5 Pentalobe-schroeven
-
Acht 3.0 mm lange P5 Pentalobe-schroeven
-
-
-
Verwijder de plastic bescherming die aan het contactbord van de batterij is bevestigd.
-
-
-
-
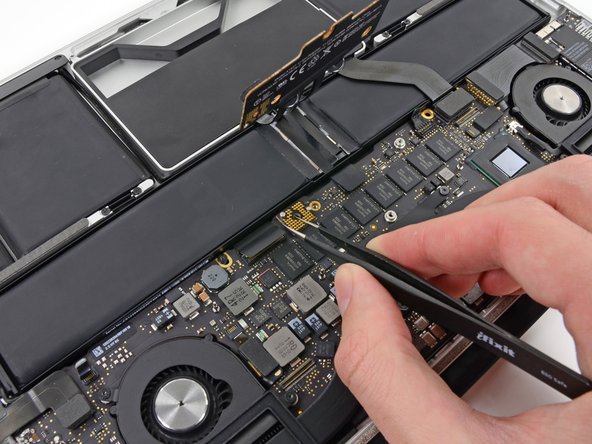
Gebruik een pincet om de kleine plastic bescherming bij de rechter onderhoek van het connectorbord van de batterij te verwijderen.
when doing this with metal tweezers as instructed in the video, it was difficult to get off and apparently while i was trying to do it, the tweezers went too far under and i believe made contact with the screw underneath? there was a zzz noise, an orange flicker and a little stream of smoke that came out. i freaked out and put everything back together to see if the laptop even still worked, it turned on and everything but died right away (i drained it before doing the repair anyway, so i was surprised it turned on at all).
i finished the battery repair and did several other things while in there. i have charged it all the way as recommended and will use it later on to see how everything is, im hoping that it’s a okay, but could someone explain to me what happened and the possible consequences?
-
-
-
Pak de Interposer met een pincet vast.
-
Til de Interposer van het logic board af en verwijder deze.
you must lift it absolutely vertically, or it fouls against the locator pin in the corner- you can easily get the impression that it won’t come over the end of this pin- almost like it’s rivetted in. it isn’t. get a good grip on it with the tweezers in the centre hole & one of the sides, & lift it STRAIGHT up.
I would recommend to use plastic tweezers in order to reduce risk of damage.
Second that. If you have thin heat shrink tubing, form some over the tweezer tips. If the tubing is thin and small enough in diameter you’ll see the serrations of the tweezer tips.
wat is the model this SSD
-
-
-
Gebruik het platte einde van een spudger om de kabelaansluiting van de hoofdtelefoonjack in een rechte beweging uit het contact op het logic board omhoog te duwen.
For an easier, lower-risk repair, skip this step and step 18 - go straight to step 19 and fold the speaker out of the way.
Agreed, this is the way
-
-
-
Duw de punt van je spudger onder de kabelaansluiting van de linkerspeaker.
-
Wrik de kabelaansluiting van de linkerspeaker rustig omhoog uit het contact op het logic board.
It's easier to follow Step 19 & 20 first and then come to Step 18 (this step). Doing so will make it easier to remove that speaker connector easily holding the cable of speaker without having to use a pry tool.
-
-
-
Gebruik een T5 Torx-schroevendraaier om de volgende schroeven, die de rechterspeaker aan de bovenste behuizing bevestigen, te verwijderen:
-
Eén zwarte 6.8 mm lange schroef
-
Eén zilveren 6.3 mm lange schroef
-
Eén zwarte 4.9 mm lange schroef
Be very careful on this step. If you aren’t you can snap the plastic on the corners where the screws go in. Remember to go slowly when spinning the screws back in, it doesn’t take gorilla torque to tighten them, just take it easy!
-
Om je toestel weer in elkaar te zetten, volg je deze instructies in omgekeerde volgorde.
Om je toestel weer in elkaar te zetten, volg je deze instructies in omgekeerde volgorde.
Annuleren: ik heb deze handleiding niet afgemaakt.
22 andere personen hebben deze handleiding voltooid.
Met dank aan deze vertalers:
100%
Thomas Keulemans helpt ons de wereld te herstellen! Wil je bijdragen?
Begin met vertalen ›
5 opmerkingen
Rats:
"Wedge the tip of a spudger beneath the left speaker cable connector.
Gently pry the left speaker cable connector up off from its socket on the logic board.
Be sure you are prying up on the connector, not the socket itself."
I accidentally pried up on the socket, which looks like it was soldered to the board. Left speaker doesn't work, of course. I assume there is no fix for this, other than replacing the board??
Thank you very much for the walkthrough. No problems to follow at all. Everything worked as a charm. Changed both speakers as per your other guide.
This was great! I fixed the computer easily.
Très bon tuto. Clair et précis. Changement des 2 HP en moins d'1 heure.
Bravo à l'équipe.


If don’t have one of those neat project mats, then you can use small pieces of flattened blu-tack to hold the screws. If you arrange them in the shape of your mac book cover, and put the screws down methodically, you can get a one-to-one mapping of the screws to the correct screw holes.
Toby Thurston - Antwoord
Or you can use an ice tray where you put the screws and the parts in separate bays in the same order as they come in the instructions.
timofej.se -
This is great! I used a small magnetic white board, and wrote on it to identify the parts as I went. This whole process, from the fast shipment to the great instructions to the complete, high quality, tool kit has been great. I’m typing this comment on my resurrected laptop. Thank you! Sue
Susan Greer - Antwoord
It would be a good idea if people recorded in the comments which screws go where so that, if someone lost their screw positions, they could recover them from the comments.
Raymond Shpeley - Antwoord