Inleiding
Gebruik deze handleiding om de vastgelijmde batterij veilig uit je MacBook Pro te verwijderen met behulp van een batterij vervangingskit van iFixit. De lijmverwijderaar in je kit verzacht de lijm die de batterij bevestigt en zorgt ervoor dat je de batterij makkelijker kunt verwijderen. De batterij bestaat uit zes verschillende cellen, waarvan er vier aan de bovenste behuizing zijn vastgelijmd.
De lijmverwijderaar van iFixit is licht ontvlambaar. Voer deze procedure daarom uit in een goed geventileerde ruimte, rook niet tijdens de reparatie en werk ook niet in de buurt van een open vuur.
Om het risico op schade te minimaliseren, ontlaad je de batterij van je MacBook voordat je met deze procedure begint. Een geladen lithium-ion batterij kan een gevaarlijke en oncontroleerbare brand veroorzaken als deze per ongeluk wordt doorboord. Neem, als je batterij gezwollen is, de juiste voorzorgsmaatregelen.
Let op: De vloeistof die je gebruikt om de lijm te verzachten, kan ook bepaalde soorten plastic aantasten, zoals de plastic speakerbehuizingen in je MacBook Pro. Wees daarom voorzichtig bij het toedienen van de vloeistof.
Als je de oude lijmverwijderaar van iFixit gebruikt, met een apart flesje en een spuit (welke we niet langer verkopen), vind je hier iets andere instructies.
Wat je nodig hebt
-
-
Verwijder de volgende tien schroeven die de onderste behuizing aan de bovenste behuizing bevestigen:
-
Twee 2.3 mm lange P5 Pentalobe-schroeven
-
Acht 3.0 mm lange P5 Pentalobe-schroeven
-
-
-
Verwijder de plastic bescherming die aan het contactbord van de batterij is bevestigd.
-
-
-
Gebruik een pincet om de kleine plastic bescherming bij de rechter onderhoek van het connectorbord van de batterij te verwijderen.
when doing this with metal tweezers as instructed in the video, it was difficult to get off and apparently while i was trying to do it, the tweezers went too far under and i believe made contact with the screw underneath? there was a zzz noise, an orange flicker and a little stream of smoke that came out. i freaked out and put everything back together to see if the laptop even still worked, it turned on and everything but died right away (i drained it before doing the repair anyway, so i was surprised it turned on at all).
i finished the battery repair and did several other things while in there. i have charged it all the way as recommended and will use it later on to see how everything is, im hoping that it’s a okay, but could someone explain to me what happened and the possible consequences?
-
-
-
Pak de Interposer met een pincet vast.
-
Til de Interposer van het logic board af en verwijder deze.
you must lift it absolutely vertically, or it fouls against the locator pin in the corner- you can easily get the impression that it won’t come over the end of this pin- almost like it’s rivetted in. it isn’t. get a good grip on it with the tweezers in the centre hole & one of the sides, & lift it STRAIGHT up.
I would recommend to use plastic tweezers in order to reduce risk of damage.
Second that. If you have thin heat shrink tubing, form some over the tweezer tips. If the tubing is thin and small enough in diameter you’ll see the serrations of the tweezer tips.
wat is the model this SSD
-
-
-
Gebruik het platte einde van een spudger om de rechterkant van de datakabelaansluiting van het I/O-bord uit het contact op het I/O-bord omhoog te duwen.
-
-
-
Wrik het platte einde van een spudger onder de linkerzijde van de datakabelaansluiting van het I/O-bord.
-
Draai de spudger rustig om om de aansluiting van de datakabel van het I/O-bord los te koppelen uit het contact op het logic board.
I also skipped this step as this data cable is not compromising the exchange of battery and less interaction with connectors is less risk of damage..
Diesen Schritt habe ich ebenfalls weggelassen, da das Datenkabel den Austausch der Batterie nicht behindert und weniger Manipulationen an Steckverbindern bedeutet ein geringeres Risiko für Beschädigungen
-
-
-
-
Gebruik het platte einde van een spudger om de kabelaansluiting van de SSD uit het contact op het logic board omhoog te duwen.
-
Haal de SSD-kabelaansluiting uit de weg.
As per my comment on step 10, this is also not required. When you remove the SSD in step 22, you can just fold it over out of the way.
This step is easy enough that I’d just remove it to be out of the way. I 100% agree with your other comments though. While you’re here, might as well do step 21 and remove the drive, just takes a sec.
I also strongly recommend not to unmount the speaker plugs, just flip them out of the way, same as with the SSD drive. Makes it much less complicated and less risky. It worked perfect for me.
Ich empfehle ebenfalls, die Platinenstecker der Lautsprecher nicht zu lösen sondern die Lautsprecher einfach, so wie das SSD-Laufwerk, einfach aus dem Weg zu legen. Das macht die Sache weniger kompliziert und weniger risikoreich. Es hat bei mir super funktioniert!
-
-
-
Duw de punt van je spudger onder de kabelaansluiting van de rechterspeaker.
-
Wrik de kabelaansluiting van de rechterspeaker rustig omhoog uit het contact op het logic board.
-
-
-
Gebruik een T5 Torx-schroevendraaier om de volgende schroeven, die de rechterspeaker aan de bovenste behuizing bevestigen, te verwijderen:
-
Eén zwarte 6.8 mm lange schroef
-
Eén zilveren 6.3 mm lange schroef
-
Eén zwarte 4.9 mm lange schroef
If you manage to misplace any screws, particularly one of the speaker retaining screws, look under the speakers - they are magnetic and great at hiding missing screws :)
-
-
-
Til de rechterspeaker uit de bovenste behuizing en verwijder deze.
For those who don’t realize it, the speakers you are removing really are the plastic corner pieces that look like they’re just there to fill the space.
-
-
-
Gebruik het platte einde van een spudger om de kabelaansluiting van de hoofdtelefoonjack in een rechte beweging uit het contact op het logic board omhoog te duwen.
For an easier, lower-risk repair, skip this step and step 18 - go straight to step 19 and fold the speaker out of the way.
Agreed, this is the way
-
-
-
Duw de punt van je spudger onder de kabelaansluiting van de linkerspeaker.
-
Wrik de kabelaansluiting van de linkerspeaker rustig omhoog uit het contact op het logic board.
It's easier to follow Step 19 & 20 first and then come to Step 18 (this step). Doing so will make it easier to remove that speaker connector easily holding the cable of speaker without having to use a pry tool.
-
-
-
Gebruik een T5 Torx-schroevendraaier om de volgende schroeven, die de rechterspeaker aan de bovenste behuizing bevestigen, te verwijderen:
-
Eén zwarte 6.8 mm lange schroef
-
Eén zilveren 6.3 mm lange schroef
-
Eén zwarte 4.9 mm lange schroef
Be very careful on this step. If you aren’t you can snap the plastic on the corners where the screws go in. Remember to go slowly when spinning the screws back in, it doesn’t take gorilla torque to tighten them, just take it easy!
-
-
-
Gebruik je duim of je vinger om de plastic veerbeugel bij de SSD-kaart te buigen en zo de twee klemmen aan de voorkant van het toestel los te maken.
-
Kantel de SSD-module, terwijl je de veerbeugel ingedrukt houdt, uit de inkeping.
-
-
-
Verwijder de drie 2.2 mm lange T5 Torx-schroeven aan beide zijden van de batterij (zes in totaal).
If I were to do this again, I think I would leave unbolting the transverse battery until after ungluing the other four. That way one can tip the laptop on to one of its short sides and so run adhesive remover along the long edge of each battery and let gravity assist penetration without the transverse battery falling out.
I think this is good advice.
I just did one of these that didn’t have these screws installed from the factory. Odd
-
-
-
Om je scherm te beschermen, plaats je een laag aluminiumfolie tussen je scherm en het toetsenbord en laat je het daar liggen terwijl je werkt.
You can use a heat gun to remove the adhesive. Remember you can always add more heat so don’t over do it. I put my heat gun on high for less than 10 seconds at a time
Using a heat gun on a lithium-ion battery is not a good idea. You can get away with it if you are careful, but a solvent is much safer. ;)
-
-
-
Nu je MacBook Pro volledig is voorbereid, is het tijd om jezelf voor te bereiden:
-
Draag oogbescherming bij het toedienen van de lijmverwijderaar. (Oogbescherming is toegevoegd in de kit.)
-
Draag geen contactlenzen zonder oogbescherming.
-
Er zitten ook handschoenen in je kit. Als je je zorgen maakt over irritaties van de huid, kun je nu je handschoenen aantrekken.
-
-
-
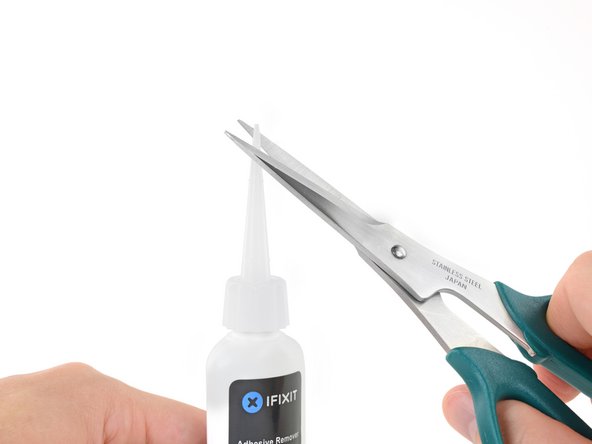
Trek de zwarte, rubberen stopper uit het flesje met lijmverwijderaar.
-
Gebruik een schaar om de verzegelde top van het flesje af te knippen.
-
-
-
Dien wat druppels lijmverwijderaar toe onder de zijkant van de meest linkse batterijcel.
-
Wacht ongeveer 2-3 minuten zodat de lijmverwijderaar in kan trekken en haar werk kan doen onder de batterijcel voordat je verdergaat.
If you use a heat gun be sure to point the heat gun away from the motherboard. After heating for 10 seconds or less use the blunt end of the metal pry tool as you don’t want to puncture the battery. You don’t need much force as after you have enough heat you will hear it unsticking when you pry at it lightly with the BLUNT end of the metal pry tool. Repeat this step on the other side. You don’t need to heat the cells near the motherboard as they are secured with small screws
I replace a lot of glued in Macbook batteries and you really do not need ISO to get them out. These wide blade plastic spudgers are brilliant and cheap. https://www.aliexpress.com/item/32824615... Image here https://imgur.com/a/0Y0Yvyj
May not need it to remove the battery, but it sure helps for removing the leftover residue and black VHB that’s left behind. I found that dousing the VHB and using a metal flat spatula helped.
Some good advice:
Use a iFixit plastic card/credit card (work from the short side of the computer) and stick it under the battery towards the glue strip and hold the card approx 45° (or whatever angle is appropriate) and drip the glue remover on the card so it slides/runs down the card underneath the battery. In this way the glue remover is aimed straight to the glue under the battery to ‘eat its way’ onto the glue. Let it do its job for a minute or two. Then you can dig in the card even more underneath (the angle of the card will obviously be less and less as you get further in; the idea is just to somehow slide the liquid under), add a bit more remover, dig a bit more, etc…
Otherwise the glue remover can get a bit all over the place but this way it is more easily directed towards the glue.
Goo Gone, applied with a pipette, is a non-flammable alternative solution for releasing the adhesive that won’t harm plastics if it seeps past the battery cavities. It does take a bit longer, 30-45 mins, but is much safer. An additional benefit is that the adhesive will be completely separated from the top-case, so cleanup is super quick.
Hi John,
We don’t recommend using Goo Gone because it’s a petroleum distillate based remover, which leaves an oily residue. The residue can prevent replacement adhesive from fully bonding with the surface. Be sure to clean any Goo Gone surface with a detergent-based cleaner.
Isopropyl alcohol and iFixit’s adhesive remover are formulated to evaporate quickly and leave little residue, which allows replacement adhesive to bond properly to the surface.
Note, per my later cleanup, I found that 2-3 drops may not be enough, or else, 2-3 minutes is too long to wait before trying to pry. Once the remover starts to dry, it is not as easy to work the adhesive. I ended up using maybe 1/10 of the bottle overall and most of that was liberally dousing the residue a few times to fully clean the case.
-
-
-
Steek het platte einde van je spudger of plastic kaart onder de meest linkse batterijcel.
-
Loop je spudger of kaart langs de onderkant van de batterijcel en wrik deze ietwat omhoog om deze te scheiden van de lijm.
This is the most difficult step. The tip of my spudger got bended and the aluminum case damaged it.
I also broke a spudger trying to do this. Eventually I figured out it is easier to go in diagonally from the corner, just to one side of the screw hole, and lever until you hear the adhesive pad tear and give way.
we use a hair dryer and gently blow hot air in between the battery for a good minute before trying to lift it with a spunger. It worked wonderfully! When lifting, just give it constant force upward and you'll hear the battery slowly breaking away from the macbook, and we don't even see glue residues on our macbook at all. Just be patient. :)
Just a note to say that the above comments were written before the liquid adhesive remover was added to the guide—you should definitely NOT be breaking any spudgers using the current procedure, which requires very little force. I recommend using plastic cards rather than spudgers—it's pretty easy to slide them under each battery cell and separate the adhesive once the solvent has done its work.
This is much easier to do using a plastic card. Just slide the card under the side of the battery and rock it back and forth. The battery will separate pretty quickly with minimal residue.
by a plastic card, do you mean a credit card type thing? thanks in advance.
Exactly—one of these or an old credit card should work fine.
I second this, I also used an old credit card and it totally worked! I did not use any heat or liquid
Some good advice:
Use a iFixit plastic card/credit card (work from the short side of the computer) and stick it under the battery towards the glue strip and hold the card approx 45° (or whatever angle is appropriate) and drip the glue remover on the card so it slides/runs down the card underneath the battery. In this way the glue remover is aimed straight to the glue under the battery to ‘eat its way’ onto the glue. Let it do its job for a minute or two. Then you can dig in the card even more underneath (the angle of the card will obviously be less and less as you get further in; the idea is just to somehow slide the liquid under), add a bit more remover, dig a bit more, etc…
Otherwise the glue remover can get a bit all over the place but this way it is more easily directed towards the glue.
My MBP identifies as late 2012/early 2013, and don’t know where you come up with a separate identity.
Looking at both disassembly procedures, neither shows the aftermarket (probably NewerTech or OWC) battery I found in this MBP.
That’s disconcerting; finds one asking myself - “Am I using the right procedure??”
if you know this might be the case, please add note to this step if the user finds only 4 physical cased batteries.
Tnx!
Use the plastic credit-card shaped card.
-
-
-
Herhaal de vorige stappen om de ernaastliggende batterijcel van de lijm eronder te scheiden:
-
Dien wat druppels lijmverwijderaar toe onder de batterijcel.
-
Wacht ongeveer 2-3 minuten zodat de lijmverwijderaar kan intrekken en haar werk kan doen.
-
Steek een spudger of plastic kaart onder de batterijcel en wees daarbij voorzichtig dat je de batterij niet beschadigt. Scheid de batterijcel van de lijm die het aan je MacBook Pro bevestigt.
-
-
-
Ga nu naar de andere kant van de batterij en herhaal deze procedure bij de twee batterijcellen aan de rechterkant van de MacBook Pro.
-
Onthoud dat je een beetje lijmverwijderaar onder iedere cel toedient en 2-3 minuten wacht zodat het in kan trekken.
Puncturing the battery’s protective covering can lead to release of caustic fumes or fire.
-
-
-
Til de batterij als een geheel uit de bovenste behuizing en verwijder deze volledig.
-
Met een beetje geluk kun je alle lijmstrips met je vingers uit de MacBook trekken.
-
Als dat niet lukt, dien je bij ieder batterijgebied wat lijmverwijderaar voor 2-3 minuten toe en schraap je het vervolgens met een openingsplectrum of een andere tool uit je kit weg van de behuizing. Dit kan wat werk vereisten, dus wees geduldig.
-
Haal tot slot alle lijmverwijderaar weg en geef je MacBook Pro wat tijd om te drogen.
-
Kalibreer je vers geïnstalleerde batterij: laad deze op tot 100% en laat deze nog minstens twee uur doorladen. Haal 'm dan van de oplader af en gebruik je laptop totdat deze uitvalt vanwege een lege batterij. Wacht vervolgens minstens 5 uur en laad je batterij tot slot nog een keer ononderbroken op tot 100%.
During battery replacement take care to position the two left and right battery packs inwards and upwards towards the macbook center such, that there is sufficient space for reinstallation of the two speakers!
I second Fred’s suggestion. I had to “smoosh” the right speaker in since my battery replacement was a little bit too far over. It was fine, but the “heads up” note is warranted.
If you're replacing the top case that includes a new battery, can't you skip removal of the battery?
Yes!! If uppercase Assembly(Includes Trackpad, keyboard, Palmrest & BATTERY) is being replaced, there is no need to remove battery from old uppercase assembly.
When you are at this step and before you put the new battery in, take the time to clean your computer really well. You will be surprised how much dust/dirt and even pet hairs have gotten into your computer. After I removed the battery, I use a little more of the acetone to clean the bays up and after it dried, I used a tiny bit of Isopropyl Alcohol to make sure there was a good clean area for the new bonding. Make sure you clean the fans. Don’t use a toothbrush or anything like that. If your have a Lowes or Home Depot, you can buy a shop vac attachment kit for about $20, it’s well worth it. Don’t use that air in a can crap, it will put moisture on circuits. Take your time, it’s not a hard task to do everything, just use a little patience.
Hi all,
After installing the new batteries, my mac is not powering up… Do i need to charge the battery first and then check again? Have anyone faced similar issue before?
My 1st battery from ifixit came out to be defective and it caused fire at the centre of the long battery. I have got a replacement for the defective piece which i have installed now. However, now i am worried that connecting to power could lead to any potential fire / harm to my mac???
Already i have spent lot of time in this and it would be very upsetting if this battery spoils my mac!!!
Any suggestion people???? thanks in advance!
BR,
Vijay
Hi Vijay!
Uh-oh, we’re sorry to hear about the battery trouble!
Our batteries come with a 1-year warranty, so this would definitely be something we can assist with. Please feel welcome to reach out via help.ifixit.com and provide our Support team with your order number so that they can look into these battery troubles with you.
Thanks!
Hi All,
Just replaced battery, and am typing this on the live MacBook. The unit fired up as soon as I plugged in the power adapter. Nice. The battery percentage indicator said the battery had approximately 85% power charge. Is this normal? If not, what steps should I take to ensure that this battery is properly calibrated?
Cheers,
James
Hi James,
Follow these steps to calibrate your new battery: https://help.ifixit.com/article/265-batt...
ご指摘ありがとうございました!訂正済みです。
Can someone tell me which model is written in the battery? I saw that is written the model a1437. Is this model compatible with the a1425? Thanks
Hi Mizuno,
The battery model is A1437, and it is compatible with the MacBook Pro model A1425.
These instructions are brilliantly concise! Thank you. And thank you everyone for your comments. As a final comment from me, it is much easier to assess the final position of the batteries if you place them gently in position, reinstall the speakers, adjust the battery position if needed and then press them firmly into place.
I did everything in the kit, but my computer won’t acknowledge the battery and is only running on my power adapter. Once I take off the power adapter it shuts down. I also tried resetting the snc, but unsure if it did anything. I reopened up the back to see if I missed anything. The batteries are warm, which means they were running. I’m very confused, anybody else run into similar issues?
My OEM adhesive was particularly persnickety and did not want to come up. I found a pick to be more useful than the flat spudger or the card. I also used several applications of remover and found that working with it wet was much more effective than letting it dry to dissolve the glue. A final few wipes with more remover and the cloth wipe that came with the kit did a good cleanup job.
So I just replaced the battery and reassembled everything and when plugging it into the power supply, the LED is not lighting up and computer is not turning on. Not sure what I did incorrectly as I basically followed the steps in reverse for reassembly after installing the battery. Any advice would be appreciated.
-


Om je toestel weer in elkaar te zetten, volg je deze instructies in omgekeerde volgorde.
Om je toestel weer in elkaar te zetten, volg je deze instructies in omgekeerde volgorde.
Annuleren: ik heb deze handleiding niet afgemaakt.
104 andere personen hebben deze handleiding voltooid.
Met dank aan deze vertalers:
100%

Thomas Keulemans helpt ons de wereld te herstellen! Wil je bijdragen?
Begin met vertalen ›


48 opmerkingen
Followed this guide step by step. Very comprehensive and accurate. I would never have dared disconnect the speakers if this guide didn't show me how.
One point though. The lower left and right speaker screws had some metallic sponge on top of them. I wouldn't have known there were screws underneath.
Excellent guide. I'm a repair technician who works on both PCs and Macs. This was my first rMBP battery replacement and I wasn't sure what to expect. For those experienced with electronics repairs, I'd say this is a relatively easy repair with the exception of releasing the adhesive which holds the battery cells to the case. I was eventually able to do it with a spudger and some elbow grease, but I was worried at times that I was going to puncture the battery. Apple really needs to dial back the strength of adhesive they use for these applications. They are clearly making it as difficult as possible for the average user to attempt, which IMO may end up costing them well informed and thoughtful customers. This setup is similar to the iPhone 6 battery (which I actually did puncture with a spudger the first time I removed one) albeit more involved to remove. In the case of the iPhone, a few minutes on the hot plate loosens it right up but this isn't really feasible in the case of the rMBP.
I recommend to skip step 14 ( pry the left speaker cable connector up off from its socket on the logic board). The risk of damaging the socket is very high. There is even a warning in this guide (Be sure you are prying up on the connector, not the socket itself!).
Proceed from 13 to 15 and 16 to remove the right speaker. Still with the connector in place you can put the speaker a bit aside and have enough room to remove the battery packs in the steps later.
Same for left speaker and its connector cable (step 18).
Hint by @roelofk with old credit card is very helpful.
Excellent description and excellent pictures. Thx
Apple should not put Adhesive most specially the time you spent to remove it. Its easy but it takes time cause the adhesive is like a glue, If somebody
read this the tactic is borrow a Hair drier from your wife and heat this Bad Battery really hot and start inserting the Plastic or whatever you have underneath the Battery slowly. Apple should just put some kind of anti static foam so its easy to remove in no time theres cover anyway that foam will keep it from moving period thats it.
Excellent guide, it worked very well for me, the parts and tools I purchased here made this job easy and a pleasure! Getting the batteries unstuck from their glue is the hardest part for sure, just patience and proper tools and it doesn't take too long though. Thank you so much!
Excellent guide, but PLEASE consider changing the reported difficulty to medium (iFixit, if that's not something the author can do). The process is actually super easy, but just takes over an hour to do.
I nearly didn't do it myself after realising it was rated the same difficulty as an SSD/HDD change in an iMac (with which I cracked my screen in two places), but it isn't. This is about a 2/10 difficulty level, and that's about 9/10.
I just think it would be a shame if the reported difficulty dissuaded people from doing it, and wasted hundreds of dollars paying Apple to do it. If you can read, and have the equivalent dexterity of tying shoelaces, you can do this. :)
Also, the battery removal is a pain, but if you cut an old credit card down the middle, you have two "spudgers" you can use underneath in a turning motion (sort of like rotating a lever in-plane), while pulling it in and out. A bit of patience and you'll get each half out in about 5 minutes.
Great manual! Thanks a lot. I do agree with @longtimemacuser tough, difficulty level was discouraging me. Once I read all the steps, I thought I could do it and I did it and it worked! So I believe this difficult level should be medium, it's not hard (expect for the battery adhesive), it just take a long time to do it.
I had a water incident with my wife's Macbook Pro. After drying the machine it would startup on power but the battery was toast. It said the battery needed replacing. Went through this battery replacement procedure - agree with the posts above that it's not as difficult as I was expecting based on the difficulty level.
Incidentally - after battery replacement the battery charged once then after that the machine wouldn't boot at all. I eventually went through this procedure a second time then removed the logic board and the i/o board and liberally cleaned both with a 99.9% isopropyl alcohol bath. Reassembled all the components and everything works great. I assume this was due to some residual water damage and the cleaning seemed to do the trick.
Kids got a new spill resistant chromebook new and the wife's Macbook Pro is happy again.
Just replaced battery + wifi module.
Thanks a lot!
This was much easier than expected, and the MBP is keeping a charge just like when I pulled it out of the box 4 years ago. Like was said before, this might be the step below "difficult" unless you've got the coordination of an elephant on stilts. Thanks for the guide!
Very clear instructions, I followed them carefully and everything worked out fine! It was quite easy, actually.
I only improvised by using my nail polish remover (acetone) as an alternative to adhesive remove, worked as expected though :)
Been repairing Apple laptops on a regular basis for about 17 years now but this was my first ‘Retina Battery Adventure.’ As a long-experienced Apple tech, this really isn’t a very hard job. Just use the adhesive remover very carefully. It does all the hard work.
I bought iFixit’s ‘kit’, which turned out to be a great value; the replacement battery along with a spudger, precision tweezers, a syringe, a super-precision nozzle (for the syringe), small jar of adhesive remover (I think it’s just Acetone nail polish remover ), gloves, pry tool and pry pick, two pry cards, eye protection… oh, and a tool handle like the one in my iFixit universal toolkit, along with all the screwdriver bits required for the repair.
With all the extra pry tools and stuff, it looked like prep for a journey to the center of the earth or somethin’.... And hey, I was NOT disappointed when the job turned out to be waaay easier than implied by all the extra tooling. A nice collection of extra stuff for my kit! I now have two spudgers.
Wow.
The adhesive is just acetone….
I just successfully replaced my battery. I used pure acetone from the pharmacy to “melt” the glue. Afterwards you can easily (but carefully) remove it with a credit card (or similar).
Easy to follow guide. Tip: Install new battery AND re-install the speakers at the same time
Wonderfully comprehensive and easy to follow. I was able to remove the old battery and install a new one in around 1 hour. Take your time, read all of the instructions and look at all of the images a couple of times before starting. I separated all of the screws and labeled them so reassembly was a snap. Huge thanks to the author and to this site for offering the parts and detailed guide! My Mac is like new again.
I did this battery replacement this morning. If you follow the excellent instructions and take your time this is not very difficult. One thing that wasn’t covered is that the replacement battery comes attached to a piece of plexiglass to aid in the positioning of the 5 pieces of the battery. The quality control on the positioning was not perfect on mine - I had to detach half and position, then place the other half. The placement of the replacement is not covered in the instructions - but isn’t very difficult.
I recommend getting the full kit - it was complete and made the replacement go easier. My new replacement is charging to 97% and has a capacity of 6358 mAh. This is almost 1000mAh more than my original battery was reporting! My old battery was only lasting an hour, this one is reporting 4+ hours.
Thanks! Great documentation and a solid kit.
Thank you for a great guide! I was a bit worried about this, as it was rated Difficult, but it was not bad at all. I have been working on computers for many years, but had never cracked this model of MBP. My 13-year old daughter assisted me with the “transplant”, and all went well. (She has repaired a few iPhones for friends.) My old battery was only lasting a little over two hours, and I hope I have a significant increase in charge time with this new battery. Changing the battery took us about two hours, the longest amount of time was dealing with the adhesive. We found that the card provided worked better than the spudger, and the cloths in the kit were perfect for getting the remaining adhesive off after removing the battery. My daughter got to learn a new skill, and is confident that she could replace the battery in her MBP.
Zunächst mal großes Erlebnis, wenn das Paket mit all dem passenden Werkzeug und dem Akku ankommt. Alles hervorragende Qualität. Mal abwarten, ob der Akku hält, was er verspricht.
Die Anleitung ist sehr gut geschrieben, allerdings klappte der Akkuwechsel wesentlich leichter, als angekündigt. Hier ist keine Zauberei erforderlich. Nur gute Vorbereitung. Was Sinn macht: Ein Foto vom offenen Laptop machen, auf DIN a 4 ausdrucken, dann kann man die Schrauben immer an die richtige Stelle legen (am besten mit Klebeband fixieren, zB. den PRITT-Roller).
Stellt Euch einen Staubsauger zur Seite mit weicher Bürste. So könnt Ihr sehr vorsichtig die Berge an angesammeltem Staub entfernen, die sich im Gerät abgelagert haben.
Ich würde einen Hinweis begrüßen, dass die Akkus beim Einbau möglichst nah an den inneren Rand eingesetzt werden, um den Einbau der Lautsprecher zu erleichtern, die sind sonst sehr unter Spannung.
Ach ja: Der Akku wird dank eigener Platine als neuer Akku erkannt und die Anzahl Ladezyklen mit 1 angegeben.
Installation went great, but now my Mac isn’t recognizing the new battery. It doesn’t hold a charge and will shut off if not plugged in. Can anyone help/elaborate on this?! Also, I already reset the SMC…
You can find a few things to try in this thread: New replacement battery for MacBook Pro not recognised. Good luck!
This is a clear and very comprehensive guide. Just finished changing the battery to my computer.
Thank you Sam Lionheart and Ifixit, could not have done it without you. Love my IFIXIT tools!!
Brilliant guide. Great job - the repair was flawless. Old battery was at 5500 mAh capacity - now up to 6699 mAh!!!!!
It took me about 3 hours, because I spent a lot of time cleaning as I went. First time it was opened since 2014.
The instructions were very good. I was able to replace the battery using this guide. One tip is to have little cups for the small parts you remove in each step and number them with the step. When you go to put it back, you just have to look at the step number and corresponding picture you will know exactly where it goes. This will save you time from hunting for them, especially the very small ones.
Great guide, replaced my battery in no time without any problems. Shame the Ifixit battery I bought now only has about 60% capacity after 4 of use months and 12 recharge cycles. Says Service battery again!
Hi Scott,
The battery should definitely last more than that. Try calibrating the battery following the instructions below. If that doesn’t solve the issue, contact our support and we will help resolve the issue!
For optimal performance, calibrate your newly installed battery: Charge it to 100% and keep charging it for at least 2 more hours. Then use your device until it shuts off due to low battery. Finally, charge it uninterrupted to 100%.
The replacement is easy, thanks to the excellent description.
Only the adhesive foils of the replacement batteries were too weak. The batteries detached after a short time, so I had to reopen the case and use my own adhesive foils to get this fixed.
The fact that the batteries were loose was noticeable by a clattering sound.
Great guide but I had one minor issue, when installing the new battery you need a note to make sure you place the two remote batteries snug top and inside or you don’t have enough room to install the speakers. I had to pull them up and restick them down.
Excellent guide. The instructions are very clear and easy to follow. I was worried about removing the adhesive and getting the battery out without damaging it but it turned about to be quite straightforward - just take your time and let the solvent do its work. Thanks.
Just reporting that I finished this install without disconnecting the speakers, removing the SSD, or anything else. I simply disconnected the old battery, the SSD connector, and unscrewed each speaker and gently folded them out of the way. I then used a thin spatula-like tool (that I made) to remove the old battery. A fresh razor blade makes quick work of any remaining adhesive. Only took about 45 minutes all told. Thanks, iFixIt team, for all you do for the DIY community!!
John
I followed these great instructions but for one point: I didn’t use acetone at all, I just used a very thin metal blade (some kind of surgical tool used by dentists) to unglue the battery packs. There is always the risk of piercing a pack but with the proper blade (thin but no cutting edge, very flexible but with a very strong inoxydable steel) it worked very well and I had the feeling that acetone was much more dangerous (just a very small drop on a circuit board could be bad, plus the strong necessity of a thorough clean afterwards to make sure the next glue won’t be dissolved by remaining acetone vapors …). And I second the very first remark, make sure to leave enough space to re-install the loudspeakers, on the left side my battery was glued 1 mm to close to the unibody side …
Pierre.
This guide is great. As an amateur, I found it easy to follow and replace my battery. However, the battery itself may be defective. Started at 107% and after only 7 charges the battery has gone down to 97%. Even calibrated it twice. Also the adhesive on the battery did not stick to the lower casing, so you might need to buy some double sided tape for it.
I’m glad the replacement went well for you! If you haven’t yet, I would suggest performing an SMC reset.
I have zero computer servicing or building experience. The instructions were great. I had no problems, EXCEPT, that the new battery wasn’t charging. After taking things apart and putting them back together for most of the day, and finding no answers online or on this website as to my issue, I finally decided to use some common sense and start messing around with the MagSafe port. Turns out that it must have disconnected during the install. I plugged it back in, and it started charging. I didn’t see a warning about this being a possibility (although I was reading the instructions from my phone so it could be there) so it probably should be pointed out. My only problem. After calibrating the battery per the instructions, at best I’m getting three hours of unplugged time (and that’s without me hearing the fans turn on. Doesn’t seem right. And after just a couple of cycles, the battery life is already at 97%. Seems like I’ll be needing another battery replacement within the next couple of years.
Excellent guide! It is even faster with the Macbook pro 13 Retina to replace the battery. Got me 1hour with cleaning.
Did the battery swap just today. Instructions are on point. I thought this was going to be a headache but turned out to be pretty easy. The only hard thing in the whole process was removing the adhesive in step 34.
Thanks a lot, this is an excellent description on how to safely exchange the battery of my MacBook Pro 13" (early 2013, Model A1425)! However, I did skip all steps of removal of connectors other than the battery connector (see comments). Furthermore, I did not use solvent to remove the old batteries. I used bigger spudgers and some gentle force to lift the batteries off the housing. Afterwards, I used some acetone and a piece of cloth to remove the remaining film of glue. It took me about an hour (including cleaning). Everything worked absolutely perfect.
I had great success with this project. The right tools and the excellent guide were real confidence builders. There doesn't appear to be much info about installing the new battery, but I found it is fairly critical to make sure there is room for the speakers to fit back in. There's not a lot of adjustability after the battery adhesive contacts the case, so pay attention to keeping the batteries located up towards the interior of the battery pocket, away from the outer edge where the speaker sits. It's easy to focus on getting the long section of the battery lined up so the 6 screws will fit in, and meanwhile, the four smaller battery sections are starting to stick here and there before you can put them where they go.
Overall, this was really a bit of fun pretending to be a computer geek for an hour!
Thank you for an excellent product.
Christopher
Die Anleitung ist super! Klar ist der Austausch den Akkus kein Pappenstiel, aber die Anleitung erklärt alles. Bei mir war der Original-Akku schon stark gebläht. Ich habe mir zehn kleine Schachteln zurecht gelegt und immer wenn ich Schrauben oder Teile ausgebaut hatte, die Sachen inkl. eines Zettels in die Box gelegt, auf dem ich die Schritt Nr. vermerkt habe. Anschließend alles in umgekehrter Richtung wieder eingebaut. Das Notebook hat sofort wieder einwandfrei funktioniert und schreibe ich diesen Kommentar damit...:-)
My husband and I followed these exact instructions to replace the battery in my 2013 Macbook Pro. The laptop still worked wonderfully, but the battery was just shot. If I unplugged the power supply, my laptop would shut down in 20 seconds. These instructions were easy to follow, and my laptop now has a new, functioning battery! It's only been a day, but so far so good. I'll be sure to post an update every once in a while to share our progress with this new battery.
got this done seemed to work great but new batteries now rattle when laptop is turned upside down - sticky doesnt seems to stick very well
If don’t have one of those neat project mats, then you can use small pieces of flattened blu-tack to hold the screws. If you arrange them in the shape of your mac book cover, and put the screws down methodically, you can get a one-to-one mapping of the screws to the correct screw holes.
Toby Thurston - Antwoord
Or you can use an ice tray where you put the screws and the parts in separate bays in the same order as they come in the instructions.
timofej.se -
This is great! I used a small magnetic white board, and wrote on it to identify the parts as I went. This whole process, from the fast shipment to the great instructions to the complete, high quality, tool kit has been great. I’m typing this comment on my resurrected laptop. Thank you! Sue
Susan Greer - Antwoord
It would be a good idea if people recorded in the comments which screws go where so that, if someone lost their screw positions, they could recover them from the comments.
Raymond Shpeley - Antwoord