Ga door naar hoofdinhoud

Deze versie kan foutieve bewerkingen bevatten. Schakel over naar de recentste gecontroleerde momentopname.

Gearchiveerde handleiding
Deze handleiding wordt enkel nog bijgehouden voor historische doeleinden. Gebruik de laatste versie van deze gids om uw reparatie uit te voeren.

Wat je nodig hebt

  1. , Onderste behuizing: stap 1, afbeelding 1 van 1
    Gereedschap gebruikt in deze stap:
    Magnetic Project Mat
    $19.95
    Koop
    • Verwijder de volgende tien schroeven die de onderste behuizing aan de bovenste behuizing bevestigen:

    • Twee 2.3 mm lange P5 Pentalobe schroeven

    • Acht 3.0 mm lange P5 Pentalobe schroeven

    • Zorg dat je, tijdens deze reparatie, bijhoudt welke schroeven waar vandaan komen en zorg dat ze op dezelfde plek teruggaan om schade aan je toestel te voorkomen.

  2. : stap 2, afbeelding 1 van 1
    • Wring het topje van je vingers tussen de bovenste en de onderste behuizing.

    • Trek de onderste behuizing rustig en op voorzichtige wijze weg van de bovenste behuizing om deze te verwijderen.

  3. : stap 3, afbeelding 1 van 2 : stap 3, afbeelding 2 van 2
    • De onderste behuizing wordt in het midden door middel van twee plastic klemmen aan de bovenste behuizing bevestigd.

    • Druk het midden van de onderste behuizing, tijdens het weer in elkaar zetten van je toestel, naar beneden om de twee plastic klemmen weer met elkaar te verbinden.

  4. , Batterijaansluiting: stap 4, afbeelding 1 van 1
    • Verwijder, indien nodig, de plastic bescherming die aan het contactbord van de batterij bevestigd is.

  5. : stap 5, afbeelding 1 van 2 : stap 5, afbeelding 2 van 2
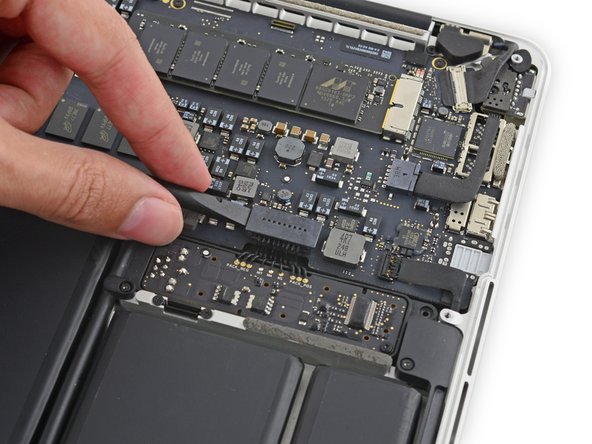
    • Gebruik het platte einde van een spudger om de batterijaansluiting in een rechte beweging uit het contact op het logic board omhoog te duwen.

    • Zorg dat je alleen de connector en niet het contact zelf omhoogduwt, aangezien je daarmee riskeert het logic board permanent te beschadigen.

  6. : stap 6, afbeelding 1 van 1
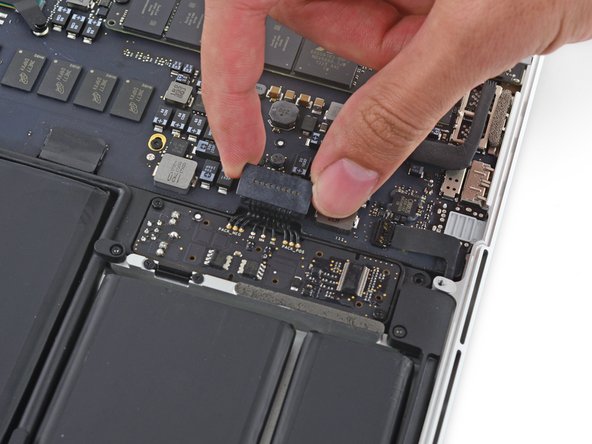
    • Buig de batterijaansluiting omhoog en uit de weg om te voorkomen dat deze tijdens de reparatie per ongeluk contact maakt met het contact.

  7. , Rechterspeaker: stap 7, afbeelding 1 van 1
    • Verwijder de twee 2.1 mm lange T5 Torx-schroeven die de beugel van de I/O-bordkabel - aan de kant van het logic board - bevestigen.

  8. : stap 8, afbeelding 1 van 1
    • Pak de beugel van de I/O-bordkabel vast met een puncet en verwijder deze uit de MacBook.

  9. : stap 9, afbeelding 1 van 2 : stap 9, afbeelding 2 van 2
    • Gebruik het platte einde van een spudger om de I/O-bordaansluiting recht uit het contact op het logic board omhoog te duwen.

    • Wees voorzichtig dat je hierbij enkel de I/O-bordkabel en niet het contact zelf omhoogduwt. Anders riskeer je het logic board permanent te beschadigen.

  10. : stap 10, afbeelding 1 van 2 : stap 10, afbeelding 2 van 2
    • Til de I/O-bordkabel - aan de kant van het logic board - omhoog en buig deze aan de kant.

    • Om te voorkomen dat je de kabel beschadigt, vouw je de kabel enkel vanaf de buiging die reeds aan de kant van het I/O-bord in de kabel zit.

  11. : stap 11, afbeelding 1 van 2 : stap 11, afbeelding 2 van 2
    • Duw de punt van je spudger op voorzichtige wijze onder de kabel van de rechterspeaker, in de buurt van de aansluiting, en til deze uit het contact op het logic board.

  12. : stap 12, afbeelding 1 van 3 : stap 12, afbeelding 2 van 3 : stap 12, afbeelding 3 van 3
    • Trek de kabel van de rechterspeaker voorzichtig los van de bovenste behuizing.

  13. : stap 13, afbeelding 1 van 1
    • Verwijder de volgende schroeven die de rechterspeaker aan de bovenste behuizing bevestigen:

    • Eén 5.7 mm lange T5 Torx-schroef

    • Eén 6.5 mm lange T5 Torx-schroef

    • Eén 3.8 mm lange T5 Torx-schroef

  14. : stap 14, afbeelding 1 van 3 : stap 14, afbeelding 2 van 3 : stap 14, afbeelding 3 van 3
    • Til de rechterspeaker aan de kabel uit de behuizing en verwijder deze.

  15. , Linkerspeaker: stap 15, afbeelding 1 van 2 , Linkerspeaker: stap 15, afbeelding 2 van 2
    • Steek de punt van een spudger onder de kabel van de linkerspeaker, in de buurt van de aansluiting, en til deze uit het contact op het logic board.

  16. : stap 16, afbeelding 1 van 1
    • Verwijder de volgende schroeven, die de linkerspeaker aan de bovenste behuizing bevestigen:

    • Eén 5.7 mm lange T5 Torx-schroef

    • Eén 6.5 mm lange T5 Torx-schroef

    • Eén 3.8 mm lange T5 Torx-schroef

  17. : stap 17, afbeelding 1 van 3 : stap 17, afbeelding 2 van 3 : stap 17, afbeelding 3 van 3
    • Til de hoek van de linkerspeaker omhoog en schuif deze om de batterij heen weg om te verwijderen.

    • Wees voorzichtig dat je de speakerkabel hierbij niet kapot scheurt op het uitstekende schroefgat in de zijkant van de behuizing.

  18. Deze stap is niet vertaald. Help het te vertalen

    : stap 18, afbeelding 1 van 1
    • Remove the five 3.7 mm T5 Torx screws securing the battery to the upper case.

  19. Deze stap is niet vertaald. Help het te vertalen

    : stap 19, afbeelding 1 van 1
    • The liquid adhesive remover provided in your iFixit battery replacement kit can affect the antireflective coating on your MacBook Pro's display.

    • To protect your display, place a sheet of aluminum foil between the display and keyboard and leave it there while you work.

  20. Deze stap is niet vertaald. Help het te vertalen

    : stap 20, afbeelding 1 van 2 : stap 20, afbeelding 2 van 2
    • If you have an iFixit battery kit with liquid adhesive remover, it's time to get it prepped.

    • Alternatively, if you are using the hot iOpener method, skip the following three steps.

    • iFixit adhesive remover contains acetone, a mild skin and eye irritant.

    • Wear eye protection when handling and applying the adhesive remover. (Eye protection is included in your kit.)

    • Do not wear contact lenses without eye protection.

    • Protective gloves are also included in your kit. If you are concerned about skin irritation, put your gloves on now.

  21. Deze stap is niet vertaald. Help het te vertalen

    : stap 21, afbeelding 1 van 2 : stap 21, afbeelding 2 van 2
    • Open your container of adhesive remover.

    • Fill the syringe included in your kit with a small amount (approximately 1-2 milliliters) of adhesive remover.

    • It's best to fill the syringe with no more than about 1-2 milliliters of adhesive remover at a time, so as to avoid accidentally applying too much.

    • Refill your syringe as needed throughout the rest of this procedure.

  22. Deze stap is niet vertaald. Help het te vertalen

    : stap 22, afbeelding 1 van 1
    • Apply a small amount of adhesive remover (approximately 1 ml) evenly under the edge of the rightmost battery cell.

    • Wait 2-3 minutes for the liquid adhesive remover to penetrate underneath the battery cell before you proceed to the next step.

    • Do not apply more than 1 ml of the adhesive remover at a time. Using too much can allow the adhesive remover to make its way to the backside of your keyboard and potentially damage it.

  23. Deze stap is niet vertaald. Help het te vertalen

    : stap 23, afbeelding 1 van 2 : stap 23, afbeelding 2 van 2
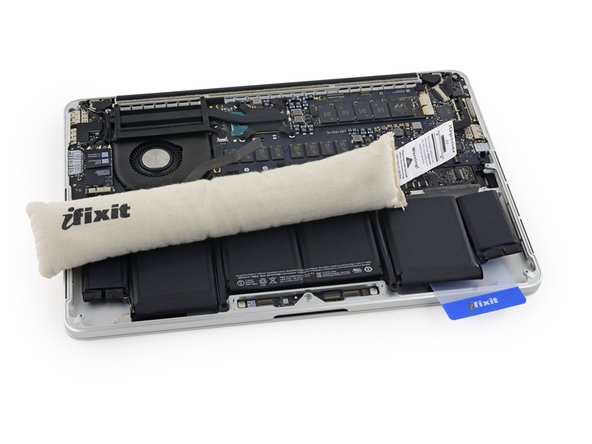
    • If you don't have a liquid adhesive remover, you'll be using a hot iOpener to warm and soften a section of the adhesive securing the battery to the upper case, and then carefully prying at that point.

    • Use the hot iOpener to cover half of the two right-most battery cells.

    • After about a minute, reheat the iOpener and move it to cover the other half of the right-most battery cells.

  24. Deze stap is niet vertaald. Help het te vertalen

    : stap 24, afbeelding 1 van 2 : stap 24, afbeelding 2 van 2
    Gereedschap gebruikt in deze stap:
    Plastic Cards
    $2.99
    Koop
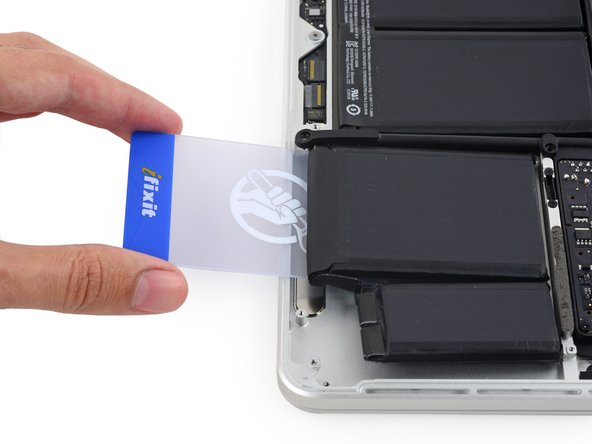
    • Push a plastic card between the right-most battery cell and the upper case, cutting the adhesive between the two.

    • Throughout this procedure, be careful not to damage any of the battery cells with your tools. A damaged lithium-ion battery may leak dangerous chemicals and/or catch fire. Use only plastic pry tools.

    • When using the hot iOpener method, if you encounter significant resistance to prying, stop and use the iOpener to reheat the section you're working on.

  25. Deze stap is niet vertaald. Help het te vertalen

    : stap 25, afbeelding 1 van 2 : stap 25, afbeelding 2 van 2
    • Use the plastic card to pry the right-most battery cell up from the rear case.

  26. Deze stap is niet vertaald. Help het te vertalen

    : stap 26, afbeelding 1 van 3 : stap 26, afbeelding 2 van 3 : stap 26, afbeelding 3 van 3
    • Repeat this procedure with the adjacent battery cell:

    • Apply a small amount (about 1 ml) of liquid adhesive remover under the battery cell, and wait 2-3 minutes for it to penetrate and soften the adhesive.

    • Alternatively, re-heat this section with your iOpener if needed.

    • Push a plastic card about an inch between the battery cell and the upper case, and slowly pry the cell up to separate all of the adhesive.

  27. Deze stap is niet vertaald. Help het te vertalen

    : stap 27, afbeelding 1 van 3 : stap 27, afbeelding 2 van 3 : stap 27, afbeelding 3 van 3
    • Temporarily leave your plastic card underneath the two rightmost battery cells to prevent them from re-adhering to the upper case.

    • If using an iOpener, reheat it and reapply it, this time to the left-most battery cells.

    • Again, leave the iOpener in each position for about a minute, reheating in between, to heat each half of the left-most battery cells.

  28. Deze stap is niet vertaald. Help het te vertalen

    : stap 28, afbeelding 1 van 3 : stap 28, afbeelding 2 van 3 : stap 28, afbeelding 3 van 3
    • Repeat the above procedure to separate the two leftmost battery cells from the upper case.

    • Remember to apply a small amount (about 1 ml) of adhesive remover to each battery cell, and wait 2-3 minutes for it to penetrate and soften the adhesive.

    • Use a second plastic card to separate the two leftmost battery cells from the upper case.

  29. Deze stap is niet vertaald. Help het te vertalen

    : stap 29, afbeelding 1 van 1
    • Leave the second card in the corner between the two left cells.

    • In the following steps, you can either use a third card, or the card from the right corner. The right corner adhesive should be dry/cool enough that the cells can easily be pulled up again when needed.

  30. Deze stap is niet vertaald. Help het te vertalen

    : stap 30, afbeelding 1 van 2 : stap 30, afbeelding 2 van 2
    • To separate the adhesive securing the final two, middle battery cells, apply another 1 milliliter or so of liquid adhesive remover (or your iOpener) to each cell.

    • It may help to elevate one side of your MacBook Pro a few inches so that the adhesive remover flows in the correct direction, underneath the battery cells. You can use a sturdy book or foam block to prop up one side of your MacBook Pro while you work.

    • Insert the card about an inch between the left-center battery cell and the upper case, separating the adhesive between the cell and the case.

  31. Deze stap is niet vertaald. Help het te vertalen

    : stap 31, afbeelding 1 van 2 : stap 31, afbeelding 2 van 2
    • Pull the card back out and insert it about an inch between the right-center battery cell and the upper case, separating the adhesive between the cell and case.

  32. Deze stap is niet vertaald. Help het te vertalen

    : stap 32, afbeelding 1 van 2 : stap 32, afbeelding 2 van 2
    • By this point, the outer cells should be free, and you should only encounter resistance from the two center cells. If this is not the case, go back and completely loosen the four outer-most cells from the upper case.

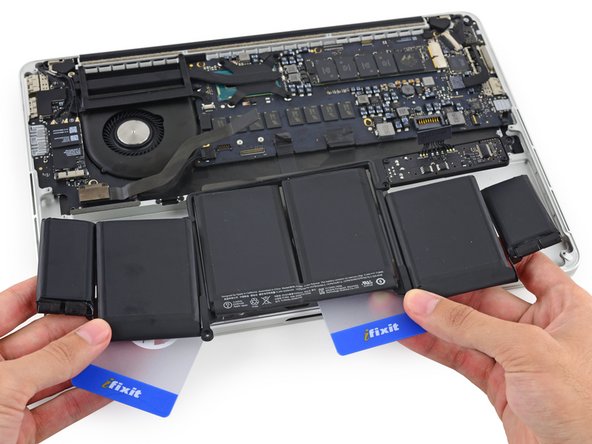
    • Pry up on the two center cells to separate the last of the adhesive and lift the battery from the device.

  33. Deze stap is niet vertaald. Help het te vertalen

    : stap 33, afbeelding 1 van 2 : stap 33, afbeelding 2 van 2
    • Remove the battery.

    • Before installing your new battery, remove all the old adhesive from the MacBook Pro's case.

    • With a little luck, you can slowly pull out each strip of adhesive with your fingers.

    • Otherwise, soak each section of adhesive with a bit of adhesive remover for 2-3 minutes, and then scrape it out with an opening pick or one of the other tools in your kit. This can take quite a bit of work, so be patient.

    • Mop up any remaining adhesive remover and give your MacBook Pro a few minutes to air dry.

    • The replacement battery included in your iFixit kit comes with adhesive pre-installed. Test the battery's fit and alignment carefully before peeling off the film covering the adhesive, and then press each cell firmly into place. If any additional films/liners are present that weren't on your original battery, remove them now.

    • Calibrate your battery before using it: allow it to drain overnight, then charge it to 100% and drain it again until your MacBook Pro shuts down automatically. Charge it again and use it normally.

    • If you notice any unusual behavior or problems after installing your new battery, you may need to reset your MacBook Pro's SMC.

Eindstreep

2 andere personen hebben deze handleiding voltooid.

Sam Goldheart

Lid sinds: 10/18/12

465.659 Reputatie

538 handleidingen geschreven

Team

iFixit Lid van iFixit

Staff

135 Leden

16.757 handleidingen geschreven

0 opmerkingen

Voeg opmerking toe

Weergavestatistieken:

Afgelopen 24 uren: 0

Afgelopen 7 dagen: 5

Afgelopen 30 dagen: 10

Altijd: 1,260