Ga door naar hoofdinhoud
Word lid van de reparatiegemeenschap - Account aanmaken

MacBook Air Models A1237 and A1304 Port Hatch Assembly Replacement

Wat je nodig hebt

    1. MacBook Air Models A1237 and A1304 Port Hatch Assembly Replacement, Lower Case: stap 1, afbeelding 1 van 1
      • Unplug your MacBook Air and power it off before you proceed.

      • Remove ten Phillips screws securing the lower case to the MacBook Air:

      • Six 2.8 mm screws

      • Two 3.8 mm screws

      • Two 5.4 mm screws

      Vraag FixBot

      Voeg opmerking toe

    2. MacBook Air Models A1237 and A1304 Port Hatch Assembly Replacement: stap 2, afbeelding 1 van 2 MacBook Air Models A1237 and A1304 Port Hatch Assembly Replacement: stap 2, afbeelding 2 van 2
      • Slightly lift the lower case near the vents and push it toward the rear of the computer to free the mounting tabs.

      Vraag FixBot

      Voeg opmerking toe

    1. MacBook Air Models A1237 and A1304 Port Hatch Assembly Replacement, Battery: stap 3, afbeelding 1 van 1
      • Disconnect the battery connector by pulling it straight out of its socket.

      Vraag FixBot

      Voeg opmerking toe

    2. MacBook Air Models A1237 and A1304 Port Hatch Assembly Replacement: stap 4, afbeelding 1 van 1
      • Remove the following nine screws securing the battery to the Air:

      • Four 2.9 mm Phillips.

      • Four 3.8 mm Phillips.

      • One 7.2 mm Phillips.

      Vraag FixBot

      Voeg opmerking toe

    3. MacBook Air Models A1237 and A1304 Port Hatch Assembly Replacement: stap 5, afbeelding 1 van 1
      • Lift the battery out of the Air.

      • If you're installing a new battery, you should calibrate it after installation:

      • Charge it to 100%, and then keep charging it for at least 2 more hours. Then, unplug and use it normally to drain the battery. When you see the low battery warning, save your work, and keep your laptop on until it goes to sleep due to low battery. Wait at least 5 hours, then charge your laptop uninterrupted to 100%.

      • If you notice any unusual behavior or problems after installing your new battery, you may need to reset your MacBook's SMC.

      Vraag FixBot

      Voeg opmerking toe

    1. MacBook Air Models A1237 and A1304 Port Hatch Assembly Replacement, Speaker: stap 6, afbeelding 1 van 1
      • Remove the following two screws securing the speaker assembly to the upper case.

      • One 3 mm Phillips.

      • One 5.8 mm Phillips.

      Vraag FixBot

      Voeg opmerking toe

    2. MacBook Air Models A1237 and A1304 Port Hatch Assembly Replacement: stap 7, afbeelding 1 van 2 MacBook Air Models A1237 and A1304 Port Hatch Assembly Replacement: stap 7, afbeelding 2 van 2
      • Use a spudger to lift the audio-out connector board off the adhesive that secures it to the hard drive bracket.

      • Disconnect the audio out connector from its socket.

      Vraag FixBot

      Voeg opmerking toe

    3. MacBook Air Models A1237 and A1304 Port Hatch Assembly Replacement: stap 8, afbeelding 1 van 2 MacBook Air Models A1237 and A1304 Port Hatch Assembly Replacement: stap 8, afbeelding 2 van 2
      • Rotate the speaker assembly toward the center of the Air.

      • Use a spudger to pry the speaker cable connector up off the audio board.

      Vraag FixBot

      Voeg opmerking toe

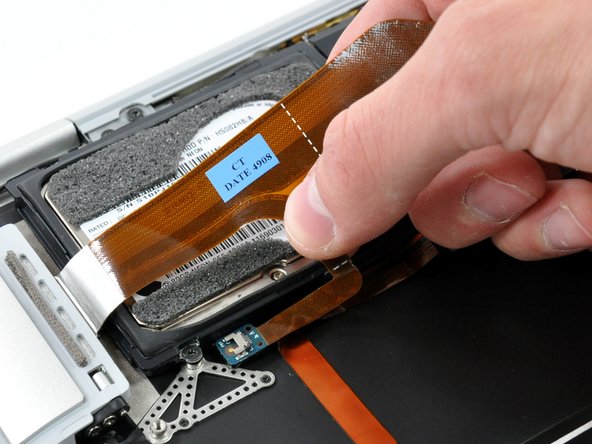
    1. MacBook Air Models A1237 and A1304 Port Hatch Assembly Replacement, Port Hatch Assembly: stap 9, afbeelding 1 van 2 MacBook Air Models A1237 and A1304 Port Hatch Assembly Replacement, Port Hatch Assembly: stap 9, afbeelding 2 van 2
      • Disconnect the port hatch ribbon cable from the logic board by pulling it straight up by its black pull tab.

      • If necessary, pull the audio out ribbon cable off the adhesive securing it to the upper case.

      Vraag FixBot

      Voeg opmerking toe

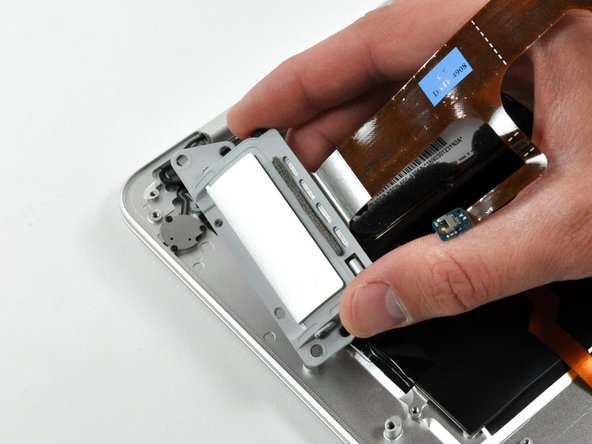
    2. MacBook Air Models A1237 and A1304 Port Hatch Assembly Replacement: stap 10, afbeelding 1 van 2 MacBook Air Models A1237 and A1304 Port Hatch Assembly Replacement: stap 10, afbeelding 2 van 2
      • Remove the four 3.2 mm Phillips screws securing the port hatch assembly to the upper case.

      • Lift the port hatch assembly out of the upper case.

      Vraag FixBot

      Voeg opmerking toe

Conclusie

To reassemble your device, follow these instructions in reverse order.

Annuleren: ik heb deze handleiding niet afgemaakt.

7 andere personen hebben deze handleiding voltooid.

0Gids Commentaar

Voeg opmerking toe

Weergavestatistieken:

Afgelopen 24 uren: 3

Afgelopen 7 dagen: 20

Afgelopen 30 dagen: 65

Altijd: 15,963