Ga door naar hoofdinhoud

MacBook Air 13" Late 2010 Logic Board Replacement

Wat je nodig hebt

  1. MacBook Air 13" Late 2010 Logic Board Replacement, Lower Case: stap 1, afbeelding 1 van 1
    Gereedschap gebruikt in deze stap:
    P5 Pentalobe Screwdriver Retina MacBook Pro and Air
    $5.99
    Koop
    • Before proceeding, power off the device, close the lid and lay it on a soft surface top-side down.

    • Remove the following ten screws:

    • Two 9 mm 5-point Pentalobe screws

    • Eight 2.6 mm 5-point Pentalobe screws

    • The special screwdriver needed to remove the eight 5-point Pentalobe screws can be found here.

  2. MacBook Air 13" Late 2010 Logic Board Replacement: stap 2, afbeelding 1 van 1
    • Wedge your fingers between the display and the lower case and pull upward to pop the lower case off the Air.

    • Remove the lower case and set it aside.

  3. MacBook Air 13" Late 2010 Logic Board Replacement, Battery: stap 3, afbeelding 1 van 1
    • For precautionary purposes, we advise that you disconnect the battery connector from the logic board to avoid any electrical discharge. This step is optional and is not required.

    • Grab the clear plastic pull tab attached to the battery connector and pull it toward the front edge of the Air to disconnect the battery from the logic board.

    • Do not lift upward on the connector as you disconnect it.

  4. MacBook Air 13" Late 2010 Logic Board Replacement, I/O Board Cable: stap 4, afbeelding 1 van 1
    • Use the flat end of a spudger to pry the I/O board cable connector upward out of its socket on the I/O board.

  5. MacBook Air 13" Late 2010 Logic Board Replacement: stap 5, afbeelding 1 van 2 MacBook Air 13" Late 2010 Logic Board Replacement: stap 5, afbeelding 2 van 2
    • The following connector has an especially deep socket. Use care when disconnecting it.

    • Carefully peel the I/O board cable from the top of the fan.

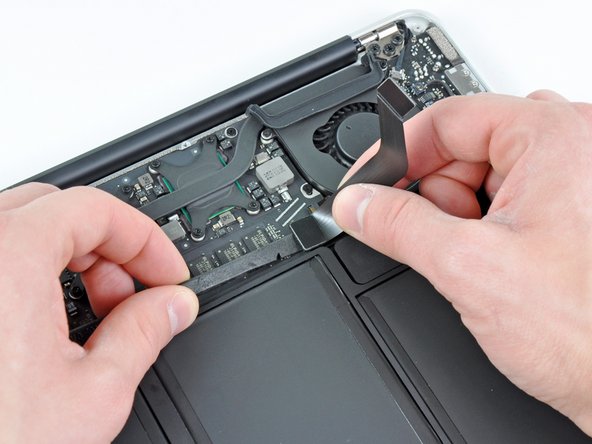
    • While gently pulling the I/O board cable upward near its connection to the logic board, use the tip of a spudger to pry upward on alternating sides of the connector to help "walk" it out of its socket.

    • Remove the I/O board cable.

  6. MacBook Air 13" Late 2010 Logic Board Replacement, Fan: stap 6, afbeelding 1 van 1
    • Use the tip of a spudger to carefully flip up the retaining flap on the fan cable ZIF socket.

    • Be sure you are prying up on the hinged retaining flap, not the socket itself.

  7. MacBook Air 13" Late 2010 Logic Board Replacement: stap 7, afbeelding 1 van 1
    • Peel the rubber gasket off the adhesive on the top of the fan.

  8. MacBook Air 13" Late 2010 Logic Board Replacement: stap 8, afbeelding 1 van 1
    • Remove the following three screws securing the fan to the upper case:

    • One 3.6 mm T5 Torx screw

    • One 2.7 mm T5 Torx screw

    • One 3.6 mm T5 Torx screw with a short head

  9. MacBook Air 13" Late 2010 Logic Board Replacement: stap 9, afbeelding 1 van 1
    • Lift the fan out of the upper case and carefully pull the fan ribbon cable out of its socket as you remove it from the Air.

  10. MacBook Air 13" Late 2010 Logic Board Replacement, I/O Board: stap 10, afbeelding 1 van 1
    • Disconnect the I/O board by pulling the power cable away from its socket on the logic board.

    • Pull the cable parallel to the face of the logic board toward the right edge of the Air.

  11. MacBook Air 13" Late 2010 Logic Board Replacement: stap 11, afbeelding 1 van 1
    • Pull the camera cable parallel to the face of the I/O board toward the corner of the Air to disconnect it from its socket, using the tip of a spudger to help push the connector out of its socket.

    • Do not lift upward on this cable as you disconnect it, as its socket may break off the logic board.

  12. MacBook Air 13" Late 2010 Logic Board Replacement: stap 12, afbeelding 1 van 2 MacBook Air 13" Late 2010 Logic Board Replacement: stap 12, afbeelding 2 van 2
    • Use the flat end of a spudger to pry the left speaker cable connector up and out of its socket on the I/O board.

    • Pry up from beneath the wires.

    • De-route the left speaker cable from its retainer on the I/O board.

  13. MacBook Air 13" Late 2010 Logic Board Replacement: stap 13, afbeelding 1 van 1
    • Use the flat end of a spudger to pry the microphone cable connector up and out of its socket on the I/O board.

    • Pry up from beneath the wires.

  14. MacBook Air 13" Late 2010 Logic Board Replacement: stap 14, afbeelding 1 van 1
    • Remove the single 3.6 mm T5 Torx screw securing the I/O board to the upper case.

  15. MacBook Air 13" Late 2010 Logic Board Replacement: stap 15, afbeelding 1 van 1
    • Carefully lift the I/O board from its edge nearest the logic board and remove it from the upper case.

  16. MacBook Air 13" Late 2010 Logic Board Replacement, Battery: stap 16, afbeelding 1 van 1
    • Remove the following five screws securing the battery to the upper case:

    • Three 6.3 mm T5 Torx screws

    • Two 2.4 mm T5 Torx screws

  17. MacBook Air 13" Late 2010 Logic Board Replacement: stap 17, afbeelding 1 van 1
    • When handling the battery, avoid squeezing or touching the four exposed lithium polymer cells.

    • Lift the battery from its edge nearest the logic board and remove it from the upper case.

  18. MacBook Air 13" Late 2010 Logic Board Replacement, Logic Board: stap 18, afbeelding 1 van 2 MacBook Air 13" Late 2010 Logic Board Replacement, Logic Board: stap 18, afbeelding 2 van 2
    • Use the tip of a spudger or your fingernail to flip up the retaining flap on the trackpad ribbon cable ZIF socket.

    • Be sure you are prying up on the hinged retaining flap, not the socket itself.

    • Pull the trackpad ribbon cable straight out of its socket toward the front edge of the Air.

  19. MacBook Air 13" Late 2010 Logic Board Replacement: stap 19, afbeelding 1 van 1
    • Use the flat end of a spudger to pry the right speaker cable connector up and out of its socket on the logic board.

    • Pry up from beneath the cables.

  20. MacBook Air 13" Late 2010 Logic Board Replacement: stap 20, afbeelding 1 van 2 MacBook Air 13" Late 2010 Logic Board Replacement: stap 20, afbeelding 2 van 2
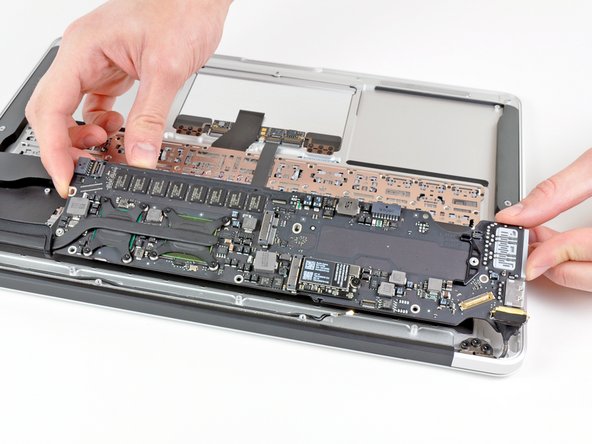
    • Gently push the tip of a spudger under the black plastic flap stuck to the display data cable lock to make the lock pop upward and away from the socket.

    • While holding the lock away from the socket, use the tip of a spudger and your fingers to gently remove the display data cable from its socket by sliding it toward the corner of the Air.

    • Do not pull upward on the display data cable as you disconnect it, as its socket may break off the logic board.

  21. MacBook Air 13" Late 2010 Logic Board Replacement: stap 21, afbeelding 1 van 2 MacBook Air 13" Late 2010 Logic Board Replacement: stap 21, afbeelding 2 van 2
    • Use the flat end of a spudger to pry both antenna cable connectors up and off their sockets on the AirPort/Bluetooth card.

  22. MacBook Air 13" Late 2010 Logic Board Replacement: stap 22, afbeelding 1 van 1
    • Gently de-route the antenna cables from the slot cut into the logic board.

  23. MacBook Air 13" Late 2010 Logic Board Replacement: stap 23, afbeelding 1 van 1
    • Remove the single 2.85 mm T5 Torx screw securing the SSD to the logic board.

  24. MacBook Air 13" Late 2010 Logic Board Replacement: stap 24, afbeelding 1 van 1
    • Do not lift the end of the SSD excessively.

    • Pull the drive straight out of its socket and remove it from the logic board.

    • When reinstalling the SSD, be sure it is properly seated before reinstalling its retaining screw.

  25. MacBook Air 13" Late 2010 Logic Board Replacement: stap 25, afbeelding 1 van 1
    • Remove the six 6.3 mm T5 Torx screws securing the logic board to the upper case.

  26. MacBook Air 13" Late 2010 Logic Board Replacement: stap 26, afbeelding 1 van 1
    • Remove the inner two 4.9 mm T8 Torx screws securing the antenna cable retainer and left clutch hinge to the upper case.

  27. MacBook Air 13" Late 2010 Logic Board Replacement: stap 27, afbeelding 1 van 1
    • Push the antenna cable retainer away slightly and remove the 3 mm T5 Torx screw securing the end of the heat sink to the upper case.

  28. MacBook Air 13" Late 2010 Logic Board Replacement: stap 28, afbeelding 1 van 1
    • Hold the antenna cables out of the way as you lift the heat sink end of the logic board out of the upper case.

  29. MacBook Air 13" Late 2010 Logic Board Replacement: stap 29, afbeelding 1 van 1
    • Carefully remove the logic board assembly from the upper case, minding any cables that may get caught.

  30. MacBook Air 13" Late 2010 Logic Board Replacement, Logic Board: stap 30, afbeelding 1 van 1
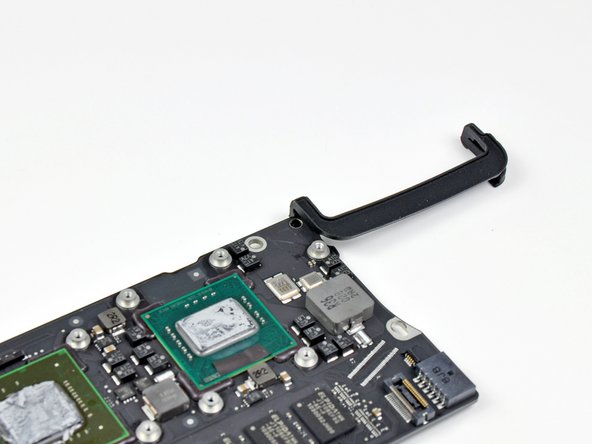
    • Remove the single 2.9 mm T5 Torx screw securing the AirPort/Bluetooth card to the logic board.

  31. MacBook Air 13" Late 2010 Logic Board Replacement: stap 31, afbeelding 1 van 1
    • Slightly lift the free end of the AirPort/Bluetooth board and pull it out of its socket on the logic board.

    • Remove the AirPort/Bluetooth board from the logic board.

  32. MacBook Air 13" Late 2010 Logic Board Replacement: stap 32, afbeelding 1 van 1
    • Remove the eight 2.5 mm T5 Torx screws securing the heat sink to the logic board.

  33. MacBook Air 13" Late 2010 Logic Board Replacement: stap 33, afbeelding 1 van 2 MacBook Air 13" Late 2010 Logic Board Replacement: stap 33, afbeelding 2 van 2
    • If the heat sink seems to be stuck to the logic board after removing all eight screws, use a spudger to carefully separate the heat sink from the faces of the CPU and GPU.

    • Remove the heat sink from the logic board.

    • When reinstalling the heat sink, be sure to apply a new layer of thermal paste. If you have never applied thermal paste before, we have a guide that makes it easy.

  34. MacBook Air 13" Late 2010 Logic Board Replacement: stap 34, afbeelding 1 van 1
    • Remove the rubber fan gasket from the logic board.

    • Logic board remains.

  35. MacBook Air 13" Late 2010 Logic Board Replacement: stap 35, afbeelding 1 van 2 MacBook Air 13" Late 2010 Logic Board Replacement: stap 35, afbeelding 2 van 2
    • These shots show how the rubber fan gasket should be installed during reassembly. Be sure not to install the gasket underneath the ear where the end of the heatsink is screwed down to the upper case.

    • Additionally, be sure the small post molded into the rubber gasket mates with the hole cut into the upper right corner of the logic board.

Conclusie

To reassemble your device, follow these instructions in reverse order.

33 andere personen hebben deze handleiding voltooid.

4 opmerkingen

Can I use a later model logic board in the 2010 model?

Albert Einstein - Antwoord

Later models logic board have connection for backlit keyboard next to battery connector. Also different shaped right speaker

Brendan Vandervliet -

Please be so nice and let me know if logic board replacement at my late 2010 with 2G RAM in to the same model but with 4G RAM, will give me visible, tangible nice results, that the speed is improved ? It should but can someone confirm it ?

Artur - Antwoord

Hi Artur,

TL;DR: Yes!

If you have a look in the “activity monitor” unter memory, you will find that with just 2GB of RAM, OS X will almost always use some “Swap” memory, which means, it has to offload files from the RAM to the HDD (SDD). Whenever this happens, the system will get a lot less responsive, since moving files from the RAM to the SSD and back is a lot slower, than just reading/writing from/to the RAM. In my experience, with 2GB this happens all the time, whereas with 4GB, you have to run a number of programs at once, until that happens.

To be clear: 4GB will not suddenly make this a fast machine, it’s still a 10+ years als Core2Duo, but it will be a lot more responsive and usable with 4GB in it. The replacement process is relatively easy, as you can see in the guide, as long as you got the right screwdrivers. If you can get a 4 GB board for a decent price, give it a try!

NebukadV -

Voeg opmerking toe

Weergavestatistieken:

Afgelopen 24 uren: 1

Afgelopen 7 dagen: 5

Afgelopen 30 dagen: 45

Altijd: 52,246