Wat je nodig hebt
-
-
MacBook Air Late 2010 - Working - High Sierra, Catalina, M2 Samsung Evo 860, Adapter
-
MacBook Air 2011 - Working - High Sierra, M.2 Transcend MTS830S SATA III, Long Adapter.
-
MacBook Air 2012 - Working - Catalina, M.2 Transcend MTS830S SATA III, Long Adapter.
-
MacBook Air 2013 - Unknown
-
MacBook Air 2014 - WD_black 500 + Sintech adapter, running MacOS Big Sur
-
MacBook Air Early 2015 - WORKING- Mojave 10.14.3 to Big Sur 11.0.1- Crucial P1 SSD NVME, Adapter.
-
MacBook Air 2017 - WORKING - High Sierra, Catalina and Big Sur, Monterey - Transcend MTE250S PCIe 4.0 4x NVMe, Long Adapter + Kapton Tape. / Transcend MTE260S PCie 5.0 (Testing, SSD works fine in Monterey 12.7.6 Blackmagic and AJA System Lite Disk Speed generate read errors. Employ only Amorphous Disk Test to Benchmark this PCIe 5.0 SSD.)
-
MacBook Air 2018 and forward - will not work, No removable drive
-
-
Gereedschap gebruikt in deze stap:P5 Pentalobe Screwdriver Retina MacBook Pro and Air$5.99
-
Use a P5 Pentalobe driver to remove ten screws securing the lower case, of the following lengths:
-
Two 9 mm screws
-
Eight 2.6 mm screws
-
-
-
-
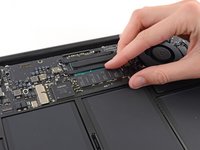
Remove the single 2.9 mm T5 Torx screw securing the SSD to the logic board.
-
-
-
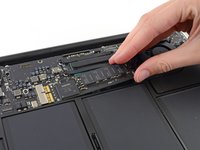
Carefully insert the new SSD into the adapter, using the length of old drive as a reference for when the SSD is fully in the adapter. The lengths should be the same.
-
Insert the SSD and the adapter into the Socket, pushing inward in a straight fashion.
-
When reinstalling the SSD, be sure it is properly seated before reinstalling its retaining screw.
-
From a Terminal, use the following command to disable hibernation: ----"sudo pmset -a hibernatemode 0" ---- If you later want to enable hibernation, use: "sudo pmset -a hibernatemode 3"
-


To reassemble your device, follow these instructions in reverse order.
Annuleren: ik heb deze handleiding niet afgemaakt.
43 andere personen hebben deze handleiding voltooid.
64Gids Commentaar
I have a Macbook air 2017 1466this model https://support.apple.com/kb/SP753?local...
macOS Mojave ver 10.14.6. will your manual work?
Yes, this Manual will work for your Device.
Greets - Maik
Hi!.. Does anyone knows if the crucial SSD will work with the Macbook Air 13” 2017?
Thanks!