Ga door naar hoofdinhoud

MacBook Air 11" Late 2010 Display Assembly Replacement

Wat je nodig hebt

  1. MacBook Air 11" Late 2010 Display Assembly Replacement, Lower Case: stap 1, afbeelding 1 van 1
    Gereedschap gebruikt in deze stap:
    P5 Pentalobe Screwdriver Retina MacBook Pro and Air
    $5.99
    Koop
    • Before proceeding, close your computer and lay it on a soft surface top-side down.

    • Remove the following ten screws:

    • Two 8 mm 5-point Pentalobe screws

    • Eight 2.5 mm 5-point Pentalobe screws

    • The special screwdriver needed to remove the eight 5-point Pentalobe screws can be found here.

    I recommend that one of the tools you obtain is a jeweler's loupe that mounts on your glasses. It makes things easier.

    blairweaver - Antwoord

    This is not correct. You need the pentalobe tool at this point.

    Duane Hellums - Antwoord

  2. MacBook Air 11" Late 2010 Display Assembly Replacement: stap 2, afbeelding 1 van 1
    • Wedge your fingers between the display and the lower case and pull upward to pop the lower case off the Air.

    • Remove the lower case and set it aside.

  3. MacBook Air 11" Late 2010 Display Assembly Replacement, Battery: stap 3, afbeelding 1 van 2 MacBook Air 11" Late 2010 Display Assembly Replacement, Battery: stap 3, afbeelding 2 van 2
    • In this step you will disconnect the battery to help avoid shorting out any components during service.

    • Use the flat end of a spudger to pry both short sides of the battery connector upward to disconnect it from its socket on the logic board.

    • Bend the battery cable slightly away from the logic board so the connector will not accidentally contact its socket.

  4. MacBook Air 11" Late 2010 Display Assembly Replacement, Solid-State Drive: stap 4, afbeelding 1 van 1
    • Remove the single 2.9 mm T5 Torx screw securing the SSD to the logic board.

    What happens if the 2.9mm t5 screw got stripped?

    Charles - Antwoord

    So when i change my ssd in mac do i have to reinstall Mac OS

    sai prahalad Alluri - Antwoord

    Correct, the SSD does not come with OS preinstalled. To install the OS you can completely clone your existing hard drive or you will need to create a bootable flash drive and format your SSD and create a partition in order to be able to install the OS.

    Ethan Lockwood -

    So my wife spilled a Martini on her MacAir and it no longer works and is not repairable, all her music and pictures are stored on the drive, I would like to transfer these files to another drive. What is needed to read the drive once removed?

    prastonis - Antwoord

  5. MacBook Air 11" Late 2010 Display Assembly Replacement: stap 5, afbeelding 1 van 2 MacBook Air 11" Late 2010 Display Assembly Replacement: stap 5, afbeelding 2 van 2
    • Use a spudger to help lift the free end of the SSD just enough to grab it with your other hand.

    • Do not lift the end of the SSD excessively.

    • Pull the drive straight out of its socket and remove it from the logic board.

    • When reinstalling the SSD, be sure it is properly seated before reinstalling its retaining screw.

    I performed all the steps above and fitted a Transcend JetDrive 500 which was very easy however when I re-assembled and turned on all I get is a question mark in the middle of the screen, can you explain if I did anything wrong?

    Ian Ashton - Antwoord

  6. MacBook Air 11" Late 2010 Display Assembly Replacement, I/O Board Cable: stap 6, afbeelding 1 van 1
    • Use the flat end of a spudger to pry the I/O board cable connector upward out of its socket on the I/O board.

  7. MacBook Air 11" Late 2010 Display Assembly Replacement: stap 7, afbeelding 1 van 1
    • The following connector has an especially deep socket. Use care when disconnecting it.

    • While gently pulling the I/O board cable upward near its connection to the logic board, use the tip of a spudger to pry upward on alternating sides of the connector to help "walk" it out of its socket.

    • Remove the I/O board cable.

  8. MacBook Air 11" Late 2010 Display Assembly Replacement, Fan: stap 8, afbeelding 1 van 1
    • Use the tip of a spudger to carefully flip up the retaining flap on the fan cable ZIF socket.

    • Be sure you are prying up on the hinged retaining flap, not the socket itself.

  9. MacBook Air 11" Late 2010 Display Assembly Replacement: stap 9, afbeelding 1 van 1
    • Remove the following three screws securing the fan to the upper case:

    • Two 5.2 mm T5 Torx screws

    • One 3.6 mm T5 Torx screw

  10. MacBook Air 11" Late 2010 Display Assembly Replacement: stap 10, afbeelding 1 van 1
    • Lift the fan out of the upper case and carefully pull the fan ribbon cable out of its socket as you remove it from the Air.

  11. MacBook Air 11" Late 2010 Display Assembly Replacement, Battery: stap 11, afbeelding 1 van 1
    • Remove the following five screws securing the battery to the upper case:

    • Two 5.2 mm T5 Torx screws

    • One 6 mm T5 Torx screw

    • Two 2.6 mm T5 Torx screws

  12. MacBook Air 11" Late 2010 Display Assembly Replacement: stap 12, afbeelding 1 van 1
    • Do not touch or squeeze the six lithium polymer cells when handling the battery.

    • Lift the battery from its edge nearest the logic board and remove it from the upper case.

  13. MacBook Air 11" Late 2010 Display Assembly Replacement, Logic Board: stap 13, afbeelding 1 van 1
    • Disconnect the I/O board by pulling the power cable away from its socket on the logic board.

    • Pull the cable parallel to the face of the logic board toward the front edge of the Air.

  14. MacBook Air 11" Late 2010 Display Assembly Replacement: stap 14, afbeelding 1 van 2 MacBook Air 11" Late 2010 Display Assembly Replacement: stap 14, afbeelding 2 van 2
    • Use the tip of a spudger or your fingernail to flip up the retaining flap on the trackpad ribbon cable ZIF socket.

    • Be sure you are prying up on the hinged retaining flap, not the socket itself.

    • Pull the trackpad ribbon cable straight out of its socket toward the front edge of the Air.

  15. MacBook Air 11" Late 2010 Display Assembly Replacement: stap 15, afbeelding 1 van 1
    • Use the tip of a spudger to de-route the right speaker cable from the slot cut into the logic board.

  16. MacBook Air 11" Late 2010 Display Assembly Replacement: stap 16, afbeelding 1 van 1
    • Use the flat end of a spudger to pry the right speaker cable connector up and out of its socket on the logic board.

    • Pry up from beneath the cables.

  17. MacBook Air 11" Late 2010 Display Assembly Replacement: stap 17, afbeelding 1 van 3 MacBook Air 11" Late 2010 Display Assembly Replacement: stap 17, afbeelding 2 van 3 MacBook Air 11" Late 2010 Display Assembly Replacement: stap 17, afbeelding 3 van 3
    • Gently push the tip of a spudger under the black plastic flap stuck to the display data cable lock to make the lock pop upward and away from the socket.

    • While holding the lock away from the socket, use the tip of a spudger and your fingers to gently remove the display data cable from its socket.

    • Do not pull upward on the display data cable as you disconnect it, as its socket may break off the logic board.

  18. MacBook Air 11" Late 2010 Display Assembly Replacement: stap 18, afbeelding 1 van 1
    • Remove the small rubber gasket from the corner of the upper case near the display data cable.

  19. MacBook Air 11" Late 2010 Display Assembly Replacement: stap 19, afbeelding 1 van 2 MacBook Air 11" Late 2010 Display Assembly Replacement: stap 19, afbeelding 2 van 2
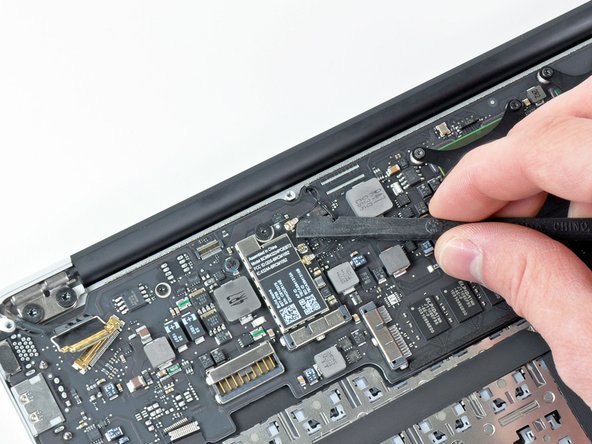
    • Use the flat end of a spudger to pry both antenna cable connectors up and off their sockets on the AirPort/Bluetooth card.

    Heads up when replacing a late 2010 display with a 2011 or later... On later model Airs the wifi card orientation changed, which causes two issues: 1) the antenna cables are longer on the newer displays, so you have excess wire to deal with, 2) On 2010 displays the longer wire goes on the antenna port closer to the battery, on 2011 and later displays the longer cable goes on the port further from the battery (flip-flopped). If you switch them up, your wifi reception will be terrible

    John - Antwoord

  20. MacBook Air 11" Late 2010 Display Assembly Replacement: stap 20, afbeelding 1 van 1
    • Gently de-route the antenna cables from the slot cut into the logic board.

  21. MacBook Air 11" Late 2010 Display Assembly Replacement: stap 21, afbeelding 1 van 1
    • Remove the three 3.6 mm T5 Torx screws securing the logic board to the upper case.

  22. MacBook Air 11" Late 2010 Display Assembly Replacement: stap 22, afbeelding 1 van 1
    • Gently lift the logic board assembly out of the upper case, minding the fragile heat sink and any cables that may get caught.

  23. MacBook Air 11" Late 2010 Display Assembly Replacement, Display Assembly: stap 23, afbeelding 1 van 1
    • Pull the camera cable parallel to the face of the I/O board toward the rear edge of the Air to disconnect it from its socket.

    • Do not lift upward on this cable as you disconnect it, as its socket may break off the logic board.

  24. MacBook Air 11" Late 2010 Display Assembly Replacement: stap 24, afbeelding 1 van 1
    • Remove the small rubber gasket from the corner of the upper case nearest the I/O board.

  25. MacBook Air 11" Late 2010 Display Assembly Replacement: stap 25, afbeelding 1 van 3 MacBook Air 11" Late 2010 Display Assembly Replacement: stap 25, afbeelding 2 van 3 MacBook Air 11" Late 2010 Display Assembly Replacement: stap 25, afbeelding 3 van 3
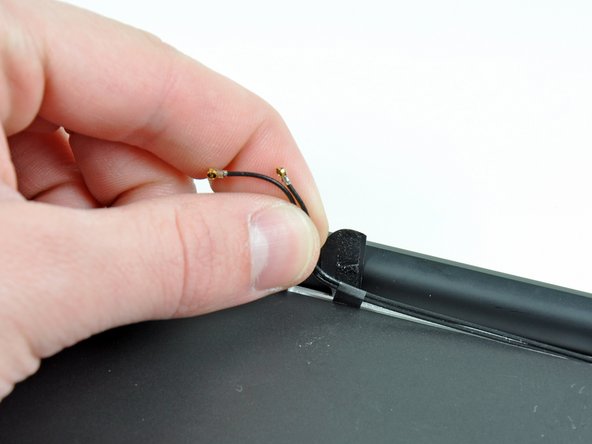
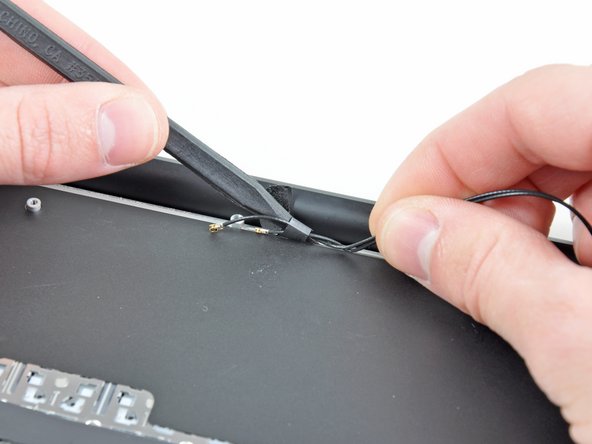
    • Peel up the six cable loops securing the antenna cables to the upper case.

    • Gently pull the cable loops slightly out of the channel cut into the upper case one at a time.

    • Use your spudger to open up the plastic loops as you de-route the antenna cables through them.

    • Repeat this for all five retaining loops.

    The last cable loop on the right side, was actually stuck around the screw which hold the I/O board.

    A hole was specially made in the cable loop, it was not an assembling error.

    So I had to remove this screw to be able to peel the cable loop.

    Julien Vollekindt - Antwoord

    I actually did the lcd only repair but this guide led me through getting the display out and reassembly. I would recommend this particular guide to anyone! Professional technician or hobbyist.

    Stephen Napoleon - Antwoord

  26. MacBook Air 11" Late 2010 Display Assembly Replacement: stap 26, afbeelding 1 van 2 MacBook Air 11" Late 2010 Display Assembly Replacement: stap 26, afbeelding 2 van 2
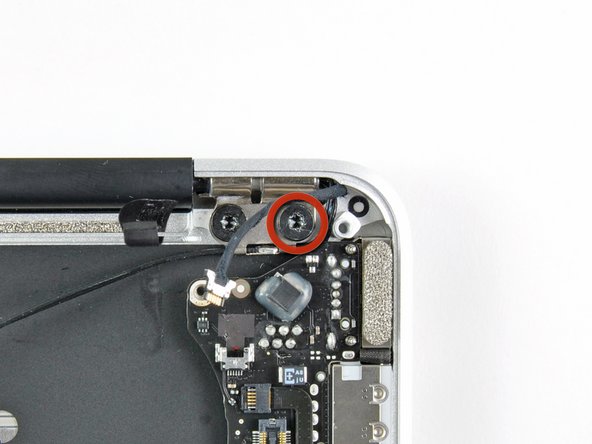
    • Remove the outer 4.9 mm T8 Torx screw securing each display hinge to the upper case (two screws total).

    The screws on my hinges are actually T9 size. A T8 driver worked to unscrew them, but I noticed that the driver "spun" a little when I screwed one back in, and discovered that a T9 driver fit perfectly.

    edward - Antwoord

    Tried to edit a comment from earlier, but had to delete and start over. I echo Edward's comment but stronger: Try a T-9 before you try a T-8. Or you could end up completely stripping the head before you can even react (one turn, in my case). Then you're left staring at a $500 screw stuck in your MBA case...

    bshigenaka - Antwoord

  27. MacBook Air 11" Late 2010 Display Assembly Replacement: stap 27, afbeelding 1 van 1
    • Open the display until it is perpendicular to the upper case and place it on a table as shown.

    • While holding the Air steady, remove the remaining 4.9 mm T8 Torx screw from the lower display bracket.

  28. MacBook Air 11" Late 2010 Display Assembly Replacement: stap 28, afbeelding 1 van 1
    • Before removing the last display screw, be sure to hold the display and upper case steady with your other hand. Failure to do so may allow the components to fall onto the table, causing potentially expensive damage.

    • Remove the last 4.9 mm T8 Torx screw securing the display to the upper case.

  29. MacBook Air 11" Late 2010 Display Assembly Replacement: stap 29, afbeelding 1 van 2 MacBook Air 11" Late 2010 Display Assembly Replacement: stap 29, afbeelding 2 van 2
    • Push the upper case slightly toward the display assembly, then rotate it away from the front of the display assembly.

    • Once the two display hinges have cleared the upper case, remove the display and set it aside.

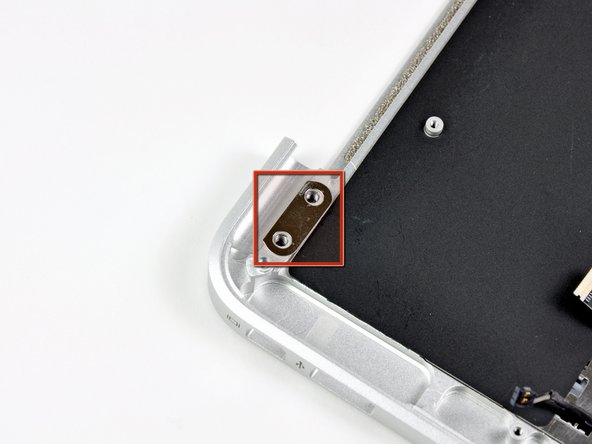
    • Keep track of the shims under each of the two display brackets. When installing the display, be sure a shim is installed under each display bracket (against the upper case) as shown in the third picture.

    Is there a way to tighten the display hinge?

    Steve - Antwoord

Conclusie

To reassemble your device, follow these instructions in reverse order.

44 andere personen hebben deze handleiding voltooid.

3 opmerkingen

Can I change the flex cable... the display cable in a macbook air? Or I have to change all the display? thank

eltecnicodenotebook - Antwoord

You can change it, but you have to buy the cable with the hinge and change both because it goes together.

Alvaro B.B. -

One of the antenna cables got stuck in one of the loops, so I pulled it and the antenna connector got off. Now I can’t connect to the Internet. And there is no easy or cheap fix for this problem. So, people, be careful. Better to cut open some of the loops around antenna cables than make my mistake.

Igor Zaytsev - Antwoord

Voeg opmerking toe

Weergavestatistieken:

Afgelopen 24 uren: 0

Afgelopen 7 dagen: 17

Afgelopen 30 dagen: 54

Altijd: 72,019