Ga door naar hoofdinhoud

Deze versie kan foutieve bewerkingen bevatten. Schakel over naar de recentste gecontroleerde momentopname.

Wat je nodig hebt

  1. , Onderste behuizing: stap 1, afbeelding 1 van 1
    Gereedschap gebruikt in deze stap:
    P5 Pentalobe Screwdriver Retina MacBook Pro and Air
    $5.99
    Koop
    • Schakel je laptop uit en klap het scherm dicht. Leg je laptop op z'n kop op een zachte ondergrond.

    • Verwijder de volgende tien schroeven:

    • Twee 8 mm lange 5-punts Pentalobe-schroeven.

    • Acht 2.5 mm lange 5-punts Pentalobe-schroeven.

    • Hier vind je de speciale schroevendraaier waarmee je 5-punts Pentalobe-schroeven kunt verwijderen.

  2. : stap 2, afbeelding 1 van 1
    • Duw je vingers tussen het scherm en de onderste behuizing en trek de behuizing omhoog om deze van de rest van de MacBook Air te verwijderen.

  3. , Batterijaansluiting: stap 3, afbeelding 1 van 2 , Batterijaansluiting: stap 3, afbeelding 2 van 2
    • In deze stap zie je hoe je de batterij loskoppelt om te voorkomen dat je kortsluiting veroorzaakt tijdens de reparatie.

    • Gebruik het platte deel van je spudger om beide zijden van de batterijaansluiting uit het contact op het moederbord omhoog te duwen en de aansluiting los te koppelen.

    • Buig de kabel een stukje weg van het moederbord zodat je zeker weet dat de batterijaansluiting niet per ongeluk contact kan maken met het contact op het moederbord.

  4. Deze stap is niet vertaald. Help het te vertalen

    : stap 4, afbeelding 1 van 2 : stap 4, afbeelding 2 van 2
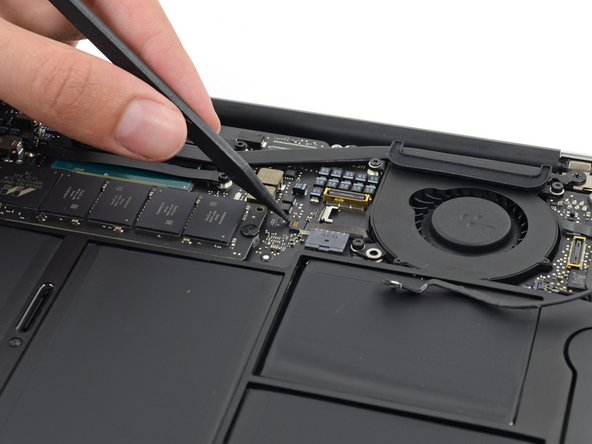
    • Use the tip of a spudger to carefully push on each side of the iSight camera cable connector to loosen it out of its socket on the logic board.

    • We recommend you gently "walk" the connector out of its socket.

  5. Deze stap is niet vertaald. Help het te vertalen

    : stap 5, afbeelding 1 van 2 : stap 5, afbeelding 2 van 2
    • Peel the iSight camera cable up off the adhesive securing it to the fan.

  6. Deze stap is niet vertaald. Help het te vertalen

    : stap 6, afbeelding 1 van 2 : stap 6, afbeelding 2 van 2
    • Use the tip of a spudger to carefully flip up the retaining flap on the fan cable ZIF socket.

    • Be sure you are prying up on the hinged retaining flap, not the socket itself.

  7. Deze stap is niet vertaald. Help het te vertalen

    : stap 7, afbeelding 1 van 1
    • Remove the following three screws securing the fan to the upper case:

    • Two 5.5 mm T5 Torx screws

    • One 4.6 mm T5 Torx screw

    • In some models this is a 3.6 mm T5 Torx screw.

  8. Deze stap is niet vertaald. Help het te vertalen

    : stap 8, afbeelding 1 van 3 : stap 8, afbeelding 2 van 3 : stap 8, afbeelding 3 van 3
    • Lift, but do not remove the fan out of its recess in the upper case.

    • Carefully pull the fan ribbon cable out of its socket as you remove the fan from the Air.

  9. Deze stap is niet vertaald. Help het te vertalen

    : stap 9, afbeelding 1 van 1
    • Remove the four 2.5 mm T5 Torx screws securing the heat sink to the logic board.

  10. Deze stap is niet vertaald. Help het te vertalen

    : stap 10, afbeelding 1 van 2 : stap 10, afbeelding 2 van 2
    • If the heat sink seems to be stuck to the logic board after removing all four screws, use a spudger to carefully separate the heat sink from the face of the CPU.

    • Remove the heat sink from the logic board.

    • When reinstalling the heat sink, be sure to apply a new layer of thermal paste. If you have never applied thermal paste before, we have a guide that makes it easy.

Eindstreep

3 andere personen hebben deze handleiding voltooid.

Sam Goldheart

Lid sinds: 10/18/12

465.870 Reputatie

538 handleidingen geschreven

Team

iFixit Lid van iFixit

Staff

135 Leden

17.222 handleidingen geschreven

3 opmerkingen

you should seriously note the danger of the cpu screw holders. apple for some reason decided to attach the fricken screw receivers/standoffs via surface mount. they dont have a bottom cap either. use a screw slightly too long or turn too far and pop(screw pushes against motherboard and pops the holder off)... one corner is unable to be screwed in. ask me how i learned this...lol...I cant see how this design decision helps anything but apples wallet. the other side of the board has components smds as well so its not like a really short through hole was undo-able.

John W - Antwoord

There is step missing between 3 and 4. There is another ribbon cable over fan that is still there in step 3 but gone in step 4.

Bogdaniec Ze Zbyszka - Antwoord

The step 3 and 4, there should be a step removing the I/O cable. I/O cable must be removed or disassembled to access iSight camera cable. The I/O cable is covering the entire iSight cable, and without removing, accessing the iSight cable will extremely difficult.

ChiKen - Antwoord

Voeg opmerking toe

Weergavestatistieken:

Afgelopen 24 uren: 1

Afgelopen 7 dagen: 9

Afgelopen 30 dagen: 51

Altijd: 4,834