Ga door naar hoofdinhoud

Mac Pro Late 2013 AirPort Card Replacement

Wat je nodig hebt

  1. Mac Pro Late 2013 AirPort Card Replacement, Outer Case: stap 1, afbeelding 1 van 2 Mac Pro Late 2013 AirPort Card Replacement, Outer Case: stap 1, afbeelding 2 van 2
    • Slide the lock switch to the right, to the unlocked position.

  2. Mac Pro Late 2013 AirPort Card Replacement: stap 2, afbeelding 1 van 3 Mac Pro Late 2013 AirPort Card Replacement: stap 2, afbeelding 2 van 3 Mac Pro Late 2013 AirPort Card Replacement: stap 2, afbeelding 3 van 3
    • Lift the outer case straight up off the Mac Pro.

    • It may help to push down on the center of the fan while lifting the case up.

  3. Mac Pro Late 2013 AirPort Card Replacement, Fan Assembly: stap 3, afbeelding 1 van 3 Mac Pro Late 2013 AirPort Card Replacement, Fan Assembly: stap 3, afbeelding 2 van 3 Mac Pro Late 2013 AirPort Card Replacement, Fan Assembly: stap 3, afbeelding 3 van 3
    • Remove five 5.1 mm T10 Torx screws from around the outer perimeter of the fan assembly.

    You don't have to remove the fan assy to get to the wifi board & card. It can be done with the fan assy still attached.

    Fat Mango - Antwoord

    Fat Mango is correct. That said. If you do pull the fan assembly note that the screws are all held in with blue Permatex and breaking them free takes a fair amount of effort. Getting a good set of Torx screwdrivers is a must.

    Jim WIlson - Antwoord

    Hey guys, what would happen if you only replace one card.. I have a D300 but the plan is to upgrade to D500 or D600. So If I can afford and install one instead of the pair would it increase something? or will it cause any conflict? I guess I don’t understand if I the Mac Pro has 2 D300 graphic cards that means each has 1GB? Same as If I would Install 1 D600 that would increase 3GB only? Thanks.

    marcotamayo - Antwoord

    D300 = 2GB each card. Very few apps uses two cards at the same time.

    Gio Cas -

    The (5) Screws are Apple part number 923-0713

    Steven Gier - Antwoord

  4. Mac Pro Late 2013 AirPort Card Replacement: stap 4, afbeelding 1 van 2 Mac Pro Late 2013 AirPort Card Replacement: stap 4, afbeelding 2 van 2
    • The fan assembly is attached to the rest of the computer by two cables on the IO board side.

    • Tilt the assembly up away from the IO board.

    • Do not try to remove the fan assembly yet, as it is still attached by two cables.

  5. Mac Pro Late 2013 AirPort Card Replacement: stap 5, afbeelding 1 van 1
    • While supporting the fan assembly with one hand, loosen the two T8 captive screws in the fan cable bracket.

    • These screws are captive in the Mac Pro. Do not try to remove these screws from your Mac Pro.

    On my Mac Pro (assembled mid-2017) these are T8 screws. In fact, there were no T7 screws anywhere in my machine.

    mark33 - Antwoord

    There was no bracket on top of the cable at all, so I got a bit confused, so I had to skip step 5 and 6.

    Rakesh - Antwoord

    On my machine, a TR7 worked to remove them due to the weird angle.

    Wilson Gaberino - Antwoord

  6. Mac Pro Late 2013 AirPort Card Replacement: stap 6, afbeelding 1 van 1
    • Use a pair of tweezers to pull the fan cable bracket away from the fan assembly.

  7. Mac Pro Late 2013 AirPort Card Replacement: stap 7, afbeelding 1 van 2 Mac Pro Late 2013 AirPort Card Replacement: stap 7, afbeelding 2 van 2
    • Use the flat end of a spudger to disconnect the fan assembly ribbon cable from the IO board.

  8. Mac Pro Late 2013 AirPort Card Replacement: stap 8, afbeelding 1 van 1
    • Disconnect the fan assembly antenna cable from the IO board.

    • Remove the fan assembly from the Mac Pro.

    You don't have to remove the fan assy to do the steps below. They can be done with the fan assy still attached.

    Fat Mango - Antwoord

  9. Mac Pro Late 2013 AirPort Card Replacement, Fan Assembly Lid: stap 9, afbeelding 1 van 3 Mac Pro Late 2013 AirPort Card Replacement, Fan Assembly Lid: stap 9, afbeelding 2 van 3 Mac Pro Late 2013 AirPort Card Replacement, Fan Assembly Lid: stap 9, afbeelding 3 van 3
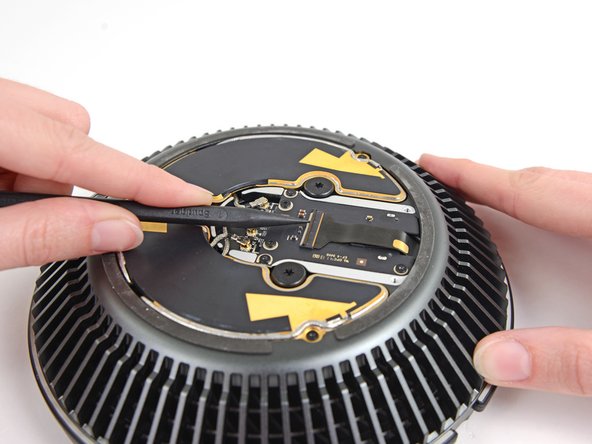
    • Use the flat end of a spudger to pry the fan assembly lid up off the fan assembly.

    • Remove the fan assembly lid.

    There is a thin circle of double sided adhesive that must be loosened in order to remove the plastic cover.

    somethingorother - Antwoord

  10. Mac Pro Late 2013 AirPort Card Replacement, AirPort Board: stap 10, afbeelding 1 van 1
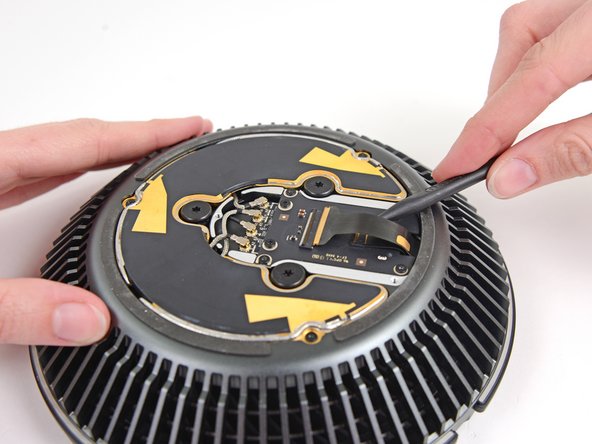
    • Remove the three 3.7 mm T4 screws securing the metal cover to the AirPort board bay.

    I had better luck using a T5 driver.

    somethingorother - Antwoord

    Same here. Mine were T5, not T4.

    Carsten Clark - Antwoord

    t4 was good for me

    Arden De Cuir - Antwoord

  11. Mac Pro Late 2013 AirPort Card Replacement: stap 11, afbeelding 1 van 1
    • Lift and remove the metal cover from the AirPort board bay.

  12. Mac Pro Late 2013 AirPort Card Replacement: stap 12, afbeelding 1 van 3 Mac Pro Late 2013 AirPort Card Replacement: stap 12, afbeelding 2 van 3 Mac Pro Late 2013 AirPort Card Replacement: stap 12, afbeelding 3 van 3
    • Use the tip of a spudger to flip the ZIF retaining tab on the fan assembly ribbon cable connector.

    • Remove the fan assembly ribbon cable from its ZIF socket.

  13. Mac Pro Late 2013 AirPort Card Replacement: stap 13, afbeelding 1 van 3 Mac Pro Late 2013 AirPort Card Replacement: stap 13, afbeelding 2 van 3 Mac Pro Late 2013 AirPort Card Replacement: stap 13, afbeelding 3 van 3
    • Use the tip of a spudger to flip the ZIF retaining tab on the fan ribbon cable.

    • Disconnect the fan ribbon cable.

  14. Mac Pro Late 2013 AirPort Card Replacement, AirPort Card: stap 14, afbeelding 1 van 3 Mac Pro Late 2013 AirPort Card Replacement, AirPort Card: stap 14, afbeelding 2 van 3 Mac Pro Late 2013 AirPort Card Replacement, AirPort Card: stap 14, afbeelding 3 van 3
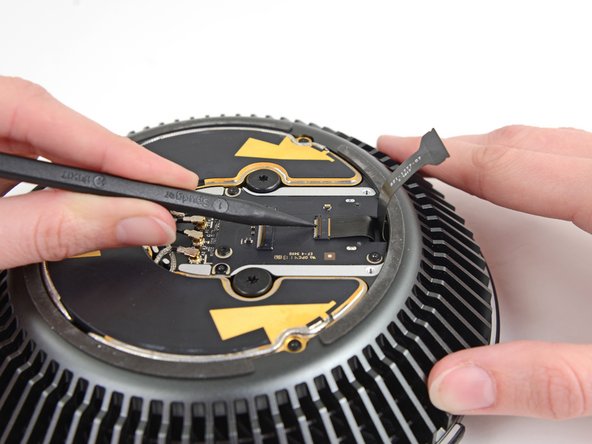
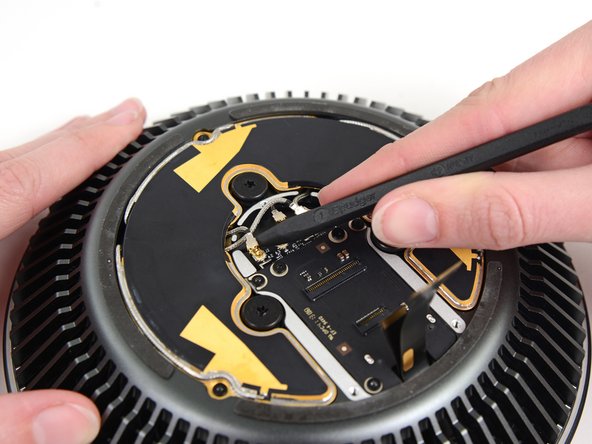
    • Use the tip of a spudger to disconnect the four AirPort antenna cables from the AirPort card.

  15. Mac Pro Late 2013 AirPort Card Replacement: stap 15, afbeelding 1 van 1
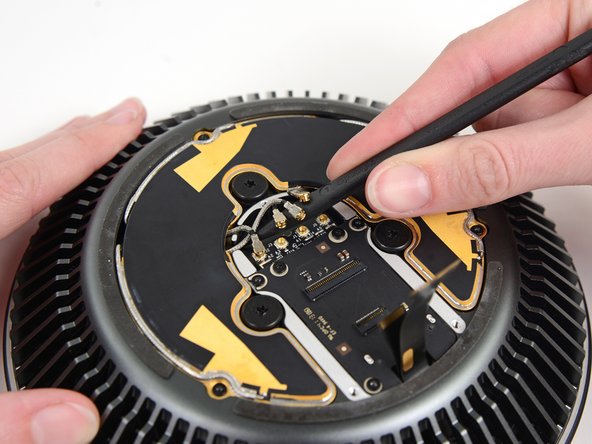
    • Remove three 3.7 mm T4 screws securing the AirPort board to the fan assembly.

    These screws were also T5, not T4, for me.

    Carsten Clark - Antwoord

  16. Mac Pro Late 2013 AirPort Card Replacement: stap 16, afbeelding 1 van 1
    • Remove the AirPort board and card from the fan assembly.

  17. Mac Pro Late 2013 AirPort Card Replacement: stap 17, afbeelding 1 van 1
    • Remove the two 3.7 mm T4 Torx screws securing the AirPort card to the AirPort board.

    And, finally, so were these!

    Carsten Clark - Antwoord

  18. Mac Pro Late 2013 AirPort Card Replacement: stap 18, afbeelding 1 van 2 Mac Pro Late 2013 AirPort Card Replacement: stap 18, afbeelding 2 van 2
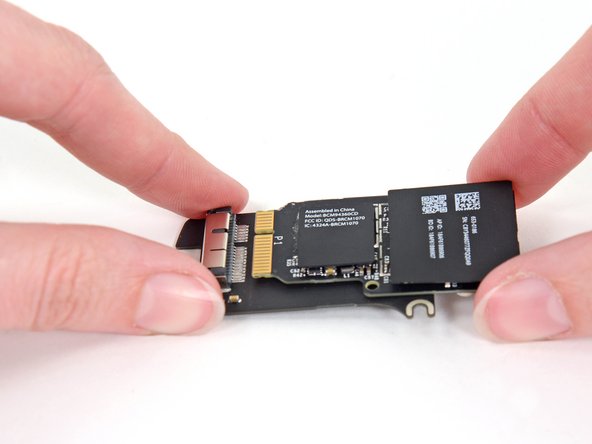
    • Slide the AirPort card out of its socket in the AirPort board.

Conclusie

To reassemble your device, follow these instructions in reverse order.

3 andere personen hebben deze handleiding voltooid.

Andrew Optimus Goldheart

Lid sinds: 10/17/09

502.656 Reputatie

407 handleidingen geschreven

Team

iFixit Lid van iFixit

Staff

135 Leden

16.718 handleidingen geschreven

4 opmerkingen

Is there a way to replace the Mac Pro Airport card with a more recent one, like when you insert a recent one in an old macbook pro to get new features such as "unlock my mac with my apple watch" ? This is an interesting question that remains unanswered (until now ?)

Vincent Monteil - Antwoord

You show how to replace it but I can’t buy it from ifixit….why?

Sanong - Antwoord

Why not start at step 9 and leave the lid attached?

dillonrw - Antwoord

I wondered the exact same thing. I can see zero reason to remove the fan assembly from the top of the machine just to replace the wifi card. The only reason I can see for doing it would be if you drop a screw it’s at least easy to get to, because everything is separate from the core unit.

David Orriss Jr -

Voeg opmerking toe

Weergavestatistieken:

Afgelopen 24 uren: 7

Afgelopen 7 dagen: 22

Afgelopen 30 dagen: 102

Altijd: 10,147