Ga door naar hoofdinhoud

Mac Pro Late 2013 AirPort Card Replacement

Wat je nodig hebt

  1. Mac Pro Late 2013 AirPort Card Replacement, Outer Case: stap 1, afbeelding 1 van 2 Mac Pro Late 2013 AirPort Card Replacement, Outer Case: stap 1, afbeelding 2 van 2
    • Slide the lock switch to the right, to the unlocked position.

  2. Mac Pro Late 2013 AirPort Card Replacement: stap 2, afbeelding 1 van 3 Mac Pro Late 2013 AirPort Card Replacement: stap 2, afbeelding 2 van 3 Mac Pro Late 2013 AirPort Card Replacement: stap 2, afbeelding 3 van 3
    • Lift the outer case straight up off the Mac Pro.

    • It may help to push down on the center of the fan while lifting the case up.

  3. Mac Pro Late 2013 AirPort Card Replacement, Fan Assembly: stap 3, afbeelding 1 van 3 Mac Pro Late 2013 AirPort Card Replacement, Fan Assembly: stap 3, afbeelding 2 van 3 Mac Pro Late 2013 AirPort Card Replacement, Fan Assembly: stap 3, afbeelding 3 van 3
    • Remove five 5.1 mm T10 Torx screws from around the outer perimeter of the fan assembly.

  4. Mac Pro Late 2013 AirPort Card Replacement: stap 4, afbeelding 1 van 2 Mac Pro Late 2013 AirPort Card Replacement: stap 4, afbeelding 2 van 2
    • The fan assembly is attached to the rest of the computer by two cables on the IO board side.

    • Tilt the assembly up away from the IO board.

    • Do not try to remove the fan assembly yet, as it is still attached by two cables.

  5. Mac Pro Late 2013 AirPort Card Replacement: stap 5, afbeelding 1 van 1
    • While supporting the fan assembly with one hand, loosen the two T8 captive screws in the fan cable bracket.

    • These screws are captive in the Mac Pro. Do not try to remove these screws from your Mac Pro.

  6. Mac Pro Late 2013 AirPort Card Replacement: stap 6, afbeelding 1 van 1
    • Use a pair of tweezers to pull the fan cable bracket away from the fan assembly.

  7. Mac Pro Late 2013 AirPort Card Replacement: stap 7, afbeelding 1 van 2 Mac Pro Late 2013 AirPort Card Replacement: stap 7, afbeelding 2 van 2
    • Use the flat end of a spudger to disconnect the fan assembly ribbon cable from the IO board.

  8. Mac Pro Late 2013 AirPort Card Replacement: stap 8, afbeelding 1 van 1
    • Disconnect the fan assembly antenna cable from the IO board.

    • Remove the fan assembly from the Mac Pro.

  9. Mac Pro Late 2013 AirPort Card Replacement, Fan Assembly Lid: stap 9, afbeelding 1 van 3 Mac Pro Late 2013 AirPort Card Replacement, Fan Assembly Lid: stap 9, afbeelding 2 van 3 Mac Pro Late 2013 AirPort Card Replacement, Fan Assembly Lid: stap 9, afbeelding 3 van 3
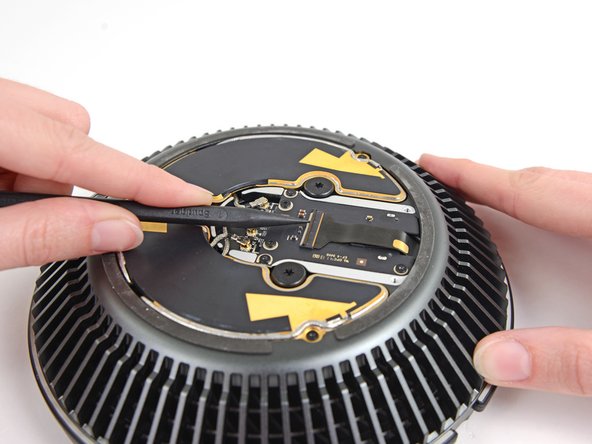
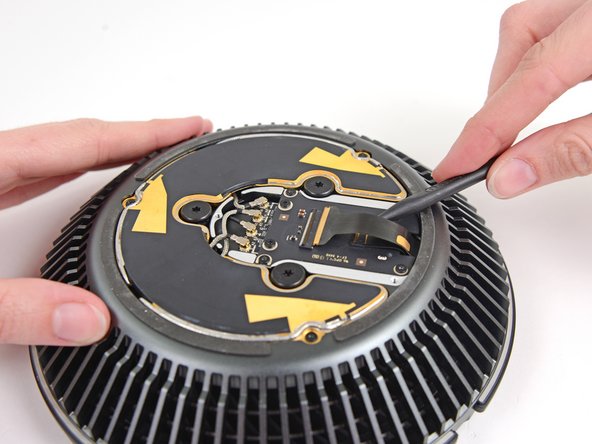
    • Use the flat end of a spudger to pry the fan assembly lid up off the fan assembly.

    • Remove the fan assembly lid.

  10. Mac Pro Late 2013 AirPort Card Replacement, AirPort Board: stap 10, afbeelding 1 van 1
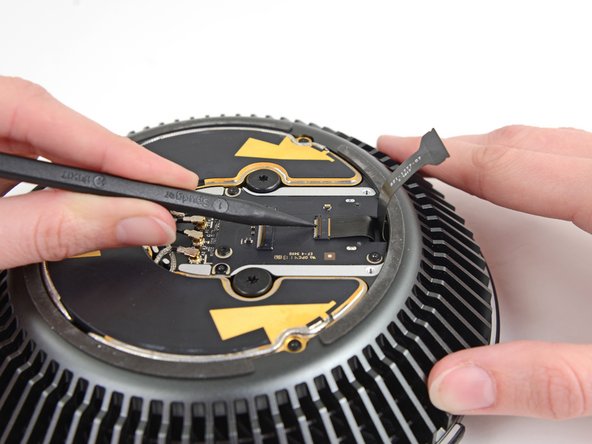
    • Remove the three 3.7 mm T4 screws securing the metal cover to the AirPort board bay.

  11. Mac Pro Late 2013 AirPort Card Replacement: stap 11, afbeelding 1 van 1
    • Lift and remove the metal cover from the AirPort board bay.

  12. Mac Pro Late 2013 AirPort Card Replacement: stap 12, afbeelding 1 van 3 Mac Pro Late 2013 AirPort Card Replacement: stap 12, afbeelding 2 van 3 Mac Pro Late 2013 AirPort Card Replacement: stap 12, afbeelding 3 van 3
    • Use the tip of a spudger to flip the ZIF retaining tab on the fan assembly ribbon cable connector.

    • Remove the fan assembly ribbon cable from its ZIF socket.

  13. Mac Pro Late 2013 AirPort Card Replacement: stap 13, afbeelding 1 van 3 Mac Pro Late 2013 AirPort Card Replacement: stap 13, afbeelding 2 van 3 Mac Pro Late 2013 AirPort Card Replacement: stap 13, afbeelding 3 van 3
    • Use the tip of a spudger to flip the ZIF retaining tab on the fan ribbon cable.

    • Disconnect the fan ribbon cable.

  14. Mac Pro Late 2013 AirPort Card Replacement, AirPort Card: stap 14, afbeelding 1 van 3 Mac Pro Late 2013 AirPort Card Replacement, AirPort Card: stap 14, afbeelding 2 van 3 Mac Pro Late 2013 AirPort Card Replacement, AirPort Card: stap 14, afbeelding 3 van 3
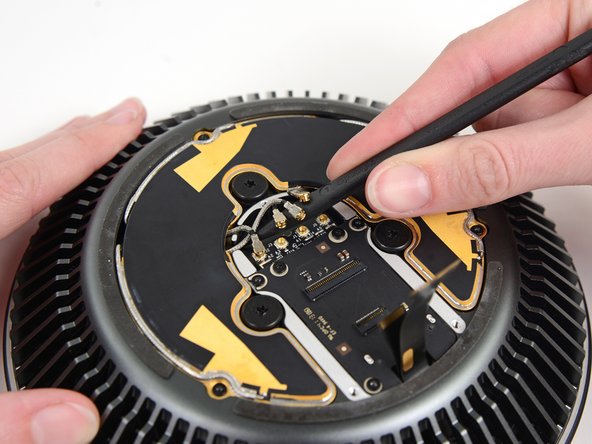
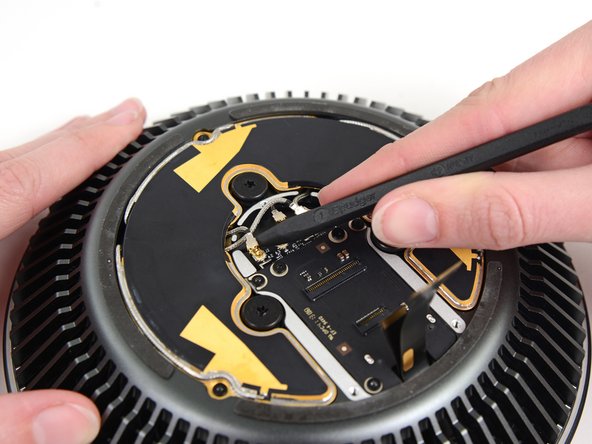
    • Use the tip of a spudger to disconnect the four AirPort antenna cables from the AirPort card.

  15. Mac Pro Late 2013 AirPort Card Replacement: stap 15, afbeelding 1 van 1
    • Remove three 3.7 mm T4 screws securing the AirPort board to the fan assembly.

  16. Mac Pro Late 2013 AirPort Card Replacement: stap 16, afbeelding 1 van 1
    • Remove the AirPort board and card from the fan assembly.

  17. Mac Pro Late 2013 AirPort Card Replacement: stap 17, afbeelding 1 van 1
    • Remove the two 3.7 mm T4 Torx screws securing the AirPort card to the AirPort board.

  18. Mac Pro Late 2013 AirPort Card Replacement: stap 18, afbeelding 1 van 2 Mac Pro Late 2013 AirPort Card Replacement: stap 18, afbeelding 2 van 2
    • Slide the AirPort card out of its socket in the AirPort board.

Conclusie

To reassemble your device, follow these instructions in reverse order.

3 andere personen hebben deze handleiding voltooid.

Andrew Optimus Goldheart

Lid sinds: 10/17/09

502.749 Reputatie

407 handleidingen geschreven

Team

iFixit Lid van iFixit

Staff

135 Leden

16.732 handleidingen geschreven

4 opmerkingen

Is there a way to replace the Mac Pro Airport card with a more recent one, like when you insert a recent one in an old macbook pro to get new features such as "unlock my mac with my apple watch" ? This is an interesting question that remains unanswered (until now ?)

Vincent Monteil - Antwoord

You show how to replace it but I can’t buy it from ifixit….why?

Sanong - Antwoord

Why not start at step 9 and leave the lid attached?

dillonrw - Antwoord

I wondered the exact same thing. I can see zero reason to remove the fan assembly from the top of the machine just to replace the wifi card. The only reason I can see for doing it would be if you drop a screw it’s at least easy to get to, because everything is separate from the core unit.

David Orriss Jr -

Voeg opmerking toe

Weergavestatistieken:

Afgelopen 24 uren: 8

Afgelopen 7 dagen: 29

Afgelopen 30 dagen: 101

Altijd: 10,162