Ga door naar hoofdinhoud

Mac Mini Mid 2011 Hard Drive Replacement

Alleen vereisten
Deze handleiding is alleen bedoeld als vereiste voor andere handleidingen. Het staat niet op zichzelf.

Wat je nodig hebt

  1. Mac Mini Mid 2011 Hard Drive Replacement, Hard Drive: stap 1, afbeelding 1 van 1
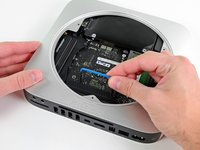
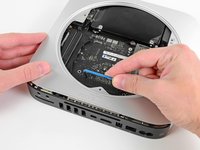
    • Use the flat end of a spudger to pry the hard drive connector up from its socket on the logic board.

  2. Mac Mini Mid 2011 Hard Drive Replacement: stap 2, afbeelding 1 van 1
    • Use the tip of a spudger to lift the IR sensor connector up and out of its socket on the logic board.

    • This connector can be very fragile—lift gently and evenly.

  3. Mac Mini Mid 2011 Hard Drive Replacement: stap 3, afbeelding 1 van 1
    • Remove the following three screws:

    • One 5.0 mm T8 Torx or 2.0 mm Hex screw (either screwdriver will work)

    • One 16.2 mm T6 Torx screw

    • One 26 mm T6 Torx standoff

  4. Mac Mini Mid 2011 Hard Drive Replacement: stap 4, afbeelding 1 van 3 Mac Mini Mid 2011 Hard Drive Replacement: stap 4, afbeelding 2 van 3 Mac Mini Mid 2011 Hard Drive Replacement: stap 4, afbeelding 3 van 3
    Gereedschap gebruikt in deze stap:
    Mac mini Logic Board Removal Tool
    $4.99
    Koop
    • To remove the logic board, the two cylindrical rods of the Mac mini Logic Board Removal Tool must be inserted into the holes highlighted in red. Inserting instruments into any logic board holes other than the ones highlighted in red may destroy the logic board.

    • Insert the Mac mini Logic Board Removal Tool into the two holes highlighted in red. Be sure it makes contact with the top side of outer case below the logic board before proceeding.

    • Carefully pull the tool toward the I/O board. The logic board and I/O board assembly should slightly slide out of the outer case.

    • Cease prying when the I/O board is visibly separated from the outer case.

    • Remove the Mac mini Logic Board Removal tool.

  5. Mac Mini Mid 2011 Hard Drive Replacement: stap 5, afbeelding 1 van 1
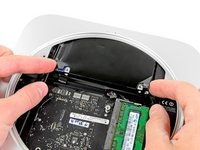
    • Simultaneously push the two plastic clips on the far left and right sides of the I/O board toward the middle of the I/O board and pull the I/O board away from the outer case.

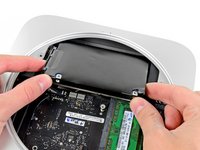
    • Only pull the logic board assembly out of the outer case until the edge of the I/O board is about .5" away from the edge of the aluminum outer case.

  6. Mac Mini Mid 2011 Hard Drive Replacement: stap 6, afbeelding 1 van 2 Mac Mini Mid 2011 Hard Drive Replacement: stap 6, afbeelding 2 van 2
    • Pull the hard drive away from the front edge of the mini and remove it from the outer case.

Eindstreep

Één andere persoon heeft deze handleiding voltooid.

0 opmerkingen

Voeg opmerking toe

Weergavestatistieken:

Afgelopen 24 uren: 0

Afgelopen 7 dagen: 0

Afgelopen 30 dagen: 0

Altijd: 1,509