Ga door naar hoofdinhoud

MSI GT72 2QE Dominator Pro RAM Replacement

Wat je nodig hebt

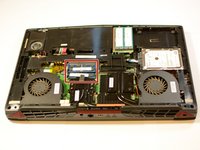
  1. MSI GT72 2QE Dominator Pro RAM Replacement, RAM: stap 1, afbeelding 1 van 1
    • Remove the 7 indicated 6mm Phillips #00 screws.

    • Same PH0 screwdriver can be used in all steps.

  2. MSI GT72 2QE Dominator Pro RAM Replacement: stap 2, afbeelding 1 van 1
    • With the screws out, remove the bottom door.

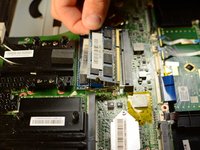
  3. MSI GT72 2QE Dominator Pro RAM Replacement: stap 3, afbeelding 1 van 2 MSI GT72 2QE Dominator Pro RAM Replacement: stap 3, afbeelding 2 van 2
    • Pull back clamps holding the RAM to remove it from the socket.

Conclusie

To reassemble your device, follow these instructions in reverse order.

Één andere persoon heeft deze handleiding voltooid.

Nate

Lid sinds: 04/18/17

128 Reputatie

1 Handleiding geschreven

Team

Cal Poly, Team S17-G2, Banghart Spring 2017 Lid van Cal Poly, Team S17-G2, Banghart Spring 2017

CPSU-BANGHART-S17S17G2

5 Leden

7 handleidingen geschreven

Één opmerking

This guide is incomplete. There's 4 RAM slots, you've only shown the 2 on the near side of the motherboard.

luke - Antwoord

Voeg opmerking toe

Weergavestatistieken:

Afgelopen 24 uren: 0

Afgelopen 7 dagen: 9

Afgelopen 30 dagen: 19

Altijd: 2,411