Inleiding
Use this guide to replace a faulty fan in your MSI GS65 Stealth Thin 8RE laptop.
The fan is the main method your device uses to keep the CPU cool. There are two fans on either side of the laptop that blow hot air out the exhaust vents. To ensure that one or both of these fans needs replacement, navigate to the MSI Dragon Center and monitor the fan speeds to determine if they are functioning as needed. If one fan is compensating, then this means the other fan needs replacement. If the computer temperature is above nominal and neither fan has a high RPM rate, then both fans need replacement.
In step 8 of this guide, you will need to apply thermal paste to your laptop. To ensure that you do not damage your computer through overuse, please review the Thermal Paste Instructions before beginning. Make sure to power off your laptop completely and disconnect from any external power source prior to beginning the process.
Wat je nodig hebt
-
-
Remove the fifteen black 6.0 mm Phillips #00 screws from the back cover.
-
Carefully remove the back cover by prying up the case with a plastic opening tool, starting at the opening end and finishing at the hinge.
-
-
-
Gereedschap gebruikt in deze stap:Tweezers$4.99
-
Unscrew the 4.0mm Phillips #00 screw holding down the WiFi card.
-
Be extra careful as to not unplug the tiny wires when lifting out the WiFi card, as it may be quite difficult to plug them back in.
-
Slightly lift and slide out the card towards you to remove it.
-
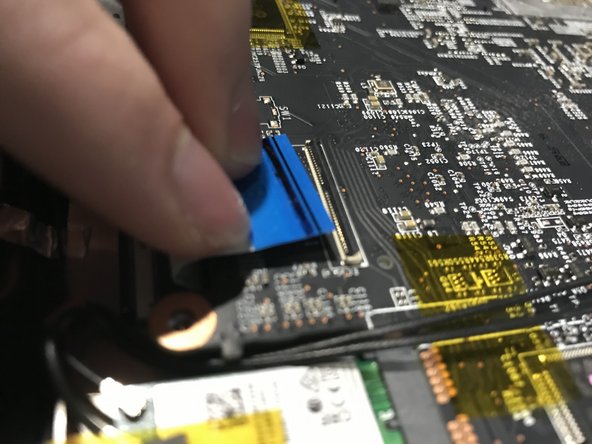
Using tweezers or careful manipulation with your hand, unplug the cable just beside the WiFi card.
-
-
-
Flip the motherboard over.
-
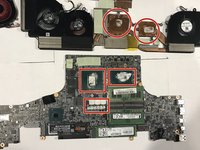
Each of the screws may have a number next to it on the black metal, unscrew them in that order for both disassembly and reassembly (i.e. don't reverse the order on reassembly). If you are uncertain of the order, it should be as follows:
-
First screw: red
-
Second screw: orange
-
Third screw: yellow
-
Fourth and fifth screws: green in either order
-
Unplug the wires connected to each fan: 2 for the GPU fan and 1 for the CPU fan. One of the GPU fan wires is under a black piece of tape.
-
-
-
For a CPU fan replacement, which is the most common replacement, remove the three black 3.0 mm Phillips #000 screws from the singular fan.
-
For a GPU fan replacement, remove the 5 black 3.0 mm Phillips #000 screws from the twin fan setup.
-
Then peel off the very strong tape that seals the fan vents.
-
After removing the fan and inserting the new one, follow all of the steps in the guide again in reverse order.
-
After following all of the steps in the guide again in reverse order to reassemble your device, plug your computer in to its charger, wait a few moments, then turn it on. It should perform optimally now; however, if you experience any new issues, you should once again check to see if you had plugged all of the wires and ribbons back into their dedicated spots.
After following all of the steps in the guide again in reverse order to reassemble your device, plug your computer in to its charger, wait a few moments, then turn it on. It should perform optimally now; however, if you experience any new issues, you should once again check to see if you had plugged all of the wires and ribbons back into their dedicated spots.
Annuleren: ik heb deze handleiding niet afgemaakt.
16 andere personen hebben deze handleiding voltooid.
11 opmerkingen
Very helpful, thank you!
The only issue I encountered was removing the GPU fan. I couldn't get it from “picture 2 to picture 3” in Step 9 as easily as you did it here. Frustrating!
Very helpful guide! I replaced the GPU fan, got it all put back together, and freaked out a bit when it didn’t power on at all… then I realized there was an important note in the conclusion to PLUG IT IN first. Phew!
Amazing guide. Many thanks to the author!


