Ga door naar hoofdinhoud

Logitech UE Boom Motherboard Replacement

Wat je nodig hebt

  1. Logitech UE Boom Motherboard Replacement, D-ring: stap 1, afbeelding 1 van 1
    • Turn the device over. The D-ring will be on the left face of the speaker when viewing the device from this orientation.

  2. Logitech UE Boom Motherboard Replacement: stap 2, afbeelding 1 van 2 Logitech UE Boom Motherboard Replacement: stap 2, afbeelding 2 van 2
    • Lift the handle on the D-ring and unscrew it.

    • Remove the D-ring.

  3. Logitech UE Boom Motherboard Replacement, Bluetooth Adapter: stap 3, afbeelding 1 van 1
    • Any repairs made from this point forward will void your device's warranty.

    • Holding the speaker upright, wedge the metal spudger in between the casing and the speaker. Gently pry open the tabs as they are easily broken.

  4. Logitech UE Boom Motherboard Replacement: stap 4, afbeelding 1 van 3 Logitech UE Boom Motherboard Replacement: stap 4, afbeelding 2 van 3 Logitech UE Boom Motherboard Replacement: stap 4, afbeelding 3 van 3
    • Find the part of the casing that covers the volume controls. Wedge the metal spudger under this and pry open all of the tabs as in the previous step.

    • Repeat for the bottom of the speaker and pry the casing open with your fingers.

  5. Logitech UE Boom Motherboard Replacement: stap 5, afbeelding 1 van 2 Logitech UE Boom Motherboard Replacement: stap 5, afbeelding 2 van 2
    • Using the Phillips J0 head screwdriver, unscrew the four silver 9 mm screws.

    • Do the same for the two black 7 mm screws.

  6. Logitech UE Boom Motherboard Replacement: stap 6, afbeelding 1 van 3 Logitech UE Boom Motherboard Replacement: stap 6, afbeelding 2 van 3 Logitech UE Boom Motherboard Replacement: stap 6, afbeelding 3 van 3
    • This next step involves the use of a hot soldering iron. Remember to be careful during this step since it can be easy to burn yourself.

    • Using a soldering iron, de-solder the two ends of the switch plate.

  7. Logitech UE Boom Motherboard Replacement: stap 7, afbeelding 1 van 1
    • With the switch plate disconnected, remove it and your device should now look like this.

  8. Logitech UE Boom Motherboard Replacement, Lithium Battery: stap 8, afbeelding 1 van 1
    • With a metal spudger, pry open the tabs on the speaker sleeve along the length of the speaker.

  9. Logitech UE Boom Motherboard Replacement: stap 9, afbeelding 1 van 1
    • Use a plastic opening tool to pry the sleeve off from the bottom of the speaker.

  10. Logitech UE Boom Motherboard Replacement: stap 10, afbeelding 1 van 3 Logitech UE Boom Motherboard Replacement: stap 10, afbeelding 2 van 3 Logitech UE Boom Motherboard Replacement: stap 10, afbeelding 3 van 3
    • Peel off the sleeve.

  11. Logitech UE Boom Motherboard Replacement: stap 11, afbeelding 1 van 2 Logitech UE Boom Motherboard Replacement: stap 11, afbeelding 2 van 2
    • Use a Phillips 1 screwdriver to unscrew the eight black 14 mm screws along the length of the casing.

  12. Logitech UE Boom Motherboard Replacement: stap 12, afbeelding 1 van 2 Logitech UE Boom Motherboard Replacement: stap 12, afbeelding 2 van 2
    • With the screws removed, pry open the casing to be able to get to the components inside.

    • Try prying the case open from one of the ends if that is easier.

  13. Logitech UE Boom Motherboard Replacement: stap 13, afbeelding 1 van 2 Logitech UE Boom Motherboard Replacement: stap 13, afbeelding 2 van 2
    • With a Phillips #00 screwdriver, unscrew two 5.6 mm screws from the rectangular shaped circuit board.

  14. Logitech UE Boom Motherboard Replacement: stap 14, afbeelding 1 van 1
    • With the Phillips #2 screwdriver, unscrew the 9.9 mm screw from the larger circuit board surrounding the speaker.

  15. Logitech UE Boom Motherboard Replacement: stap 15, afbeelding 1 van 1
    • Once all of the screws are gone, you should be able to remove the circuit boards and find the battery.

  16. Logitech UE Boom Motherboard Replacement: stap 16, afbeelding 1 van 2 Logitech UE Boom Motherboard Replacement: stap 16, afbeelding 2 van 2
    • Remove the battery by pulling it from the terminal as marked in the picture.

  17. Logitech UE Boom Motherboard Replacement, Motherboard: stap 17, afbeelding 1 van 2 Logitech UE Boom Motherboard Replacement, Motherboard: stap 17, afbeelding 2 van 2
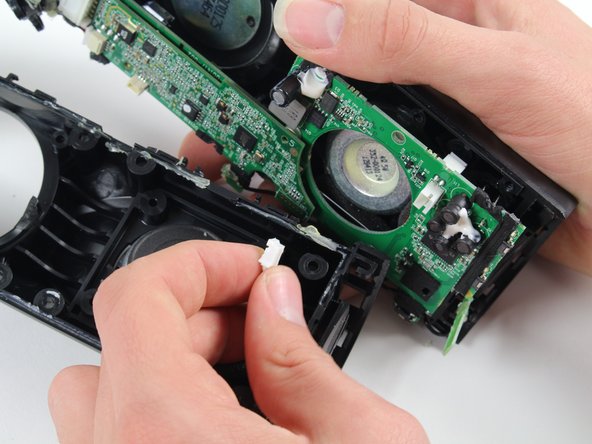
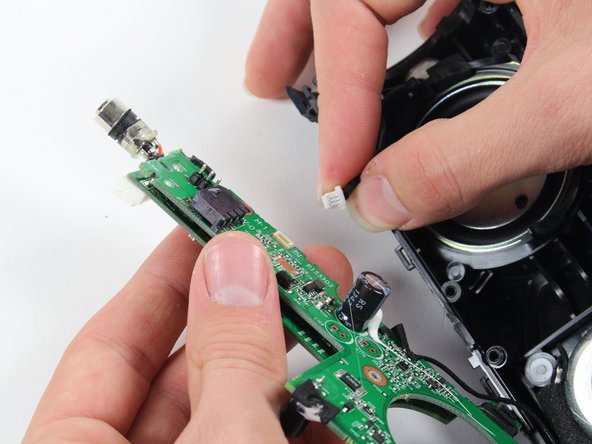
    • Remove the speaker by pulling it from the terminal as marked in the picture.

  18. Logitech UE Boom Motherboard Replacement: stap 18, afbeelding 1 van 2 Logitech UE Boom Motherboard Replacement: stap 18, afbeelding 2 van 2
    • Remove the second speaker by pulling it from the terminal as marked in the picture.

  19. Logitech UE Boom Motherboard Replacement: stap 19, afbeelding 1 van 2 Logitech UE Boom Motherboard Replacement: stap 19, afbeelding 2 van 2
    • Finally, remove the motherboard completely by pulling it from the terminal as marked in the picture.

Conclusie

To reassemble your device, follow these instructions in reverse order.

7 andere personen hebben deze handleiding voltooid.

Sean Reilly

Lid sinds: 10/01/15

1.715 Reputatie

2 handleidingen geschreven

Team

Cal Poly, Team 4-1, Maness Fall 2015 Lid van Cal Poly, Team 4-1, Maness Fall 2015

CPSU-MANESS-F15S4G1

4 Leden

20 handleidingen geschreven

2 opmerkingen

Is there anywhere I can buy the motherboard to replace my UE Boom board fried by lightning?

Mohd Razali Hamid - Antwoord

I would like to know where can I buy the UE BOOM Mother Board.

許志豪 - Antwoord

Voeg opmerking toe

Weergavestatistieken:

Afgelopen 24 uren: 2

Afgelopen 7 dagen: 9

Afgelopen 30 dagen: 36

Altijd: 9,562