Ga door naar hoofdinhoud

Lenovo Yoga Tab 3 8 Kickstand Lock Replacement

Wat je nodig hebt

  1. Lenovo Yoga Tab 3 8 Kickstand Lock Replacement, Back Cover: stap 1, afbeelding 1 van 3 Lenovo Yoga Tab 3 8 Kickstand Lock Replacement, Back Cover: stap 1, afbeelding 2 van 3 Lenovo Yoga Tab 3 8 Kickstand Lock Replacement, Back Cover: stap 1, afbeelding 3 van 3
    Gereedschap gebruikt in deze stap:
    Tweezers
    $4.99
    Koop
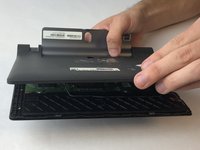
    • Open the kickstand by pressing the release button in the center.

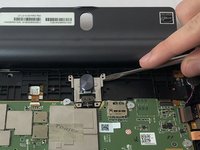
    • Remove the identification sticker with a pair of tweezers to allow access to the two 2mm screws underneath.

  2. Lenovo Yoga Tab 3 8 Kickstand Lock Replacement: stap 2, afbeelding 1 van 1
    • Remove the three 2mm screws under the kickstand with a PH00 screwdriver.

    • The third 2mm screw to the right may have an S sticker covering it which you can scrape off.

  3. Lenovo Yoga Tab 3 8 Kickstand Lock Replacement: stap 3, afbeelding 1 van 3 Lenovo Yoga Tab 3 8 Kickstand Lock Replacement: stap 3, afbeelding 2 van 3 Lenovo Yoga Tab 3 8 Kickstand Lock Replacement: stap 3, afbeelding 3 van 3
    • Starting along the edge opposite of the hinge, insert a plastic opening tool between the screen and the backing to begin separating the small clips holding the backing on.

    • Work along the edge and then up the sides, separating the clips with the plastic opening tool.

    • There is adhesive underneath the slot for the SD card so you will need to slowly apply some force to break the adhesive.

    • As the back is separated from the device, be careful to not lose the power button. It may come loose and fall out.

  4. Lenovo Yoga Tab 3 8 Kickstand Lock Replacement, Kickstand Lock: stap 4, afbeelding 1 van 1
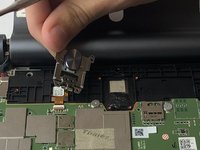
    • Locate the four 2mm screws that secure the lock and remove them with a PH00 screwdriver.

  5. Lenovo Yoga Tab 3 8 Kickstand Lock Replacement: stap 5, afbeelding 1 van 2 Lenovo Yoga Tab 3 8 Kickstand Lock Replacement: stap 5, afbeelding 2 van 2
    • Pry the lock up with a metal spudger. There is adhesive holding the mechanism down. Carefully separate it using even pressure.

Conclusie

To reassemble your device, follow these instructions in reverse order.

Nicklaus Krems

Lid sinds: 09/25/17

1.049 Reputatie

8 handleidingen geschreven

Team

USF Tampa, Team S16-G2, Eyestone Fall 2017 Lid van USF Tampa, Team S16-G2, Eyestone Fall 2017

USFT-EYESTONE-F17S16G2

4 Leden

16 handleidingen geschreven

0 opmerkingen

Voeg opmerking toe

Weergavestatistieken:

Afgelopen 24 uren: 0

Afgelopen 7 dagen: 2

Afgelopen 30 dagen: 10

Altijd: 895