Ga door naar hoofdinhoud

Lenovo Yoga 910-13IKB USB Ports Replacement

Wat je nodig hebt

  1. Lenovo Yoga 910-13IKB USB Ports Replacement, Bottom Panel: stap 1, afbeelding 1 van 2 Lenovo Yoga 910-13IKB USB Ports Replacement, Bottom Panel: stap 1, afbeelding 2 van 2
    • Before you begin, be sure to turn off your laptop and unplug it from the outlet.

    • Turn the laptop over and remove the ten Torx T5 screws along the perimeter of the bottom panel.
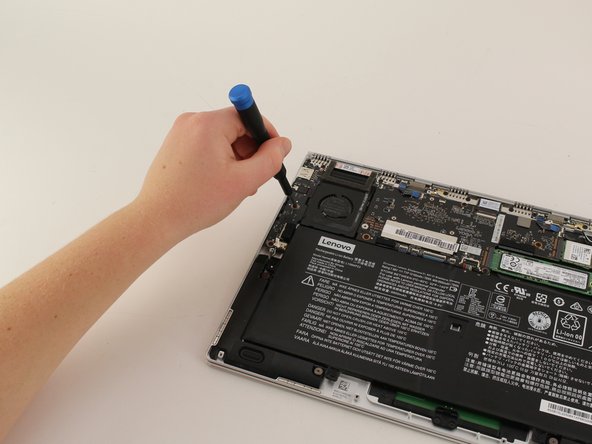
    • Remove the panel.

  2. Lenovo Yoga 910-13IKB USB Ports Replacement: stap 2, afbeelding 1 van 1
    • Remove all 4 screws attached to the battery with a small Phillips head screwdriver.

    • Each screw on the back is M2 x 1.7mm

    • After the screws are taken out, remove the battery.

  3. Lenovo Yoga 910-13IKB USB Ports Replacement: stap 3, afbeelding 1 van 1
    • Remove all 6 screws attached to the trackpad with a small Phillips head screwdriver.

    • Each screw on the back is M2 x 1.7mm

    • Detach the ribbon cable connected to the trackpad using a wedge device.

    • Remove the trackpad using a wedge device

  4. Lenovo Yoga 910-13IKB USB Ports Replacement: stap 4, afbeelding 1 van 1
    • Remove all 6 screws attached to the USB ports on both sides of the device with a small Philips head screwdriver.

    • Detach both ribbon cables attached to each USB port with a wedge device, then detach the USB ports.

  5. Lenovo Yoga 910-13IKB USB Ports Replacement: stap 5, afbeelding 1 van 3 Lenovo Yoga 910-13IKB USB Ports Replacement: stap 5, afbeelding 2 van 3 Lenovo Yoga 910-13IKB USB Ports Replacement: stap 5, afbeelding 3 van 3
    • Remove all 4 screws attached to SSD stick with a small Phillips head screwdriver.

    • Pull the SSD stick directly to the right until it shifts out of place to remove it.

    • The storage chip above it (further away from you) may also simply be detached by pulling it directly to the right until it clicks out.

  6. Lenovo Yoga 910-13IKB USB Ports Replacement: stap 6, afbeelding 1 van 3 Lenovo Yoga 910-13IKB USB Ports Replacement: stap 6, afbeelding 2 van 3 Lenovo Yoga 910-13IKB USB Ports Replacement: stap 6, afbeelding 3 van 3
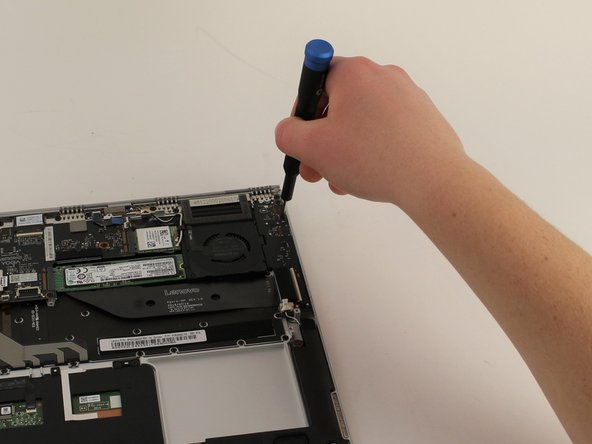
    • Remove all 4 screws attached to both fans, and the back connector strip (long metal piece furthest from you with screws in it) with a small Phillips head screwdriver

    • Remove the back connector strip using a wedge device to pry it off of the device

    • With the back connector strip removed, pry the fans (which are attached) using a wedge device and the fans will now be maintainable.

  7. Lenovo Yoga 910-13IKB USB Ports Replacement, Battery: stap 7, afbeelding 1 van 1
    • Remove the four 3 mm Phillips #0 screws holding the battery in place.

  8. Lenovo Yoga 910-13IKB USB Ports Replacement: stap 8, afbeelding 1 van 3 Lenovo Yoga 910-13IKB USB Ports Replacement: stap 8, afbeelding 2 van 3 Lenovo Yoga 910-13IKB USB Ports Replacement: stap 8, afbeelding 3 van 3
    • Disconnect the battery cable from its motherboard socket by gently pulling it towards the battery. The spudger tool may be needed to lift the flap seal.

    • Pull parallel to the battery, not straight up.

    • Pull evenly on the width of the cable so that no individual wire is overly strained.

    • Lift the battery out.

  9. Lenovo Yoga 910-13IKB USB Ports Replacement, USB Ports: stap 9, afbeelding 1 van 3 Lenovo Yoga 910-13IKB USB Ports Replacement, USB Ports: stap 9, afbeelding 2 van 3 Lenovo Yoga 910-13IKB USB Ports Replacement, USB Ports: stap 9, afbeelding 3 van 3
    • Remove the five 3mm JIS #00 screws holding the array of ports in place.

  10. Lenovo Yoga 910-13IKB USB Ports Replacement: stap 10, afbeelding 1 van 1
    • Lift up on the cover on top of the ribbon connector and gently pull the ribbon cable out.

  11. Lenovo Yoga 910-13IKB USB Ports Replacement: stap 11, afbeelding 1 van 1
    • Lift up on the component and remove it.

  12. Lenovo Yoga 910-13IKB USB Ports Replacement: stap 12, afbeelding 1 van 1
    • Repeat the same process on the opposite side, lifting up on the connector cover and pulling the ribbon cable out of its place.

  13. Lenovo Yoga 910-13IKB USB Ports Replacement: stap 13, afbeelding 1 van 1
    • Lift up on the set of ports and remove it from the device.

Conclusie

To reassemble your device, follow these instructions in reverse order.

Één andere persoon heeft deze handleiding voltooid.

Pablo Gonzalez

Lid sinds: 01/23/20

538 Reputatie

2 handleidingen geschreven

Team

Cal Poly, Team S1-G5, White Winter 2020 Lid van Cal Poly, Team S1-G5, White Winter 2020

CPSU-WHITE-W20S1G5

4 Leden

14 handleidingen geschreven

0 opmerkingen

Voeg opmerking toe

Weergavestatistieken:

Afgelopen 24 uren: 0

Afgelopen 7 dagen: 3

Afgelopen 30 dagen: 30

Altijd: 4,114