Ga door naar hoofdinhoud

Lenovo Yoga 730-13IKB Heat Sink Replacement

Wat je nodig hebt

  1. Lenovo Yoga 730-13IKB Heat Sink Replacement, Back Case: stap 1, afbeelding 1 van 3 Lenovo Yoga 730-13IKB Heat Sink Replacement, Back Case: stap 1, afbeelding 2 van 3 Lenovo Yoga 730-13IKB Heat Sink Replacement, Back Case: stap 1, afbeelding 3 van 3
    • Power off the laptop and place it facedown on a non-scratching surface.

    • Remove the nine T5 screws fastening the back case.

  2. Lenovo Yoga 730-13IKB Heat Sink Replacement: stap 2, afbeelding 1 van 3 Lenovo Yoga 730-13IKB Heat Sink Replacement: stap 2, afbeelding 2 van 3 Lenovo Yoga 730-13IKB Heat Sink Replacement: stap 2, afbeelding 3 van 3
    • Slide a plastic opening tool underneath the back case near the screen hinges. Gently pry up on either side.

    • Slide the opening tool underneath the back case next to the middle screw hole at either side of the case. Gently pry up.

    • You may hear popping sounds as the tabs securing the case release. This is normal. If the case does not move, try prying at a different angle/position.

  3. Lenovo Yoga 730-13IKB Heat Sink Replacement: stap 3, afbeelding 1 van 1
    • Remove the back case by pulling up near the screen hinges and lifting diagonally away from the laptop.

    • Go slowly to avoid breaking any connecting tabs.

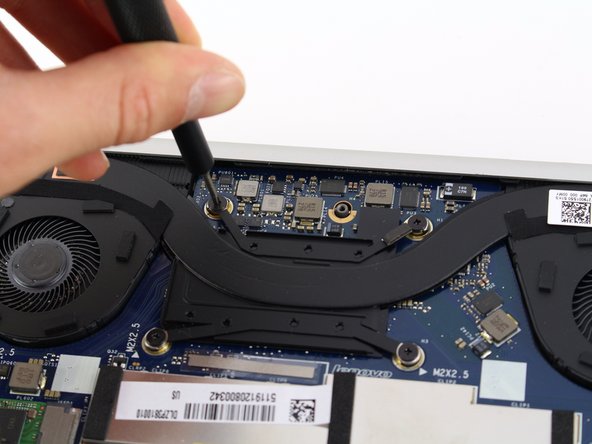
  4. Lenovo Yoga 730-13IKB Heat Sink Replacement, Heat Sink: stap 4, afbeelding 1 van 2 Lenovo Yoga 730-13IKB Heat Sink Replacement, Heat Sink: stap 4, afbeelding 2 van 2
    • Use a Phillips #00 screwdriver to remove the eight 2.5mm screws securing the heat sink assembly.

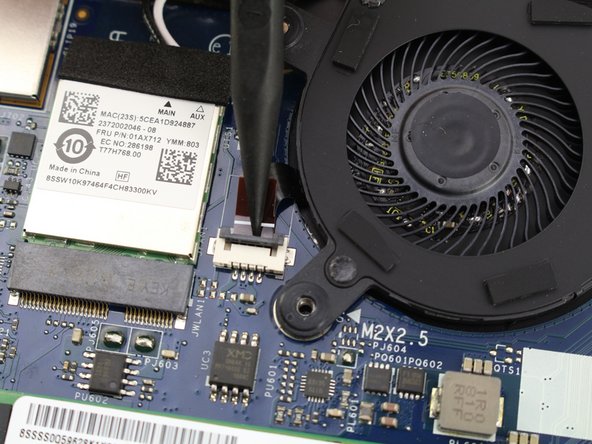
  5. Lenovo Yoga 730-13IKB Heat Sink Replacement: stap 5, afbeelding 1 van 2 Lenovo Yoga 730-13IKB Heat Sink Replacement: stap 5, afbeelding 2 van 2
    • Release the fan connector by gently pushing the gray locking tab up using a plastic spudger. Do this for both of the fans.

    • Pull each fan cable straight out of the connector.

  6. Lenovo Yoga 730-13IKB Heat Sink Replacement: stap 6, afbeelding 1 van 1
    • Remove the heat sink assembly by holding the middle plate and rotating the assembly down towards the back of the motherboard.

    • Pull the heat sink diagonally away from the laptop.

Conclusie

To reassemble your device, follow these instructions in reverse order.

Één andere persoon heeft deze handleiding voltooid.

Colin Reay

Lid sinds: 01/23/20

848 Reputatie

5 handleidingen geschreven

Team

Cal Poly, Team S1-G1, White Winter 2020 Lid van Cal Poly, Team S1-G1, White Winter 2020

CPSU-WHITE-W20S1G1

3 Leden

14 handleidingen geschreven

Één opmerking

gdje i kako kupiti hladnjak za lenovo yoga 730-13 sa zamjenu

Smajo Avdic - Antwoord

Voeg opmerking toe

Weergavestatistieken:

Afgelopen 24 uren: 0

Afgelopen 7 dagen: 2

Afgelopen 30 dagen: 7

Altijd: 936