Ga door naar hoofdinhoud

Lenovo Yoga 710-14IKB Trackpad Replacement

Wat je nodig hebt

  1. Lenovo Yoga 710-14IKB Trackpad Replacement, Back Cover: stap 1, afbeelding 1 van 1
    • Ensure your device is completely OFF before starting this guide.

    • Use a Torx T4 screwdriver to unscrew the nine 5 mm screws holding the cover in place.

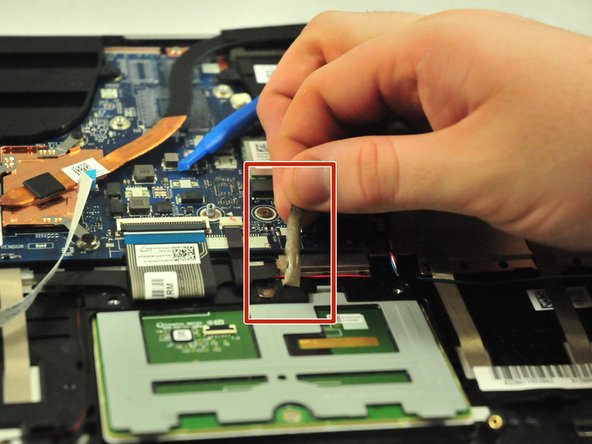
    • Use a Torx T4 screwdriver to unscrew the 8 mm screw in the center.

    • When, reassembling, make sure not to tighten the screws too much or you may risk cracking the plastic cover.

  2. Lenovo Yoga 710-14IKB Trackpad Replacement: stap 2, afbeelding 1 van 3 Lenovo Yoga 710-14IKB Trackpad Replacement: stap 2, afbeelding 2 van 3 Lenovo Yoga 710-14IKB Trackpad Replacement: stap 2, afbeelding 3 van 3
    • Use the plastic opening tool to pry the cover up and away from the laptop, starting at one end and working your way around the cover.

    • The cover is large and flat and made of thin plastic. It cracks easily, so make sure not to pry too hard.

  3. Lenovo Yoga 710-14IKB Trackpad Replacement, Battery: stap 3, afbeelding 1 van 2 Lenovo Yoga 710-14IKB Trackpad Replacement, Battery: stap 3, afbeelding 2 van 2
    • Use a Phillips #00 screwdriver to remove the four 3 mm screws holding the battery in place.

    • Be careful not to cross-thread the screws. Also, don't let the screws fall down into the laptop case.

  4. Lenovo Yoga 710-14IKB Trackpad Replacement: stap 4, afbeelding 1 van 2 Lenovo Yoga 710-14IKB Trackpad Replacement: stap 4, afbeelding 2 van 2
    • Use your fingers or an opening tool to slide the battery connector out of its motherboard socket.

  5. Lenovo Yoga 710-14IKB Trackpad Replacement: stap 5, afbeelding 1 van 1
    • Remove the battery.

  6. Lenovo Yoga 710-14IKB Trackpad Replacement, Trackpad: stap 6, afbeelding 1 van 1
    • Use the Phillips #1 screwdriver to take off the three 3mm screws.

  7. Lenovo Yoga 710-14IKB Trackpad Replacement: stap 7, afbeelding 1 van 2 Lenovo Yoga 710-14IKB Trackpad Replacement: stap 7, afbeelding 2 van 2
    • Grip the blue tab and pull out.

    • Careful to not pull too hard, there is a chance of damaging the tab.

  8. Lenovo Yoga 710-14IKB Trackpad Replacement: stap 8, afbeelding 1 van 2 Lenovo Yoga 710-14IKB Trackpad Replacement: stap 8, afbeelding 2 van 2
    • Lift off the layer of tape from the trackpad.

  9. Lenovo Yoga 710-14IKB Trackpad Replacement: stap 9, afbeelding 1 van 1
    • Push out the trackpad.

Conclusie

To reassemble your device, follow these instructions in reverse order.

Één andere persoon heeft deze handleiding voltooid.

Chuefeng Vang

Lid sinds: 11/01/18

136 Reputatie

1 Handleiding geschreven

Team

UMass Dartmouth, Team S5-G8, Gulbrandsen Fall 2018 Lid van UMass Dartmouth, Team S5-G8, Gulbrandsen Fall 2018

UMASSD-GULBRANDSEN-F18S5G8

3 Leden

9 handleidingen geschreven

0 opmerkingen

Voeg opmerking toe

Weergavestatistieken:

Afgelopen 24 uren: 1

Afgelopen 7 dagen: 3

Afgelopen 30 dagen: 15

Altijd: 1,393