Ga door naar hoofdinhoud

Lenovo Thinkpad X220 LCD Panel Replacement

Wat je nodig hebt

  1. Lenovo Thinkpad X220 LCD Panel Replacement, Remove the battery: stap 1, afbeelding 1 van 1
    • Unlock the battery by moving the left slider to the left.

    • Release the battery by moving the right slider to the right and push the battery back to remove it.

    • Remove the battery and set aisde.

  2. Lenovo Thinkpad X220 LCD Panel Replacement, Remove the display housing screws: stap 2, afbeelding 1 van 3 Lenovo Thinkpad X220 LCD Panel Replacement, Remove the display housing screws: stap 2, afbeelding 2 van 3 Lenovo Thinkpad X220 LCD Panel Replacement, Remove the display housing screws: stap 2, afbeelding 3 van 3
    • If using a sharp blade, use it to get underneath the cover and remove by rotating so the BACK side of the blade is used to prevent from cutting the cover.

    • Using a hobby knife, remove the plastic screw covers.

    • Remove both screws by using a #1 Philips bit.

  3. Lenovo Thinkpad X220 LCD Panel Replacement, Remove the LCD bezel: stap 3, afbeelding 1 van 3 Lenovo Thinkpad X220 LCD Panel Replacement, Remove the LCD bezel: stap 3, afbeelding 2 van 3 Lenovo Thinkpad X220 LCD Panel Replacement, Remove the LCD bezel: stap 3, afbeelding 3 van 3
    • Using a Pick, detatch the bezel from the assembly by carefully releasing the clips around the outside top, left and right edges of the display. This can be done by gently pressing inward and twisting.

    • Once the left and right edges are released, carefully bend the display all the way back and release the clips on the bottom using the same tecnique.

    • Last, remove the four (4) clips from the under side of the top of the bezel.

    • You should now be able to remove the bezel and set aside.

    • There may also be tape securing the top of the bezel after removing the clips. Remove carefully.

  4. Lenovo Thinkpad X220 LCD Panel Replacement, Remove LCD Panel: stap 4, afbeelding 1 van 3 Lenovo Thinkpad X220 LCD Panel Replacement, Remove LCD Panel: stap 4, afbeelding 2 van 3 Lenovo Thinkpad X220 LCD Panel Replacement, Remove LCD Panel: stap 4, afbeelding 3 van 3
    • Remove the four (4) Philips screws indicated using a #1 bit.

    • The display inverter board is connected at the bottom. Be careful during the next step not to damage the ribbon cable.

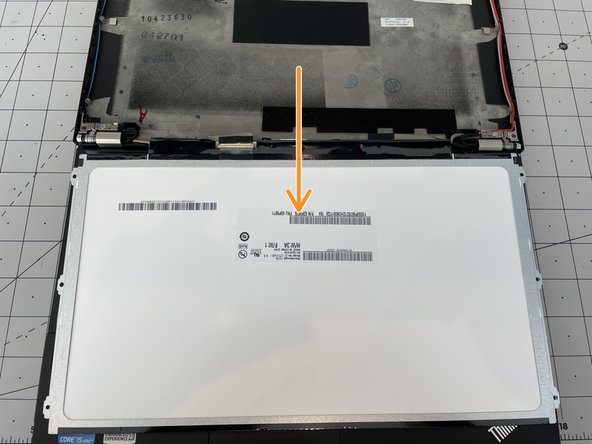
    • Remove the LCD panel from the housing and tilt down toward you, resting the LCD panel on the keyboard.

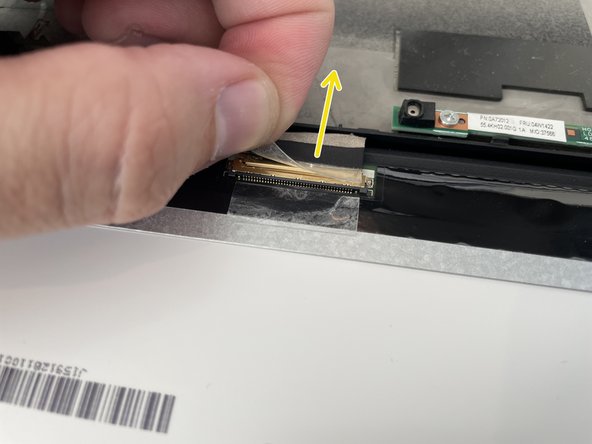
    • Disconnect the display cable from the display by carefully pulling back towards the assembly (the female end is on the display).

    • The cable may be secured using tape. Using your hobby knife, gently cut the tape being careful not to damage the display or connector. Trying to remove this stuff intact is next to impossible.

    • You can now replace the display and re-assemble by using the steps in reverse.

Conclusie

To reassemble your device, follow these instructions in reverse order.

3 andere personen hebben deze handleiding voltooid.

Hrushka

Lid sinds: 07/24/21

1.618 Reputatie

7 handleidingen geschreven

0 opmerkingen

Voeg opmerking toe

Weergavestatistieken:

Afgelopen 24 uren: 5

Afgelopen 7 dagen: 17

Afgelopen 30 dagen: 76

Altijd: 1,946