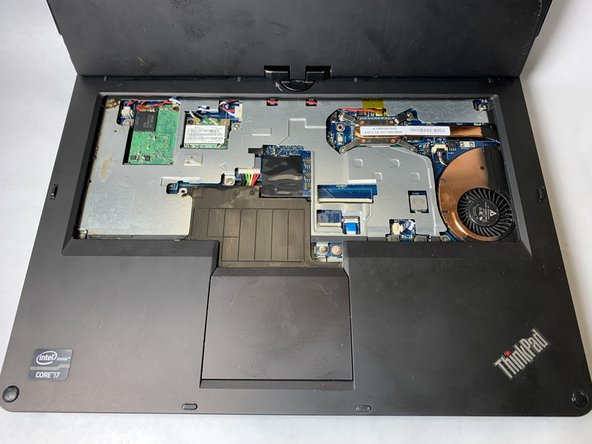
Ga door naar hoofdinhoud

Lenovo Thinkpad Twist s230u Upper Casing Replacement

Wat je nodig hebt

  1. Lenovo Thinkpad Twist s230u Upper Casing Replacement, Hard Drive: stap 1, afbeelding 1 van 2 Lenovo Thinkpad Twist s230u Upper Casing Replacement, Hard Drive: stap 1, afbeelding 2 van 2
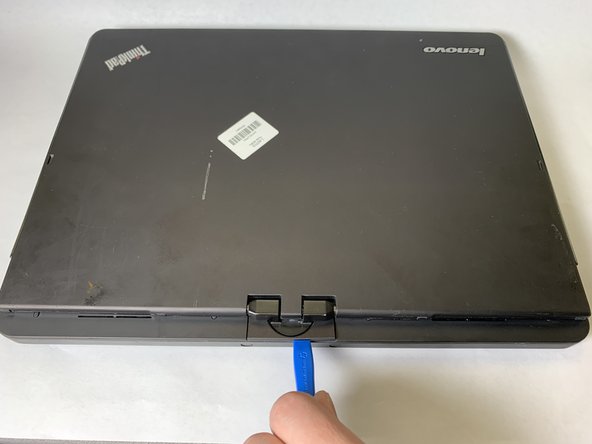
    • Flip the laptop over.

    • Using a Phillips #1 Screwdriver, unscrew the screw on the bottom left corner.

  2. Lenovo Thinkpad Twist s230u Upper Casing Replacement: stap 2, afbeelding 1 van 1
    • Using the iFixit Opening tool, loosen the hard drive cover.

  3. Lenovo Thinkpad Twist s230u Upper Casing Replacement: stap 3, afbeelding 1 van 1
    • Remove the hard drive cover.

  4. Lenovo Thinkpad Twist s230u Upper Casing Replacement: stap 4, afbeelding 1 van 2 Lenovo Thinkpad Twist s230u Upper Casing Replacement: stap 4, afbeelding 2 van 2
    • Remove the hard drive by sliding it out.

  5. Lenovo Thinkpad Twist s230u Upper Casing Replacement, Keyboard: stap 5, afbeelding 1 van 1
    • Use a Philips #1 screwdriver to remove 2 screws on the bottom of the laptop.

  6. Lenovo Thinkpad Twist s230u Upper Casing Replacement: stap 6, afbeelding 1 van 1
    • Use a spudger to loosen the keyboard around the edges.

    • Carefully push the keyboard towards the screen to unlatch it.

    • Do not push too hard, as there are ribbon cables attached to the keyboard.

  7. Lenovo Thinkpad Twist s230u Upper Casing Replacement: stap 7, afbeelding 1 van 1
    • Carefully lift up the keyboard to access the wires underneath.

    • Be careful not to break the ribbon cables attached underneath.

  8. Lenovo Thinkpad Twist s230u Upper Casing Replacement: stap 8, afbeelding 1 van 3 Lenovo Thinkpad Twist s230u Upper Casing Replacement: stap 8, afbeelding 2 van 3 Lenovo Thinkpad Twist s230u Upper Casing Replacement: stap 8, afbeelding 3 van 3
    • Open the small black flap on each of the ribbon cables. It should lift with a slight effort.

    • Pull out the ribbon cables and remove the keyboard from the device.

  9. Lenovo Thinkpad Twist s230u Upper Casing Replacement, Upper Casing: stap 9, afbeelding 1 van 1
    • Flip your device over.

    • Use the Phillips #1 screwdriver to remove the nine screws.

  10. Lenovo Thinkpad Twist s230u Upper Casing Replacement: stap 10, afbeelding 1 van 2 Lenovo Thinkpad Twist s230u Upper Casing Replacement: stap 10, afbeelding 2 van 2
    • Flip the device back over and open the top.

    • Use the Phillips #1 screwdriver to remove the seven silver screws.

    • Disconnect the three cables inside the case.

    • Lift up the brown tab and disconnect the ribbon cable.

  11. Lenovo Thinkpad Twist s230u Upper Casing Replacement: stap 11, afbeelding 1 van 2 Lenovo Thinkpad Twist s230u Upper Casing Replacement: stap 11, afbeelding 2 van 2
    • Close the lid and turn the device around.

    • Use the iFixit Opening Tool to lift up and remove the tab on the back.

  12. Lenovo Thinkpad Twist s230u Upper Casing Replacement: stap 12, afbeelding 1 van 2 Lenovo Thinkpad Twist s230u Upper Casing Replacement: stap 12, afbeelding 2 van 2
    • Turn the device back around and reopen it.

    • Use the iFixit Opening Tool to disconnect the top of the case from the bottom.

    • Lift up the top of the case and slide it out from under the screen.

Conclusie

To reassemble your device, follow these instructions in reverse order.

Één andere persoon heeft deze handleiding voltooid.

0 opmerkingen

Voeg opmerking toe

Weergavestatistieken:

Afgelopen 24 uren: 0

Afgelopen 7 dagen: 3

Afgelopen 30 dagen: 18

Altijd: 914