Ga door naar hoofdinhoud

Lenovo Thinkpad T440s Display (Full-HD, no touch) Replacement

Wat je nodig hebt

  1. Lenovo Thinkpad T440s Display (Full-HD, no touch) Replacement, Set to Maintenance Mode: stap 1, afbeelding 1 van 1
    • While booting, press the F1 button to enter the BIOS.

    • Go to "Config" and then to "Power".

    • Select "Disable Built-in Battery" and press Enter.

    • You will be asked to proceed. Select "Yes".

    • The laptop shuts down.Unplug the laptop from AC.

    • Remove the battery.

  2. Lenovo Thinkpad T440s Display (Full-HD, no touch) Replacement, Remove Front Bezel: stap 2, afbeelding 1 van 3 Lenovo Thinkpad T440s Display (Full-HD, no touch) Replacement, Remove Front Bezel: stap 2, afbeelding 2 van 3 Lenovo Thinkpad T440s Display (Full-HD, no touch) Replacement, Remove Front Bezel: stap 2, afbeelding 3 van 3
    • Start removing the front bezel in the lower display corners using a prying tool.

    • Make sure the glue and tape will stick to the front bezel instead of the display and rear bezel. You can use a gripping tool and a cutter for this.

  3. Lenovo Thinkpad T440s Display (Full-HD, no touch) Replacement, Remove Screws: stap 3, afbeelding 1 van 2 Lenovo Thinkpad T440s Display (Full-HD, no touch) Replacement, Remove Screws: stap 3, afbeelding 2 van 2
    • Remove 4 screws M2XL3 with screwdriver.

  4. Lenovo Thinkpad T440s Display (Full-HD, no touch) Replacement, Remove Rear Bezel: stap 4, afbeelding 1 van 2 Lenovo Thinkpad T440s Display (Full-HD, no touch) Replacement, Remove Rear Bezel: stap 4, afbeelding 2 van 2
    • Remove the rear bezel with the prying tool.

    • Make shure you do not move or damage the blue and black cable behind the bezel.

  5. Lenovo Thinkpad T440s Display (Full-HD, no touch) Replacement, Release Display: stap 5, afbeelding 1 van 3 Lenovo Thinkpad T440s Display (Full-HD, no touch) Replacement, Release Display: stap 5, afbeelding 2 van 3 Lenovo Thinkpad T440s Display (Full-HD, no touch) Replacement, Release Display: stap 5, afbeelding 3 van 3
    • Carefully release the display, turn it around and place it on the keyboard.

    • Ensure to not damage the connector on the lower part of the display.

  6. Lenovo Thinkpad T440s Display (Full-HD, no touch) Replacement, Release the Connector: stap 6, afbeelding 1 van 2 Lenovo Thinkpad T440s Display (Full-HD, no touch) Replacement, Release the Connector: stap 6, afbeelding 2 van 2
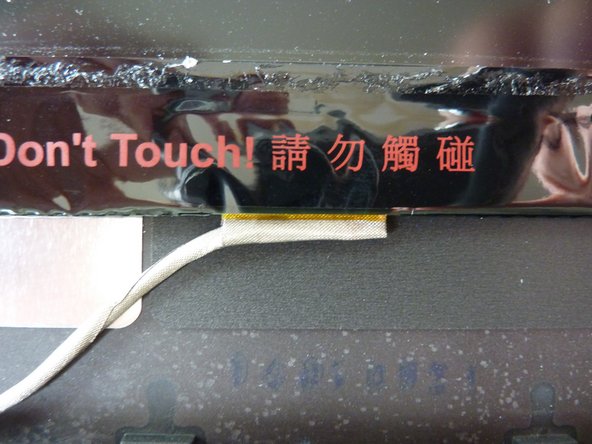
    • Remove the connector together with the label.

    How do you stick the front cover back?

    SupaHigh - Antwoord

    When you remove the back cover, it is important that the adhesive tape remains on the cover, not on the old display. In case your adhesive does not work anymore, you should clean the back panel properly and install new adhesive

    Markus Schmidt - Antwoord

Conclusie

To reassemble your device, follow these instructions in reverse order.

18 andere personen hebben deze handleiding voltooid.

Markus Schmidt

Lid sinds: 06/07/15

689 Reputatie

1 Handleiding geschreven

7 opmerkingen

Did this upgrade with my T440 and worked great, used a LP140WF1 / B140HAN01 display added some much needed pixels and IPS viewing angles. I bought from Aliexpress Store: Kevin trade shop.

Ryan - Antwoord

What about T440s with touch panel?

TINGHUI WANG - Antwoord

I do not possess a touch device, sorry.

Markus Schmidt -

Can this be done as an upgrade

Randall Bickford - Antwoord

You mean from “normal” to touch display? I cannot comment on a touch device…

Markus Schmidt -

Thanks for the manual. Just fixed my display and changed to an IPS from a T450s.

I just wanted to add to this manual that I replaced the double sided adhesive from the Display bezel with 3 mm double side adhesive (3M 9448A).

I did not get the Bezel off properly with the old adhesive. 3 meters of the tape were sufficient.

No Name - Antwoord

Can this be done with a L440?

Chicho - Antwoord

Voeg opmerking toe

Weergavestatistieken:

Afgelopen 24 uren: 2

Afgelopen 7 dagen: 24

Afgelopen 30 dagen: 89

Altijd: 31,342