Ga door naar hoofdinhoud

Lenovo ThinkPad X1 Carbon 7th Gen Thermal Fan Assembly Replacement

Wat je nodig hebt

  1. Lenovo ThinkPad X1 Carbon 7th Gen Thermal Fan Assembly Replacement, Back cover removal: stap 1, afbeelding 1 van 2 Lenovo ThinkPad X1 Carbon 7th Gen Thermal Fan Assembly Replacement, Back cover removal: stap 1, afbeelding 2 van 2
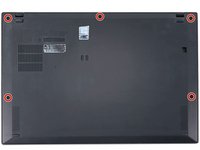
    • Use a Phillips #1 screwdriver to loosen the five captive screws securing the back cover.

  2. Lenovo ThinkPad X1 Carbon 7th Gen Thermal Fan Assembly Replacement, Insert an opening pick: stap 2, afbeelding 1 van 3 Lenovo ThinkPad X1 Carbon 7th Gen Thermal Fan Assembly Replacement, Insert an opening pick: stap 2, afbeelding 2 van 3 Lenovo ThinkPad X1 Carbon 7th Gen Thermal Fan Assembly Replacement, Insert an opening pick: stap 2, afbeelding 3 van 3
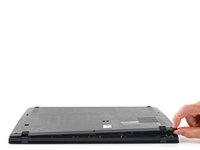
    • Insert an opening pick at a 45˚ angle between the back cover and frame near the rear middle screw.

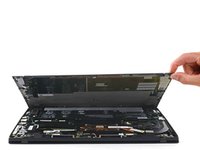
    • Pry up on the pick to release the clips securing the back cover to the frame.

    • You will hear several clicks while prying up.

  3. Lenovo ThinkPad X1 Carbon 7th Gen Thermal Fan Assembly Replacement, Remove the back cover: stap 3, afbeelding 1 van 3 Lenovo ThinkPad X1 Carbon 7th Gen Thermal Fan Assembly Replacement, Remove the back cover: stap 3, afbeelding 2 van 3 Lenovo ThinkPad X1 Carbon 7th Gen Thermal Fan Assembly Replacement, Remove the back cover: stap 3, afbeelding 3 van 3
    • Lift the back cover up and remove it from the chassis.

    • You will hear several clicks while lifting up.

    • During reassembly, this is a good point to power on your laptop and test all functions before sealing it up. Be sure to power your laptop back down before you continue working.

  4. Lenovo ThinkPad X1 Carbon 7th Gen Thermal Fan Assembly Replacement, Battery disconnect: stap 4, afbeelding 1 van 3 Lenovo ThinkPad X1 Carbon 7th Gen Thermal Fan Assembly Replacement, Battery disconnect: stap 4, afbeelding 2 van 3 Lenovo ThinkPad X1 Carbon 7th Gen Thermal Fan Assembly Replacement, Battery disconnect: stap 4, afbeelding 3 van 3
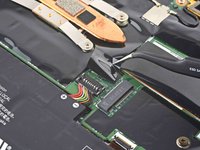
    • Use tweezers or your fingers to peel back the plastic shield covering the battery connector.

  5. Lenovo ThinkPad X1 Carbon 7th Gen Thermal Fan Assembly Replacement, Disconnect the battery: stap 5, afbeelding 1 van 3 Lenovo ThinkPad X1 Carbon 7th Gen Thermal Fan Assembly Replacement, Disconnect the battery: stap 5, afbeelding 2 van 3 Lenovo ThinkPad X1 Carbon 7th Gen Thermal Fan Assembly Replacement, Disconnect the battery: stap 5, afbeelding 3 van 3
    • Use the flat end of a spudger to pry up on and disconnect the battery cable.

  6. Lenovo ThinkPad X1 Carbon 7th Gen Thermal Fan Assembly Replacement, Thermal Fan Assembly: stap 6, afbeelding 1 van 1
    • Grab the thermal fan assembly connector with your fingers and gently pull upwards to disconnect it from the motherboard.

  7. Lenovo ThinkPad X1 Carbon 7th Gen Thermal Fan Assembly Replacement: stap 7, afbeelding 1 van 1
    • Remove four 3mm Phillips #0 heat sink screws following the numerical order engraved into the heat sink.

  8. Lenovo ThinkPad X1 Carbon 7th Gen Thermal Fan Assembly Replacement: stap 8, afbeelding 1 van 2 Lenovo ThinkPad X1 Carbon 7th Gen Thermal Fan Assembly Replacement: stap 8, afbeelding 2 van 2
    • Grab the heat sink mounting brackets and lift up to remove the thermal fan assembly.

    • Heat sink may still be hot if laptop was recently powered off.

    • When removing the heatsink, it's always good to apply a new layer of thermal paste, as it helps the heat sink pull heat away from the CPU.

Conclusie

To reassemble your device, follow these instructions in reverse order.

4 andere personen hebben deze handleiding voltooid.

Jaxon Haws

Lid sinds: 01/23/20

571 Reputatie

4 handleidingen geschreven

Team

Cal Poly, Team S19-G2, White Winter 2020 Lid van Cal Poly, Team S19-G2, White Winter 2020

CPSU-WHITE-W20S19G2

4 Leden

19 handleidingen geschreven

0 opmerkingen

Voeg opmerking toe

Weergavestatistieken:

Afgelopen 24 uren: 2

Afgelopen 7 dagen: 13

Afgelopen 30 dagen: 56

Altijd: 2,647