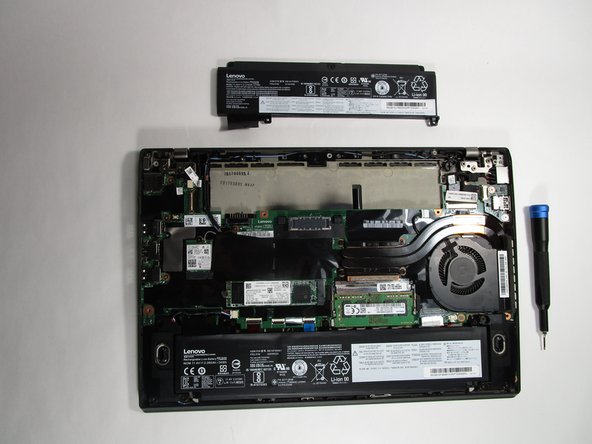
Ga door naar hoofdinhoud

Lenovo ThinkPad T470s Motherboard Replacement

Wat je nodig hebt

  1. Lenovo ThinkPad T470s Motherboard Replacement, Bottom Panel: stap 1, afbeelding 1 van 1
    • Use a Phillips #000 screwdriver to remove the five 7 mm screws from the bottom of the laptop.

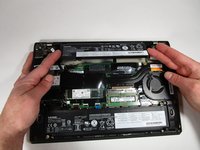
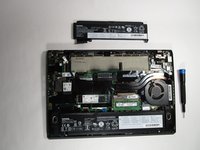
    • Lift the bottom panel up and off the laptop.

  2. Lenovo ThinkPad T470s Motherboard Replacement, Batteries: stap 2, afbeelding 1 van 3 Lenovo ThinkPad T470s Motherboard Replacement, Batteries: stap 2, afbeelding 2 van 3 Lenovo ThinkPad T470s Motherboard Replacement, Batteries: stap 2, afbeelding 3 van 3
    • Remove two screws on the bottom of the upper battery using a Phillips #000 screwdriver.

    • Remove three screws on the top of the lower battery using a Phillips #000 screwdriver.

    • Peel back connecting supporting tape on each of the batteries.

  3. Lenovo ThinkPad T470s Motherboard Replacement: stap 3, afbeelding 1 van 3 Lenovo ThinkPad T470s Motherboard Replacement: stap 3, afbeelding 2 van 3 Lenovo ThinkPad T470s Motherboard Replacement: stap 3, afbeelding 3 van 3
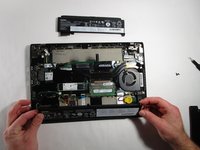
    • Slide the upper battery out of the device, away from the laptop.

    • Slide the lower battery out of the device, away from the laptop.

    My laptop says Battery 1 is at 0% and does not hold a charge and Battery 2 is at 88% and I have 4h 22min of estimates time remaining. Which battery do I need to replace? Upper or lower?

    Sohel Ameer - Antwoord

    You would think Lenovo would make this information readily available. Im in their manual right now. Not seeing anything. Extremely annoying. Will just use a trial and error method removing one and see if thats the defective one.

    Sean Love -

    Looks like battery 1 is the larger battery.

    Sean Love -

    If I remove battery 1 or 2 will there be any problem running my laptop?

    Saiful Islam - Antwoord

  4. Lenovo ThinkPad T470s Motherboard Replacement, Fan and Heat Sink: stap 4, afbeelding 1 van 1
    • Loosen the four screws from the heatsink with a Phillips #000 screwdriver.

  5. Lenovo ThinkPad T470s Motherboard Replacement: stap 5, afbeelding 1 van 1
    • Unplug the fan from the motherboard.

  6. Lenovo ThinkPad T470s Motherboard Replacement: stap 6, afbeelding 1 van 1
    • Remove the heatsink and fan from the laptop.

  7. Lenovo ThinkPad T470s Motherboard Replacement: stap 7, afbeelding 1 van 1
    • Wipe off the old thermal paste with either 99% isopropyl alcohol or kimwipes.

  8. Lenovo ThinkPad T470s Motherboard Replacement: stap 8, afbeelding 1 van 2 Lenovo ThinkPad T470s Motherboard Replacement: stap 8, afbeelding 2 van 2
  9. Lenovo ThinkPad T470s Motherboard Replacement, Wi-Fi Card: stap 9, afbeelding 1 van 1
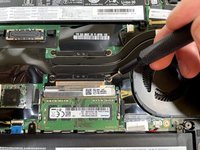
    • Use a Phillips #0 screwdriver to remove the single 2.9 mm screw securing the Wi-Fi card.

    • The Wi-Fi card will lift to a slight angle after the screw is removed.

  10. Lenovo ThinkPad T470s Motherboard Replacement: stap 10, afbeelding 1 van 1
    • Grip the Wi-Fi card on both sides, then pull it directly out of its port.

  11. Lenovo ThinkPad T470s Motherboard Replacement, USB Board: stap 11, afbeelding 1 van 2 Lenovo ThinkPad T470s Motherboard Replacement, USB Board: stap 11, afbeelding 2 van 2
    • Use a Phillips #0 screwdriver to remove the two 3.3 mm screws.

  12. Lenovo ThinkPad T470s Motherboard Replacement: stap 12, afbeelding 1 van 1
    • Use your fingernail to flip up the gate, then pull the connector directly out of the port.

  13. Lenovo ThinkPad T470s Motherboard Replacement: stap 13, afbeelding 1 van 1
    • Lift the USB board up and out of the chassis.

  14. Lenovo ThinkPad T470s Motherboard Replacement, SSD: stap 14, afbeelding 1 van 2 Lenovo ThinkPad T470s Motherboard Replacement, SSD: stap 14, afbeelding 2 van 2
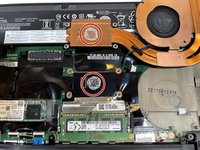
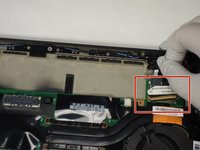
    • Locate the SSD slot between the large battery and fan.

    • Remove the screw securing the SSD using a Phillips #000 screwdriver.

  15. Lenovo ThinkPad T470s Motherboard Replacement: stap 15, afbeelding 1 van 2 Lenovo ThinkPad T470s Motherboard Replacement: stap 15, afbeelding 2 van 2
    • Slide the SSD out of the motherboard.

  16. Lenovo ThinkPad T470s Motherboard Replacement, Motherboard: stap 16, afbeelding 1 van 2 Lenovo ThinkPad T470s Motherboard Replacement, Motherboard: stap 16, afbeelding 2 van 2
    • Flip up the locking gate, then pull the cable directly out of its port.

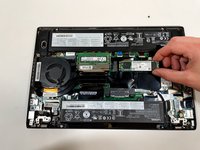
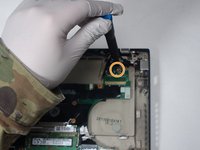
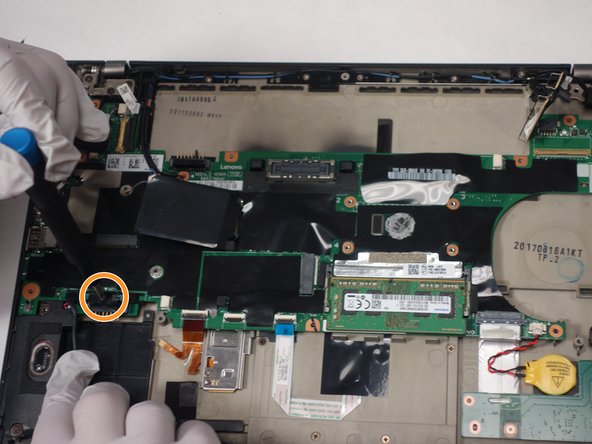
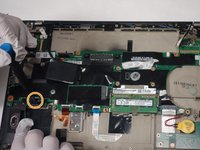
    • Use a Phillips #0 screwdriver to remove the single 3.3 mm screw on the top right corner of the motherboard.

  17. Lenovo ThinkPad T470s Motherboard Replacement: stap 17, afbeelding 1 van 1
    • Remove the single 3.3 mm screw with a Phillips #0 screwdriver.

  18. Lenovo ThinkPad T470s Motherboard Replacement: stap 18, afbeelding 1 van 1
    • Remove the single 3.3 mm screw with a Phillips #0 screwdriver.

  19. Lenovo ThinkPad T470s Motherboard Replacement: stap 19, afbeelding 1 van 1
    • Use a Phillips #0 screwdriver to remove the single 2.9 mm screw.

    I cant find the screw in step 19

    Mago Juan - Antwoord

  20. Lenovo ThinkPad T470s Motherboard Replacement: stap 20, afbeelding 1 van 2 Lenovo ThinkPad T470s Motherboard Replacement: stap 20, afbeelding 2 van 2
    • Disconnect the speaker connection covering the screw.

    • Use a Phillips #0 screwdriver to remove the single 5 mm screw securing the motherboard.

  21. Lenovo ThinkPad T470s Motherboard Replacement: stap 21, afbeelding 1 van 1
    • Remove the 3.3 mm screw using a Phillips #0 screwdriver.

  22. Lenovo ThinkPad T470s Motherboard Replacement: stap 22, afbeelding 1 van 1
    • Use a Phillips #0 screwdriver to remove the 3.3 mm screw.

  23. Lenovo ThinkPad T470s Motherboard Replacement: stap 23, afbeelding 1 van 1
    • Remove the single 3.3 mm screw with a Phillips #0 screwdriver.

  24. Lenovo ThinkPad T470s Motherboard Replacement: stap 24, afbeelding 1 van 2 Lenovo ThinkPad T470s Motherboard Replacement: stap 24, afbeelding 2 van 2
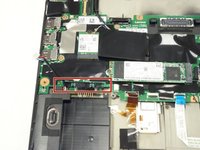
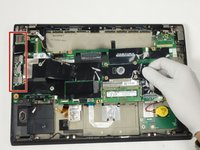
    • Gently grip the motherboard and slide it to the right to remove the USB ports from the chassis.

    • You will hear an audible clicking sound.

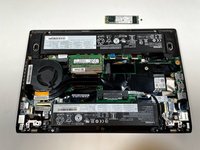
    • Lift the motherboard up and out of the chassis.

    This seems to be missing several steps: track pad and power cableā€¦

    Samuel Law - Antwoord

    This is missing that you need to remove the keyboard as well. There are ribbon cables attached to the keyboard on the bottom on the motherboard

    Michael Moreno - Antwoord

Conclusie

To reassemble your device, follow these instructions in reverse order.

2 andere personen hebben deze handleiding voltooid.

1Gids Commentaar

There are some conections that need to be disconected before baing able to take out the board anda you did it but didnt mentioned

Mago Juan - Antwoord

Voeg opmerking toe

Weergavestatistieken:

Afgelopen 24 uren: 4

Afgelopen 7 dagen: 17

Afgelopen 30 dagen: 104

Altijd: 3,838