Ga door naar hoofdinhoud

Lenovo Ideatab S6000 Rear Camera Replacement

Wat je nodig hebt

  1. Lenovo Ideatab S6000 Rear Camera Replacement, Battery: stap 1, afbeelding 1 van 1
    • Remove the speaker screens by working them loose with a plastic opening tool. You may need to first loosen them with tweezers or a craft knife.

    • These screens are held in place by glue that is hard to remove. Please take your time to ensure that that this step is done correctly.

  2. Lenovo Ideatab S6000 Rear Camera Replacement: stap 2, afbeelding 1 van 1
    • Remove the screws from both of the spots that were covered.

  3. Lenovo Ideatab S6000 Rear Camera Replacement: stap 3, afbeelding 1 van 1
    • DO NOT USE A METAL TOOL FOR THIS.

    • Go all around the casing, prying the screen away from the backing with the spudger.

    • It will make a popping sound each time one of the lock tabs is disconnected.

    • Take your time as you move all around the device when prying the backing off.

  4. Lenovo Ideatab S6000 Rear Camera Replacement: stap 4, afbeelding 1 van 1
    • Pull off the plastic that is covering the battery cable.

  5. Lenovo Ideatab S6000 Rear Camera Replacement: stap 5, afbeelding 1 van 2 Lenovo Ideatab S6000 Rear Camera Replacement: stap 5, afbeelding 2 van 2
    • Using either the plastic opening tool or your fingers, gently pull on both sides of the plug to release it.

  6. Lenovo Ideatab S6000 Rear Camera Replacement: stap 6, afbeelding 1 van 1
    • Remove the battery by grabbing the tab shown and pulling up.

    • The battery is held to the device by adhesive. Pull the battery up from the tab and it will lift out with a bit of effort.

  7. Lenovo Ideatab S6000 Rear Camera Replacement, Rear Camera: stap 7, afbeelding 1 van 1
    • Gently lift up on the metal connector plate.

  8. Lenovo Ideatab S6000 Rear Camera Replacement, Removing Rear Facing Camera.: stap 8, afbeelding 1 van 2 Lenovo Ideatab S6000 Rear Camera Replacement, Removing Rear Facing Camera.: stap 8, afbeelding 2 van 2
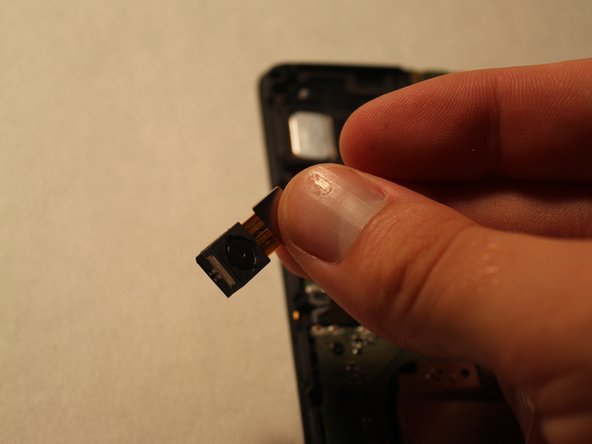
    • Push against the camera from all sides to loosen it from its position.

    • NOTE: The camera is connected by glue, so take your time, it will come out.

    • If you wish to replace the camera simply plug in the new camera, and follow the guide in reverse.

Conclusie

To reassemble your device, follow these instructions in reverse order.

Één andere persoon heeft deze handleiding voltooid.

Josiah Speed

Lid sinds: 09/22/14

965 Reputatie

4 handleidingen geschreven

Team

USF Tampa, Team 10-4, Brown Fall 2014 Lid van USF Tampa, Team 10-4, Brown Fall 2014

USFT-BROWN-F14S10G4

4 Leden

10 handleidingen geschreven

0 opmerkingen

Voeg opmerking toe

Weergavestatistieken:

Afgelopen 24 uren: 0

Afgelopen 7 dagen: 0

Afgelopen 30 dagen: 1

Altijd: 818