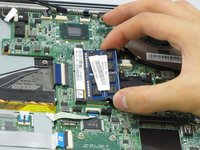
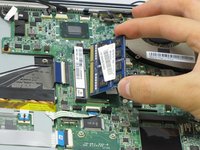
Ga door naar hoofdinhoud

Lenovo IdeaPad U310 Ram Replacement

Wat je nodig hebt

  1. Lenovo IdeaPad U310 Ram  Replacement, RAM: stap 1, afbeelding 1 van 1
    • Make sure device is turned off and disconnected from any power source before proceeding.

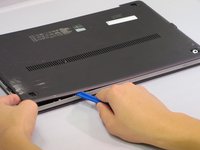
    • Flip the device over so the bottom panel is facing up.

    • Remove the rubber feet by pinching and pulling in an upward motion.

    • The rubber feet are missing from this photo, but will be located within the red markups.

  2. Lenovo IdeaPad U310 Ram  Replacement: stap 2, afbeelding 1 van 1
    • Remove the 4 screws securing the bottom panel to the device.

    • The screws are missing from this device and are not pictured. They will be located under the rubber feet within the red markups.

  3. Lenovo IdeaPad U310 Ram  Replacement: stap 3, afbeelding 1 van 2 Lenovo IdeaPad U310 Ram  Replacement: stap 3, afbeelding 2 van 2
    • Place the plastic opening tool between the bottom panel and device.

    • Pry around the device's outer edge until the bottom panel is no longer attached.

    • Lift the bottom panel up and away from device.

  4. Lenovo IdeaPad U310 Ram  Replacement: stap 4, afbeelding 1 van 1
    • Pry the RAM's two holding clips in an outward motion.

  5. Lenovo IdeaPad U310 Ram  Replacement: stap 5, afbeelding 1 van 2 Lenovo IdeaPad U310 Ram  Replacement: stap 5, afbeelding 2 van 2
    • Continue to pry open the clips, and slip the RAM from its housing.

Conclusie

To reassemble your device, follow these instructions in reverse order.

4 andere personen hebben deze handleiding voltooid.

0 opmerkingen

Voeg opmerking toe

Weergavestatistieken:

Afgelopen 24 uren: 0

Afgelopen 7 dagen: 5

Afgelopen 30 dagen: 9

Altijd: 2,490