Ga door naar hoofdinhoud

Lenovo IdeaPad 110 Touch-15ACL Hard Disk Drive Replacement

Wat je nodig hebt

  1. Lenovo IdeaPad 110 Touch-15ACL Hard Disk Drive Replacement, Back Case: stap 1, afbeelding 1 van 1
    • Remove the thirteen 6 mm Phillips #0 screws.

  2. Lenovo IdeaPad 110 Touch-15ACL Hard Disk Drive Replacement: stap 2, afbeelding 1 van 2 Lenovo IdeaPad 110 Touch-15ACL Hard Disk Drive Replacement: stap 2, afbeelding 2 van 2
    • Use an opening tool to gently disconnect most of the clips on the back panel.

    • DO NOT force the panel out towards the optical disk drive.

  3. Lenovo IdeaPad 110 Touch-15ACL Hard Disk Drive Replacement: stap 3, afbeelding 1 van 3 Lenovo IdeaPad 110 Touch-15ACL Hard Disk Drive Replacement: stap 3, afbeelding 2 van 3 Lenovo IdeaPad 110 Touch-15ACL Hard Disk Drive Replacement: stap 3, afbeelding 3 van 3
    • Pry the disk drive away from the center of the laptop.

    • Don't worry about any screws since we already removed the screws that are associated with the drive.

    • Once the drive is removed, remove the one 2 mm Phillips #0 screw that is now exposed.

  4. Lenovo IdeaPad 110 Touch-15ACL Hard Disk Drive Replacement: stap 4, afbeelding 1 van 3 Lenovo IdeaPad 110 Touch-15ACL Hard Disk Drive Replacement: stap 4, afbeelding 2 van 3 Lenovo IdeaPad 110 Touch-15ACL Hard Disk Drive Replacement: stap 4, afbeelding 3 van 3
    • Unclip any of the remaining clips and remove the back panel.

  5. Lenovo IdeaPad 110 Touch-15ACL Hard Disk Drive Replacement, Battery Replacement: stap 5, afbeelding 1 van 1
    • Remove the four 6 mm Phillips #0 mounting screws.

  6. Lenovo IdeaPad 110 Touch-15ACL Hard Disk Drive Replacement: stap 6, afbeelding 1 van 3 Lenovo IdeaPad 110 Touch-15ACL Hard Disk Drive Replacement: stap 6, afbeelding 2 van 3 Lenovo IdeaPad 110 Touch-15ACL Hard Disk Drive Replacement: stap 6, afbeelding 3 van 3
    • Detach the wire connected to the motherboard and remove the battery assembly.

  7. Lenovo IdeaPad 110 Touch-15ACL Hard Disk Drive Replacement, Hard Disk Drive Replacement: stap 7, afbeelding 1 van 1
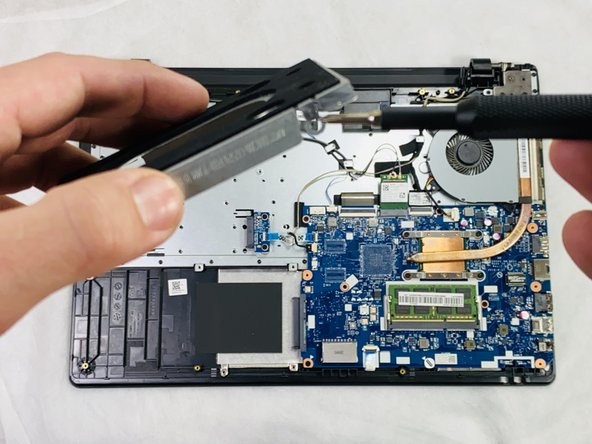
    • Remove the four 4 mm Phillips #0 mounting screws attaching the caddy to the frame.

  8. Lenovo IdeaPad 110 Touch-15ACL Hard Disk Drive Replacement: stap 8, afbeelding 1 van 2 Lenovo IdeaPad 110 Touch-15ACL Hard Disk Drive Replacement: stap 8, afbeelding 2 van 2
    • Gently remove the caddy away from the motherboard.

    • If you are removing an already existing HDD, unplug the component along with the caddy and remove the four screws mounting the caddy to the HDD.

Conclusie

To reassemble your device, follow these instructions in reverse order.

Clark Beuckman

Lid sinds: 02/22/22

529 Reputatie

5 handleidingen geschreven

Team

Clemson, Team 2-3, Hunter Spring 2022 Lid van Clemson, Team 2-3, Hunter Spring 2022

CLEM-HUNTER-S22S2G3

5 Leden

6 handleidingen geschreven

0 opmerkingen

Voeg opmerking toe

Weergavestatistieken:

Afgelopen 24 uren: 0

Afgelopen 7 dagen: 5

Afgelopen 30 dagen: 16

Altijd: 362