Inleiding
This guide was created to assist users in replacing the buttons on their left Nintendo Switch Joy-con. Please note that this guide does not contain steps for the right Joy-Con. The process for the right Joy-con is different and a bit more difficult. The process for replacing the buttons in the left Joy-Con consists of opening the Joy-Con, removing each of the inner pieces, batteries, and motherboard, then locating, removing, and replacing the desired buttons.
Wat je nodig hebt
-
-
Remove the four screws located on the back casing with a Y00 screwdriver.
-
Insert a plastic opening tool or pick into the side of the Joy-Con without the rail and gently pry downwards to release the back plate.
-
-
-
Gently pull the cord that's connecting the battery to the motherboard up and out of the Joy-Con.
This step is very precise and it is easy to break the connector if done incorrectly.
Yeah I broke it… it would be nice to see a more in-depth version of the video on their YouTube.
Rosie -
So lucky I had one to "dissect" turns out you don't pull in line with the wire it's more of a pry up/pull straight up from the board
-
-
-
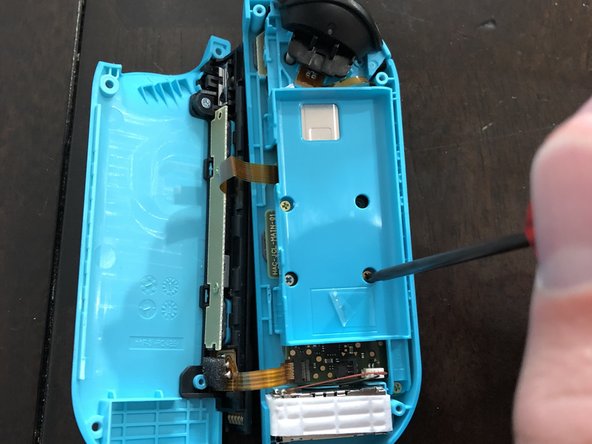
Use a Phillips #2 screwdriver to remove the three screws that are locking the inner casing into place.
There is also a phillips screw in the bottom right of the picture that needs to be removed before removing the battery holder.
-
-
-
-
Open up the inner casing in the opposite direction you opened up the outer casing.
-
-
-
Using tweezers, gently lift up on the black or grey clasps holding down each of the 5 ribbon cables connected to the motherboard.
-
Using the tweezers, gently pull each of the ribbon cables out from their connections.
I use these tutorials to also learn what each part is so I wish these were labeled with their proper names
-
-
-
Using a Phillips #2 screwdriver, unscrew both screws connecting the analog stick to the motherboard.
This step and the next are not really necessary unless you are replacing the analog stick.
-
To reassemble your device, follow these instructions in reverse order. Make sure when you are screwing the motherboard back into place you do not screw it in too tightly. If the motherboard is too tight to the buttons it could keep the buttons from pushing properly.
To reassemble your device, follow these instructions in reverse order. Make sure when you are screwing the motherboard back into place you do not screw it in too tightly. If the motherboard is too tight to the buttons it could keep the buttons from pushing properly.
Annuleren: ik heb deze handleiding niet afgemaakt.
30 andere personen hebben deze handleiding voltooid.
8 opmerkingen
My left directional button is nonresponsive. Can I fix this by dropping in a replacement left directional button? Would the rubber cover need to be replaced as well?
just incase you havent done so already, it might not be the button. it might be the motherboard, connectors, and a whole slew of other problems.
What type of switch is the minus button? It’s on the same ribbon as the L micro switch. My L switch is bad and I’m replacing it I just would like to know the name of the type of switch used on the minus button.
Thank you for the helpful guide! Is there a guide for the right Joy Con available anywhere?
Eric, no one has made a guide for the right Joy-Con yet! I’ve taken them both apart and the buttons are pretty similar. I think you can use Joshua’s button guide here and this joystick guide to guide you to the buttons in the other Joy-Con! If you do end up attempting it, consider taking some photos and making a guide for future right Joy-Con fixers. :)
Thanks for sharing this awesome guide! The first Joy-Con repair went great but i just tried repairing a second Joy-Con and after calibrating it’s drifting really bad. The replacement joystick I used was from Amazon and only $6 so I’m assuming that’s why it didn’t work. I just ordered a new replacement joystick from iFixit so hopefully that one is better quality and works. Thanks again!
Mon bouton left ne fonctionné plus , problème résolu grâce à ce tuto ,trop simple en faite .


