Ga door naar hoofdinhoud

Lecia DME Light Source Bulb Replacement

Wat je nodig hebt

  1. Lecia DME Light Source Bulb  Replacement, Light Source Bulb: stap 1, afbeelding 1 van 3 Lecia DME Light Source Bulb  Replacement, Light Source Bulb: stap 1, afbeelding 2 van 3 Lecia DME Light Source Bulb  Replacement, Light Source Bulb: stap 1, afbeelding 3 van 3
    • Set the Microscope up vertically.

    • Unplug the power cord from the microscope.

    • Do not pull from the wire. Hold it by the plug and pull away from the microscope.

  2. Lecia DME Light Source Bulb  Replacement: stap 2, afbeelding 1 van 2 Lecia DME Light Source Bulb  Replacement: stap 2, afbeelding 2 van 2
    • Carefully lay the microscope on its back to expose the bottom.

    • Hold it by the base and the frame in order to not to damage the microscope.

  3. Lecia DME Light Source Bulb  Replacement: stap 3, afbeelding 1 van 3 Lecia DME Light Source Bulb  Replacement: stap 3, afbeelding 2 van 3 Lecia DME Light Source Bulb  Replacement: stap 3, afbeelding 3 van 3
    • Pull the release knob away from the base to open the light hatch.

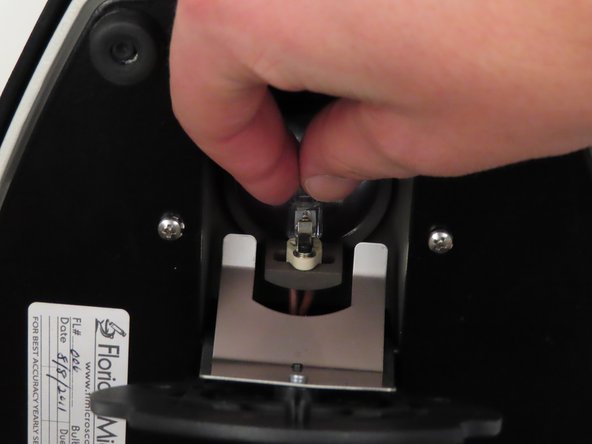
  4. Lecia DME Light Source Bulb  Replacement: stap 4, afbeelding 1 van 3 Lecia DME Light Source Bulb  Replacement: stap 4, afbeelding 2 van 3 Lecia DME Light Source Bulb  Replacement: stap 4, afbeelding 3 van 3
    • Carefully grab both sides of the light bulb.

    • Gently wiggle the light bulb side to side in order to remove it from the socket.

  5. Lecia DME Light Source Bulb  Replacement: stap 5, afbeelding 1 van 3 Lecia DME Light Source Bulb  Replacement: stap 5, afbeelding 2 van 3 Lecia DME Light Source Bulb  Replacement: stap 5, afbeelding 3 van 3
    • Grab a new 20W 12V halogen bulb to replace the broken one.

    • The place for the bulb information is located on the base of the microscope.

  6. Lecia DME Light Source Bulb  Replacement: stap 6, afbeelding 1 van 3 Lecia DME Light Source Bulb  Replacement: stap 6, afbeelding 2 van 3 Lecia DME Light Source Bulb  Replacement: stap 6, afbeelding 3 van 3
    • Take the new light bulb and firmly grasp the sides of it.

    • Insert the new bulb into the now empty socket.

    • Carefully wiggle it into place. Make sure its all the way in the socket to ensure a good connection.

  7. Lecia DME Light Source Bulb  Replacement: stap 7, afbeelding 1 van 2 Lecia DME Light Source Bulb  Replacement: stap 7, afbeelding 2 van 2
    • Close the hatch that covers the light bulb.

    • Push against the base until you hear the click of the pull and release knob setting back into place.

  8. Lecia DME Light Source Bulb  Replacement: stap 8, afbeelding 1 van 3 Lecia DME Light Source Bulb  Replacement: stap 8, afbeelding 2 van 3 Lecia DME Light Source Bulb  Replacement: stap 8, afbeelding 3 van 3
    • Hold the microscope by the base and frame and carefully place it upright.

    • Take the power cord and plug it back into the microscope.

  9. Lecia DME Light Source Bulb  Replacement: stap 9, afbeelding 1 van 1
    • Turn the red dial on the base of the microscope to test the new light.

Conclusie

After replacing the old light your Leica Microscope should be up and working again.

0 opmerkingen

Voeg opmerking toe

Weergavestatistieken:

Afgelopen 24 uren: 0

Afgelopen 7 dagen: 4

Afgelopen 30 dagen: 15

Altijd: 839