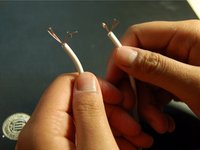
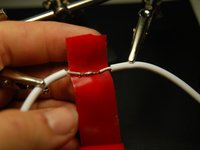
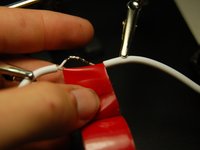
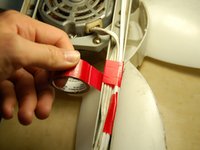
Ga door naar hoofdinhoud

Lasko Box Fan Back Wire Repair

Wat je nodig hebt

  1. Lasko Box Fan Back Wire Repair, Lasko Box Fan Back Wire Repair: stap 1, afbeelding 1 van 3 Lasko Box Fan Back Wire Repair, Lasko Box Fan Back Wire Repair: stap 1, afbeelding 2 van 3 Lasko Box Fan Back Wire Repair, Lasko Box Fan Back Wire Repair: stap 1, afbeelding 3 van 3
    • Make sure the fan is unplugged.

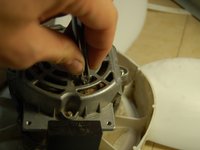
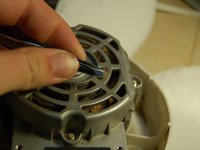
    • Unscrew the 6 screws on the front of the fan.

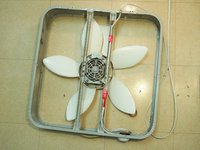
    • Remove the face plate.

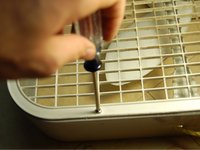
    • Flip the fan and repeat for the 6 screws on the back. They are in the same position as the front.

  2. Lasko Box Fan Back Wire Repair: stap 2, afbeelding 1 van 2 Lasko Box Fan Back Wire Repair: stap 2, afbeelding 2 van 2
    • Unscrew the screws attaching the motor/blades to the frame.

    • Unscrew the screws attaching the plastic frame to the motor.

    • The blades cannot be removed from the motor.

  3. Lasko Box Fan Back Wire Repair: stap 3, afbeelding 1 van 2 Lasko Box Fan Back Wire Repair: stap 3, afbeelding 2 van 2
    • Strip the wires using wire strippers.

  4. Lasko Box Fan Back Wire Repair: stap 4, afbeelding 1 van 1
    • Twist the ends of the wire together

    • Place wires in soldering kit arms.

  5. Lasko Box Fan Back Wire Repair: stap 5, afbeelding 1 van 2 Lasko Box Fan Back Wire Repair: stap 5, afbeelding 2 van 2
    • Plug in the soldering iron.

    • When the soldering iron is hot, solder the wires together.

    • Place the tip of the soldering iron on the wires directly.

    • Place the solder on the wire.

    • Remove the solder and soldering iron from the wire

    • Repeat this step with the second wire.

    • Soldering irons are very hot!

  6. Lasko Box Fan Back Wire Repair: stap 6, afbeelding 1 van 3 Lasko Box Fan Back Wire Repair: stap 6, afbeelding 2 van 3 Lasko Box Fan Back Wire Repair: stap 6, afbeelding 3 van 3
    • Use electrical tape to insulate the wires.

    • Wrap the tape around each wire.

    • Wrap tape around the outside of all of the wires.

    • Make sure to completely cover any exposed wire.

  7. Lasko Box Fan Back Wire Repair: stap 7, afbeelding 1 van 2 Lasko Box Fan Back Wire Repair: stap 7, afbeelding 2 van 2
    • Clean out the dust from the blades and motor using tweezers.

  8. Lasko Box Fan Back Wire Repair: stap 8, afbeelding 1 van 3 Lasko Box Fan Back Wire Repair: stap 8, afbeelding 2 van 3 Lasko Box Fan Back Wire Repair: stap 8, afbeelding 3 van 3
    • Tape wires along the frame to prevent further damage.

    • Put the face plates back on and enjoy!

Conclusie

To reassemble your device, follow these instructions in reverse order.

3 andere personen hebben deze handleiding voltooid.

Zach Emard

Lid sinds: 09/29/15

227 Reputatie

1 Handleiding geschreven

Team

Cal Poly, Team 14-1, Green Fall 2015 Lid van Cal Poly, Team 14-1, Green Fall 2015

CPSU-GREEN-F15S14G1

4 Leden

4 handleidingen geschreven

6 opmerkingen

Any tips for replacing the "Blue Plug" fuse after it's mysteriously blown in a Lasko box fan?

https://www.amazon.com/fused-safety-Lask...

I could hillbilly wire up a new plug to minimize the wire work, but don't want to start a fire either.

Zac Appleton - Antwoord

I would also like to know how to replace the plug end after the non-replaceable fuse inside the plug is blown.

Gung Ho - Antwoord

I don't know bout you but I was able to “pop" my fan blades right off of motor. Now I'm just going to replace plug end and see if it'll work since fixing wires didn't help.

(Yep found fuse was blown. Why would they make the fuse non replaceable when they eventually blow? Wonder how many fans people have thrown out all because of a blown fuse??

Steff Lusher - Antwoord

Not one thing worked

zakkerycastine876 - Antwoord

So can i replace/wire on different plug?

J Case - Antwoord

Voeg opmerking toe

Weergavestatistieken:

Afgelopen 24 uren: 1

Afgelopen 7 dagen: 11

Afgelopen 30 dagen: 53

Altijd: 22,188