Ga door naar hoofdinhoud

LG X Power Screen Replacement

Wat je nodig hebt

  1. LG X Power Screen Replacement, LG X Power Disassembly: stap 1, afbeelding 1 van 2 LG X Power Screen Replacement, LG X Power Disassembly: stap 1, afbeelding 2 van 2
    • Insert a plastic opening tool above the AUX jack and slide it around the perimeter to pop the back cover off.

  2. LG X Power Screen Replacement: stap 2, afbeelding 1 van 2 LG X Power Screen Replacement: stap 2, afbeelding 2 van 2
    • Remove the twelve 2.5mm Phillips #0 screws from the back of the phone.

  3. LG X Power Screen Replacement: stap 3, afbeelding 1 van 2 LG X Power Screen Replacement: stap 3, afbeelding 2 van 2
    • Insert a plastic opening tool underneath the mid-frame and pry upwards until you hear a click.

    • With the plastic opening tool still underneath the mid-frame, work your way around the perimeter until it's free from the smartphone.

  4. LG X Power Screen Replacement, Battery: stap 4, afbeelding 1 van 3 LG X Power Screen Replacement, Battery: stap 4, afbeelding 2 van 3 LG X Power Screen Replacement, Battery: stap 4, afbeelding 3 van 3
    • Use the flat end of a spudger to disconnect the front and rear cameras from the motherboard.

    • Pull the cameras out to remove them.

  5. LG X Power Screen Replacement: stap 5, afbeelding 1 van 1
    • Use the flat end of a spudger to disconnect the battery from the motherboard.

    • You will not be removing anything, just disconnecting.

  6. LG X Power Screen Replacement: stap 6, afbeelding 1 van 1
    • Insert a plastic opening tool underneath the motherboard and pry upwards to remove it.

  7. LG X Power Screen Replacement: stap 7, afbeelding 1 van 2 LG X Power Screen Replacement: stap 7, afbeelding 2 van 2
    • Use a spudger and plastic opening tool to carefully pry up the battery.

    • There is a strong adhesive on the back of the battery that will make it difficult to remove.

  8. LG X Power Screen Replacement, Screen: stap 8, afbeelding 1 van 2 LG X Power Screen Replacement, Screen: stap 8, afbeelding 2 van 2
    • Carefully peal off the glued vibration motor by using the plastic opening tool.

  9. LG X Power Screen Replacement: stap 9, afbeelding 1 van 2 LG X Power Screen Replacement: stap 9, afbeelding 2 van 2
    • Using the plastic opening tool, pry off the ear speaker.

Conclusie

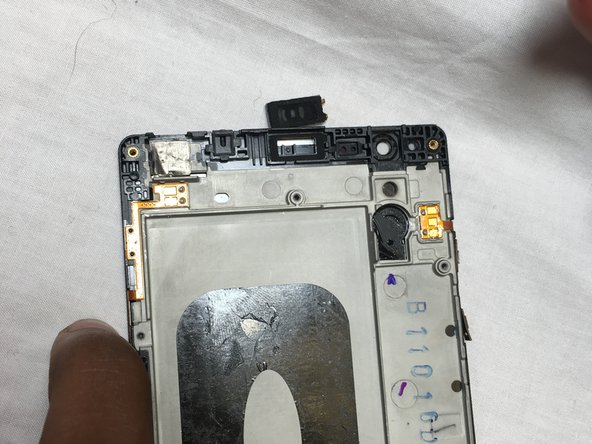
To reassemble your device, follow these instructions in reverse order.

16 andere personen hebben deze handleiding voltooid.

khaled Albannaw

Lid sinds: 02/14/18

374 Reputatie

1 Handleiding geschreven

Team

USF Tampa, Team S3-G6, Nance Spring 2018 Lid van USF Tampa, Team S3-G6, Nance Spring 2018

USFT-NANCE-S18S3G6

3 Leden

12 handleidingen geschreven

7 opmerkingen

If you are just replacing the screen, this is wrong. This would help if you are replacing with a “screen in frame”

asears - Antwoord

What is the right way for just the screen?

Kodi Butscha -

Please add “with frame” in title. Also need to make sure all contacts are present on the frame of the new screen, transfer them over if not.

rian_bay - Antwoord

Is the x power screen the same size ( or same screen altogether) as the x power 3 screen? If not what screen would I be looking for?

Jonathan - Antwoord

Where’s the part where you actually remove the screen and add in the new one?

The last step seems to be prying off the ear speaker.

Could you please fix this guide when you get the chance? I might replace the screen on my LG Power X [K210]. Thanks.

A Mix Of Geek Stuff - Antwoord

Voeg opmerking toe

Weergavestatistieken:

Afgelopen 24 uren: 1

Afgelopen 7 dagen: 7

Afgelopen 30 dagen: 19

Altijd: 8,248